
This knowledgebase guide has been created to support staff in how to plan, record and produce a video in which the presenter is the focus (commonly known as a talking head video). This guide includes instructions and video demonstrations for the three different tools that are all supported by Teesside University that can be used to create these videos.
Explanation
In the context of digital pedagogy and online education, “talking heads” typically refer to videos or video segments featuring a person’s head and upper body, mainly focusing on their face and expressions as they speak or present information. These videos often involve an instructor, subject matter expert, or even a student presenting content directly to the camera. Talking heads are a common format for delivering lectures, presentations, or discussions in online courses, and they can be used for both formative and summative assessments.
The use of talking heads in online education can add a personal touch to the learning experience, making it more engaging and interactive. They also allow for more flexibility in terms of when and where students and instructors can engage with course materials and assessments.
Here’s a more detailed explanation of how talking heads are used in education:
Formative Assessment: Talking heads can be used for formative assessment. In this context, they serve as a tool for:
- Explaining Concepts: Students can create talking head videos to explain complex topics, offer clarifications, or provide additional insights related to course content.
- Discussion Facilitation: Students can record talking head videos to present their ideas, insights, or solutions during class discussions or group activities.
Summative Assessment: Talking heads can also be used for summative assessment, this evaluates students’ overall learning outcomes at the end of a course or a specific learning unit. In this context:
- Oral Examinations: Talking head videos can be used to conduct oral examinations, where students respond to questions or prompts through recorded video responses.
- Final Project Presentations: Students may present their final projects or research findings through talking head videos, which can be assessed for content, presentation skills, and understanding of the subject matter.
- Peer Assessment: Students can assess and provide feedback on their peers’ presentations or video responses, promoting collaborative learning.
Available Tools
- Adobe Premier Rush: Advanced video editing software, suitable for students with some video editing skills. It offers a range of features for editing, enhancing, and producing high-quality talking head videos. (This software isn’t compatible with all mobile phones but does work on Apple iPads.)
- Microsoft PowerPoint: PowerPoint allows users to record narrations and webcam videos alongside their presentation slides. This is a simple way to create talking head videos for presentations and explanations via a new feature called Cameo.
- Microsoft Teams: Offers the ability to record video meetings, making it easy for both instructors and students to create talking head videos. It’s a user-friendly option that’s widely used for online communication and recording.
With all three of these tools the recorded videos, once complete can be downloaded and submitted to a standard Blackboard Ultra assignment area as this accepts up to 1 gig file size.
Techniques and Tips:
- Lighting: Encourage students to find a well-lit location for recording their videos. Natural light is often the best, but soft artificial lighting can also work.
- Audio Quality: Clear audio is crucial. Students should use an external microphone, if possible, to reduce background noise and capture their voice clearly.
- Background: Advise students to choose a clean and uncluttered background. A plain wall or a tidy workspace is often a good choice.
- Script and Rehearsal: Suggest that students create a script or outline for their talking head video. Rehearsing what they want to say can help reduce errors and improve delivery.
- Editing: Teach basic video editing techniques like trimming, cutting, and adding titles. This will help students polish their videos before submission.
- File Format and Compression: Guide students on the appropriate file format and compression settings for their video submissions. This can help reduce file sizes while maintaining quality.
- Uploading and Sharing: Explain how to upload and share the videos, whether through the university’s learning management system or another platform.
Step-by-step guides for using each tool
Adobe Premier Rush
- Select the plus sign to start a new project.
- Select Take Video or Photo.
- Review the camera options before commencing the recording.
- Change the Pro slider option to Auto.
- Press the Record button to start and stop the video.
- Press the small Tick button in the bottom right of the screen to add the recorded media to your asset’s library.
- Once you have completed the above to record your ‘Talking Heads’ video use the following guide to apply additional formatting.
- Click the Share button and select Export.
- Once downloaded, upload the video file to the BBU assessment submission area.
Video Demonstration using Adobe Premier Rush
Microsoft PowerPoint & Cameo
- Open PowerPoint and select the Insert ribbon (the Slide Desk should only include one Slide).
- Navigate to the Slide Show ribbon and tick the Always Use Subtitles.
- Select the Cameo (far right) icon > The default icon shape will appear on the screen.
- Click the camera toggle button to show a preview of the camera stream.
- Select the Camera Format ribbon and choose the camera style, border, shape and effects.
- Once the slide is designed and set up select the Record ribbon and click on the From Current Slide (You will be given a 3-second count down before the recording begins).
- To record a video (for example, if you make a mistake, click the three dots and select Clear Recordings.

- Make sure the Microphone option is enabled.
- You can also use the options at the bottom to apply effects such as ‘Blur background’.

- Once the talking head video is recorded click the Export

- Once downloaded, upload the video file to the BBU assessment submission area.
Video Demonstration using Microsoft PowerPoint and Cameo
Microsoft Teams
- Select the calendar icon (lefthand menu)
- Click the “+ New Meeting” > New Meeting dialogue box opens.
- Enter the details of the meeting (Title, Date/Time etc.).
- Join the meeting (Join Now).
- Once in the meeting space press the three dots (More) and select the Record and transcribe option and Record Now.
- Once the Talking Heads recording is complete press the three dots (More) and select the Stop recording
- Once you have completed the above to record your ‘Talking Heads’ video use the following guide to apply additional formatting.
- Click the Share button and select Export.
- Once downloaded, upload the video file to the BBU assessment submission area.
- Click the Leave button to terminate the meeting.
- Open the Chat feature from the lefthand menu and locate the meeting in the Recent chats option (If you gave the meeting a title it will be displayed here otherwise it will be titled (no title).
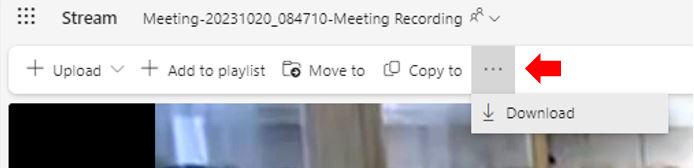
- On the recording select the three dots (More options) and then Open in Microsoft Stream.
- From the top menu select more options (three dots) and download (Unfortunately, this download option will not include the audio transcript.)
- Once downloaded, upload the video file to the BBU assessment submission area.
Video Demonstration using Microsoft Teams