
This quick start guide is intended to show you some of the functionality of the University’s Virtual Learning Environment (VLE) powered by Blackboard Ultra. It is the first step to getting familiar with the basics of using the system and will sign post you where to find help and support. You can also use your personal sandbox module to experiment with the different options and content types.
Login
Go to https://bb.tees.ac.uk, click on Sign In and authenticate your login details using your university email address and password. If off campus, you may be asked to “approve” your access using multi-factor authentication. This login process is exactly the same as already used to access university systems such email or unity.
If you have not set up multi-factor authentication for your university IT account, it is quite likely you will see an error message when you try to sign in from off campus. This help article describes multi-factor authentication in detail, and this article describes how to enable it for your account. If you encounter problems, please contact the IT Service Desk (details at the bottom of this page).

Self Study Guides
This guide is designed to give you a quick start into using Blackboard. You will find a lot more information and guidance in our Self Study guides. These are all located at https://eatsupport.tees.ac.uk/staff/. In addition, within the Organisations menu in Blackboard itself, you will find the Blackboard Ultra Self-Study CPD organisation, and many more useful organisations. It is strongly recommended you explore these organisations to get the most out of your Blackboard experience.
Base Navigation Menu
The first time you login to the system you get a welcome overlay screen informing you of several new features, including the Base Navigation Menu.
The menu provides you with quick access to your modules and several other tools which provide timely information about all of your modules in one convenient location. The Base Navigation Menu consists of the following areas:
- At the top, your Profile Picture will be displayed, along with your name. The Profile page gives you access to some of your personal information and settings. From here you can upload a profile photo. The profile photo will show in the class register and in discussions, conversations, and messages next to your activity.
- The Institution Page contains links to important information and messages.
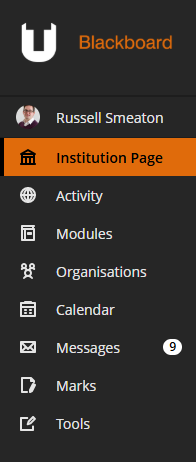
- The Activity page will display Course Activity showing any modules with recent activity. Depending on your screen size, either to the right or underneath the Course Activity you will see an Activity Stream, showing a digest of activity in all modules you are enrolled on. This included posted announcements, new content items, grades and due assignments. Notifications are shown on the website, through email and via push notifications if you have installed the Blackboard app. You can change which notifications you receive by clicking on the “cog” icon at the top right corner of the screen, and then following the on-screen prompts.
- The Modules page gives you access to all your current, previous and future modules. Your modules will be divided into sections according the semester in which they started. Modules can be viewed in list view or grid view.
- The Organisations page contains all the school and department organisations you are enrolled on. Organisations can also be viewed in List View or Grid View.
- The Calendar displays the calendar items within all your modules. This is also your own personal Calendar area any events added here are only viewable by yourself. You can customise which modules you want to view and also export the whole Calendar into your own email account.
- The Messages page displays a list of all your modules and number of any unread messages within a module. You can reply to messages from this page. The number of unread messages are indicated on the base navigation menu.
- The Marks page provides an overview of all your current modules gradable items status and tasks including submissions to grade and post. Module Instructors can begin to grade from this page.
The Modules Page
The Modules page list which modules you are teaching on or participating in. Modules are displayed on Current Modules and Previous & Future Modules pages. The Current Modules page lists all of your currently active modules, while the Previous & Future Modules lists any inactive modules, grouped by academic year. Inactive modules are those from previous academic years and any future modules which are not yet running.
Module Page Views
You can view the Modules page as a list or a grid. In grid view, you can customise the image on the module cards.

Filters can be applied to display modules based upon your enrollment status for example ‘Modules I teach’ and the status of the module for example ‘Private courses’.
Favourites appear at the top of the module list, making it easier for you to locate modules you are working on. Click on the star to favourite a module.
Module Codes Explained
All modules in the VLE have a module name followed by a module code. There are different types of modules that get created in the VLE; ones that come out of SITS (the University Student Records system) which have SITS codes and ones that come from the Support Module Database which have SPT codes.
SITS module codes have three things:
- The SITS code that refers to “what” is being taught. E.g. ACC4007-N.
- The Period Code that refers to “when” the module is being taught. E.g. BJ1. (See box below for more info on Period Codes).
- The Academic Year in which the module starts. E.g. 2025.
Support Module Database modules have:
- The name of the module.
- The SPT code and a number to identify it in the database. E.g. SPT-12722.
- The module end date in the format MMYY. This is specified when the module is created in the Support Module Database. E.g. 0715 is current until the end of July 2015.
- The name of the School and the year. E.g. SOH-2025
If you are the designated Module Leader in SITS (the University Student Records system) you will be added to a module automatically. Further teaching staff can be added to modules through SITS which is managed by School Admin Teams. Note in Blackboard Ultra Module Leaders are referred to as Instructors.
Identifying Areas of a Module
When you click a module it will open, making the most of the entire browser window. You can see the Details & Actions panel on the right and the Course Tools and Student Preview at the top. The Module Content is displayed in the central area and contains all the module materials. The basic layout of a module can be seen below:
The Details & Actions menu
Contains the following areas: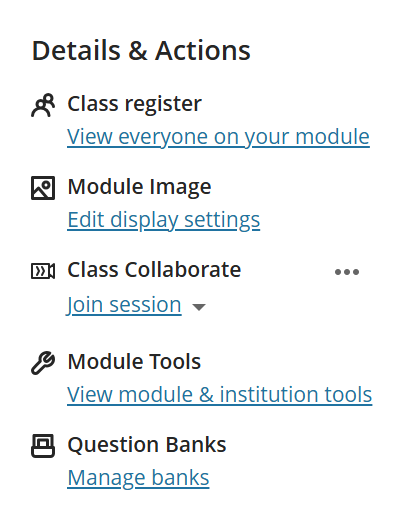
Class Register
From here you can view all the students and instructors on the module. The register can be viewed in list view and grid view. Next to each name, click the ellipsis menu (the three dots) to see individual student information and set any accommodations for students. Any accommodations set from the register page will filter through to all applicable assessment items. Accommodations can be set as a:
Due date accommodation – Students with a due date accommodation never have their work marked late.
Time limit accommodation – Students with a time limit accommodation have more time to finish their work during timed assessments.
Module Image – use this area to change the module image, sometimes called a course image or banner.
Class Collaborate – Join any live collaborate sessions here. Click on the ellipse to manage Collaborate sessions, view room report and access recordings.
Module Tools – This area contains a wide range of tools to make your module more engaging and active.
Question Banks – Use this space to set up “banks” of questions that allow you to create a diverse range of tests for your students.
Course Tools

From the course tools area you can access the following features:
Module Content – This is the landing page for the module. Clicking here will return you back to the module content area.
Calendar – Gives you access to the module calendar. Any events added here are viewable to everyone on the module.
Announcements – Any announcements made in the module can be read here
Discussions – From the Course Tools area you can see all the discussion boards within the module. If you create a discussion board from within this space, it will only display on this page (not within the module content area).
Gradebook – Provides access to all the assessed items with a due date in the module. The Gradebook also displays all the students on the module and the date of their last access. From the Gradebook you can view submissions, post grades and feedback, setup the overall grade for the module and configure the grade book settings such as marking schemas and rubrics.
Messages – displays all the messages that are specific to the module you are in. Currently, students can not send messages – only read messages that have been created by the module leads.
Analytics – Primarily usage information and statistics about any tests you have setup in your module.
Groups – Set up and modify Groups here. This section allows you to create a variety of groups, allowing students to work collaboratively.
Achievements – Your module can be “gamified” by the inclusion of Achievements, which are essentially digital badges that can be awarded to students for achieving certain tasks. If you don’t use this feature, it is not visible to students.
![]()
Student Preview – The student preview link is located in the top right of the module. Enter student preview mode to experience the module as a student, such as viewing content items, submitting assessments and posting discussion board responses. When exiting student preview, you will be prompted to either save or delete the student preview data that may have been generated.
Adding Content To Your Module
 In Ultra, the Module Content area is where all your learning materials are added. Depending on the content you wish to add, the process varies but the basic concept remains the same. Navigate to where you wish to add your content, hover your cursor over that space and click the PLUS icon. You will then be presented with the menu illustrated to your right.
To create new content (such as a folder, test or discussion board), select Create (outlined below). To re-use content from a different module, select Copy Content. To upload existing content (such as a Word document or PowerPoint presentation), select Upload. To add third party content (such as Turnitin assignments, or ReView Videos), select Content Market.
The School’s module template will pre-populate your module with content areas; you don’t need to change any of these content areas if you don’t want to. It is essential you fill in any blank spaces with information specific to your module (e.g. the Module Guide or Module Leader contact details).
Create Items
Module Content Items
We have created a wide range of guides that focuses on creating new content in your module. To help you along your journey, we have created a “Best Practice” guide and It is strongly recommended you read this guide to ensure you make the most of your module space. Please follow the link here to get started Creating Content in Blackboard Ultra
Assessment
The Assessment area includes the assessment tools Tests, Assignments, and Forms. Forms can be used for creating surveys within your module.
Participation and Engagement
Participation and Engagement section is where you create Discussion Boards (called Discussions) and Journals.
For more information on all of the tools and resources shown here please search further knowledge base articles.
Edit Content
As an instructor, you will be able to perform the following actions to edit and adjust items in the content area.
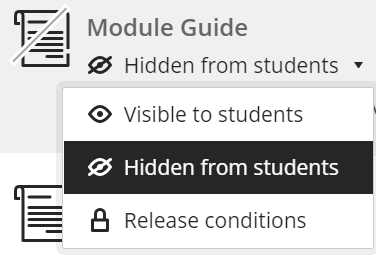
By default, any content item added to the module content area is ‘Hidden from Students’ – you can identify this underneath the title of the content item, or in some cases in the top right hand corner of the item. The item will remain hidden until you change this to ‘Visible to Students’.
Release Conditions
Use Release Conditions to make content available based on certain criteria. Options for item availability include:
- Select Members – Items can be made available to specific members or groups.
- Date and Time – This option lets you set the dates that the document will be visible.
- Activity- Availability is dependent upon performance on a marked item in the module such as a Test score.
Re-ordering Content Items
You can re-order your content items to place them in different spaces, including folders. If you hover over any menu item you will see your mouse pointer changes to a hand icon. You can now hold down the left mouse button and drag and drop items into the appropriate place.
Modifying individual Content Items
You can modify and remove your content items. Click on the ellipsis (the three dots) next to the item.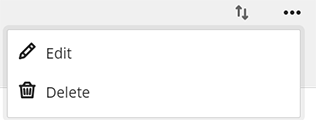
- Edit Item – From here you can change the title of the item and edit the description.
- Delete – permanently remove item. As students cannot see hidden items, you don’t really need to delete the item, especially if you think you may need it later on.
Adding Announcements
Announcements play a vital role in communicating with your students. For example, to make them aware new content is available, let them know feedback is ready or even just to send good wishes. At the very least, there should always be a Welcome Announcement to the module. Announcements can be saved and posted at a later date, and they can also be edited at a later date.
- Go to the Announcement link at the top of the module page
- If there are no announcements, there will be a large Create Announcement button in the middle of the page. Alternatively, click the plus icon in the top right hand corner.
- Give your announcement a meaningful Title and add your Message.
- If required, select options to either Send an email copy to recipients or Schedule Announcement are available.
- If you don’t want to post the announcement just yet, click Save draft.
- If you are happy with your announcement, click Post.
Making Your Module Available
When a module is created, it is in a “Closed” state, and as such not accessible to students. When your module is set up the way you wish, you have an introductory announcement and some preliminary material (remember you can – and should – add new resources all through the year), remember to open it up for student access. There are several ways to open a module to students
- From the Modules area in either List view or Grid view, click on the ellipses (three dots) next to the module name. Select Course Settings. From the page that appears, change the Course Status from Closed to Open. Click the orange X in the top left to close the page, and the module will now be open. In most cases, you will need to refresh your browser page to see the changes.
- From within the module, on the Course Settings menu in the top right of the module. This will take you to the Course Settings page. Change the Course Status from Closed to Open. Click the orange X in the top left to close the page, and the module will now be open.