
Introduction
Group work can be a very effective tool within your module space. You can assign students to work on specific projects, helping them build up a cohort identify and foster a sense of belonging in their course. This guide outlines how to create groups, and looks at some options that become available to you and your students.
Creating and managing Groups in Blackboard Ultra
Start the process by creating a “Group Set”. A group set defines the purpose of the groups. Within the group set will be the individual groups related to that set. For example, a group set might be “Project Work” and inside this set would be the various groups of students to work on that specific task.
Click the Groups menu item from the Module Content page. This will open the Manage Groups page. If you have not created any group sets, you will be prompted to create a new group set. Click New Group Set in the top right hand corner.
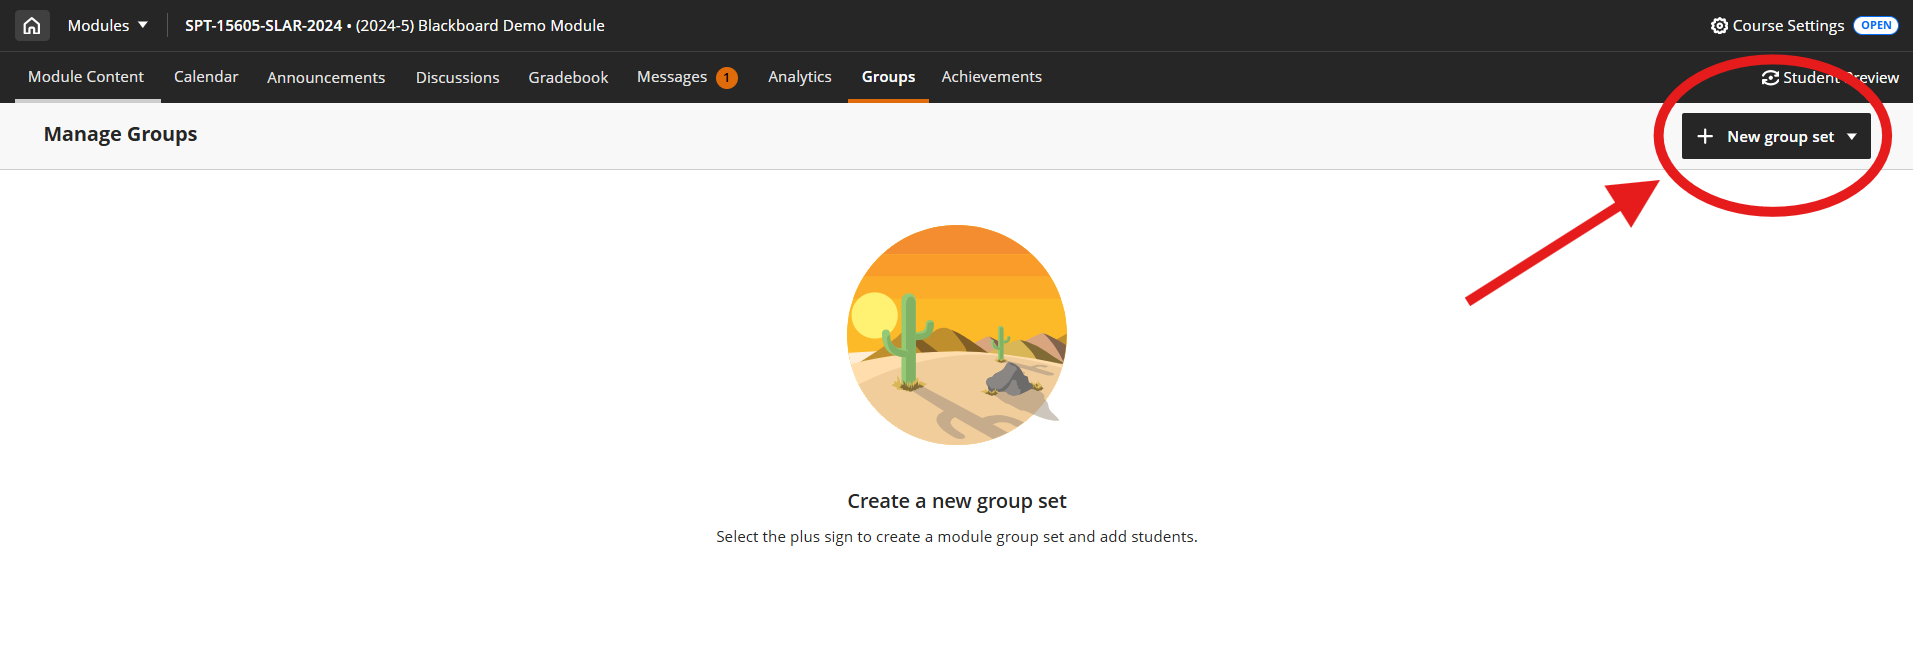
You’ll be presented with four options:
- Manually assign – select this option if you want to have full control of the group creation process.
- Automatically assign – select this option to let Blackboard randomly allocate students into a pre-determined number of groups
- Self-enrol – select this option to allow students to enrol themselves into pre-defined groups
- Import from CSV – select this option if you have created your groups in a spreadsheet application, such as Microsoft Excel
Depending on which option you select will determine the options available.
Manually Assign
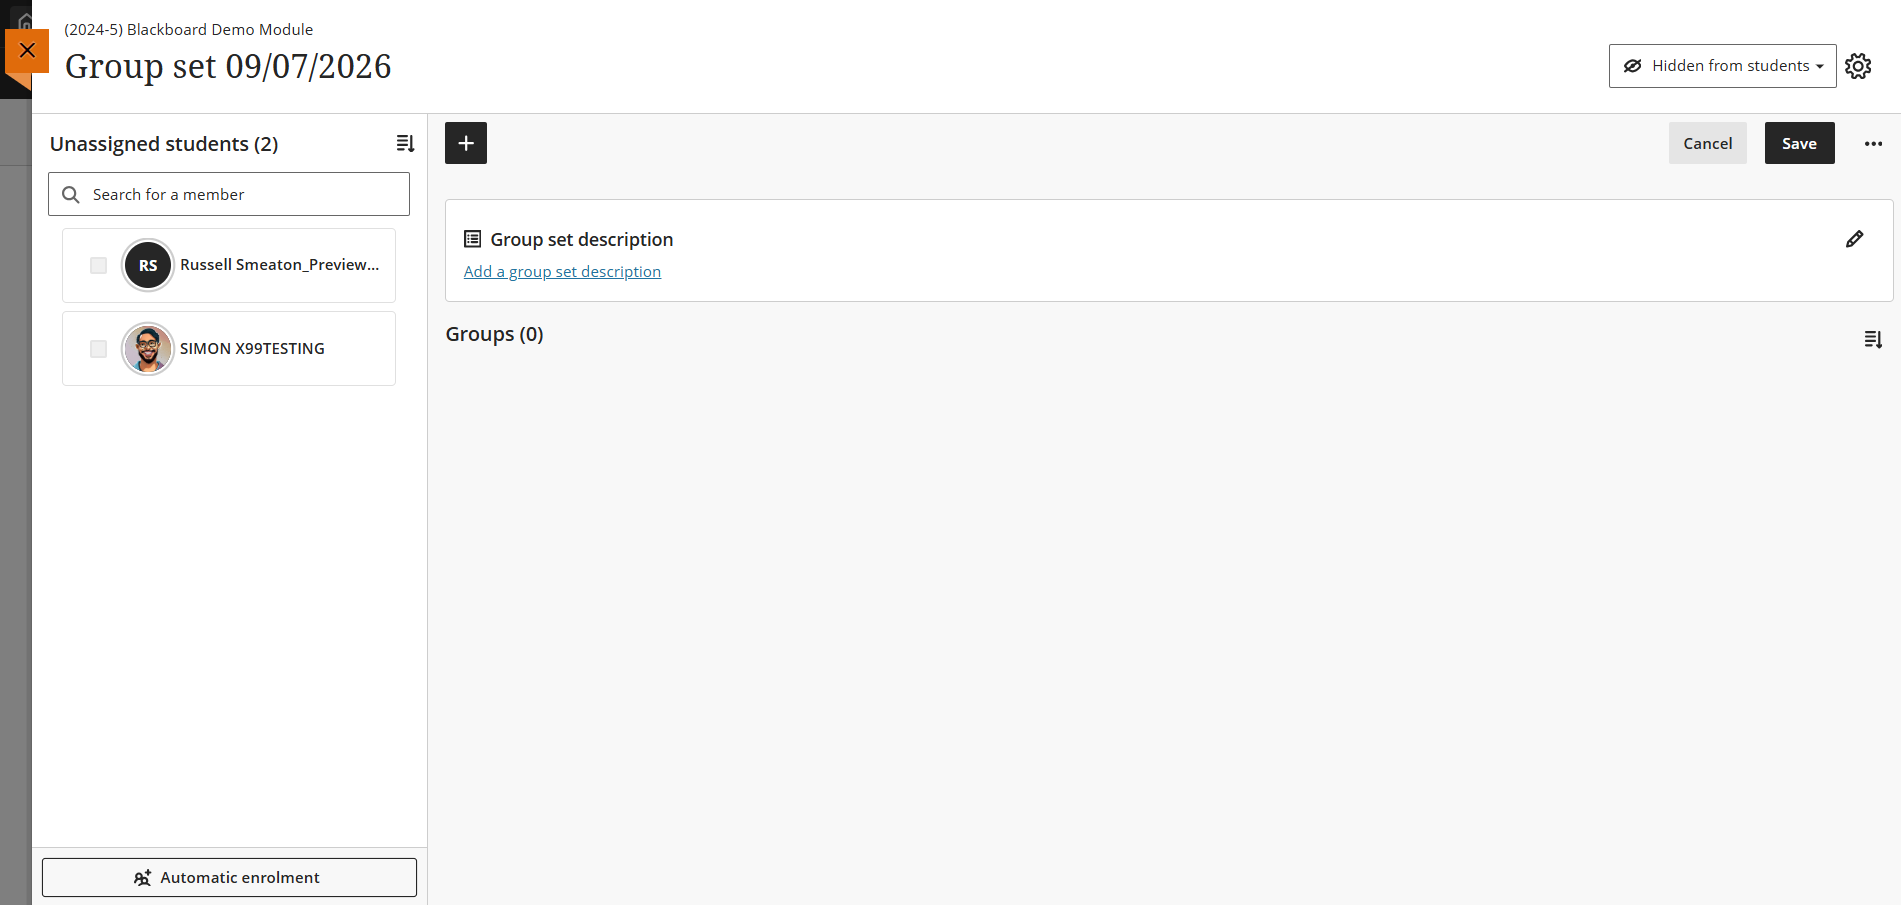
After selecting this option, you can give the group set a name, for example ECA Presentation Group. Like most items in Blackboard, the group set you create will be in a hidden state (as shown in the top right hand corner).
To the left, you can see all students currently unallocated, and in the main part of the screen is where you can create your groups. You’ll notice you have a space to give the group set a description, and this is very useful for students to understand the purpose behind the groups. Click the PLUS icon above the description to begin adding your groups.
By default, the first new group will be automatically named Group 1. It is recommended to give the group a meaningful name to help the students, as well as a description. From this panel, you can also add students – but this can be done at any stage of the process. Click Done when ready. Continue to add all your groups as required.
If you have not already added your students, you can do so after the groups have been created. Select the student from the Unassigned students list from the left hand panel, selecting more than one student if required. Once selected, you will see a small PLUS icon appear – clicking this will allow you to allocate those selected students into a specific group. Alternatively, click the Add Members option within each group – this will then present you with a list of unallocated students Use the check box next to their name to select them and then click Assign Members. Once students have been allocated to a group, they will no longer be visible in the Unassigned Students list.
Finally, you could use the Automatic enrolment option (bottom left of the page) to let Blackboard randomly allocate students.
Once finished, click Save. If you want students to be able to use the group, change the visibility from Hidden from Students to Visible to Students (top right of the page).
Automatically Assign
To begin the process, you will be prompted to define how many members you would like to add to each group. You will be informed about how many groups will be created. For example, if your module has 100 students, and if you allocate 10 members per group, this will create 10 groups. Once decided, click Enrol members.
The system will now go ahead and generate the appropriate number of groups, and randomly allocate students into those groups. At this stage, you can modify the created groups if need be. As before, the group set will be set as Hidden from Students.
Self-Enrol
When you select Self Enrol, you are prompted to give the group set a description first. You can also set a Start and End Date. This refers to the time period when students can enrol themselves into the group. You can also set the option to auto-enrol any unassigned student into a group after the end date to ensure everyone is enrolled. As well as dates, you can define the maximum number of students per group, as well as hiding the list of enrolled members if needed.
Once you have set your parameters, click Done to take you to the main Group Set page. You can now rename the group set if you so desire. By default, 3 groups are created, but you can add more depending on the module size. Click the PLUS icon to add more groups. You will also notice the group set is automatically set to be Visible to Students. This is so students can see the group set to allow them to self-enrol into the desired group.
Even though this option is to allow students to self enrol, you can still take control and modify groups if required.
Import Group Sets
Please see this guide for more information about importing groups: https://eatsupport.tees.ac.uk/staff/knowledgebase/blackboard-ultra-groups-automating-the-assigning-of-students-to-groups/
Messaging a group
Once you have created your groups, you have some options available to you with regards to communicating with each group. When you click Groups from the Module Content page, you will be taken to the Manage Groups page. This will display any group sets you’ve already created, as well as the option to create more as documented above. From this page you can send a message to separate groups. Expand the Group Set by clicking the down arrow to the far right of the Group Set name. This will display all the groups within that set. You will see there’s a Message icon visible. Clicking this will allow you to send a message to all students in that group. NB The Group Set has to be Visible to Students in order for this functionality to work.
You can also do this from the Messages area in your module. Click the New Message icon (over to the right), and you can select the appropriate group via the Recipients drop down list. If you can’t see your intended group, scroll down the list and select the option at the bottom of the list. It’ll vary from module to module, but will be something like “11 more recipients”. The number listed will change, depending on the amount of people/groups in the module. When expanded, you can now select the option to send messages to group sets and/or individual groups.
Alternatively, you might wish to consider using a Discussion Board. By using Release Conditions, you can make a Discussion Board accessible to a specific group, thus creating an interactive space for those group members to discuss content.
Assignments
When you have created group sets, these can be used for Blackboard Assignments. Please note, this does not include Turnitin Assignments. When you create a regular Blackboard assignment, open the Settings cog and scroll down to the bottom of the options. Right at the bottom of the list is the option to select Assigned Groups. Select the appropriate Group Set from the drop down list.
When using Group Assignments, if the Class Conversation option is turned on, this opens up a collaborative space within the module, specifically for the assignment. This allows group members to meet in an online space to discuss the assignment remotely.
When it comes to time to submit, each group can allocate one member to make the submission and this will constitute a submission for the entire group. You can then give overall group feedback and score, as well as give individual feedback and marks if required.