
This guide looks at how to create a Test or Quiz in your Blackboard module.
Before creating a Test, it’s important to make some decisions about what you are creating and why. Our pedagogical guide to Blackboard Quizzes discusses the benefits of using tests in your Blackboard module and explains some of the techniques you can use to make the most of them, including the use of Pools to build up banks of questions which can be reused and randomly drawn upon to generate tests automatically.
Creating a Test
Tests can be added to any Module Content area within your module.
 |
 |
- Click on the Plus icon then Create Item and then under Assessment click Test.
- Give the Test a name
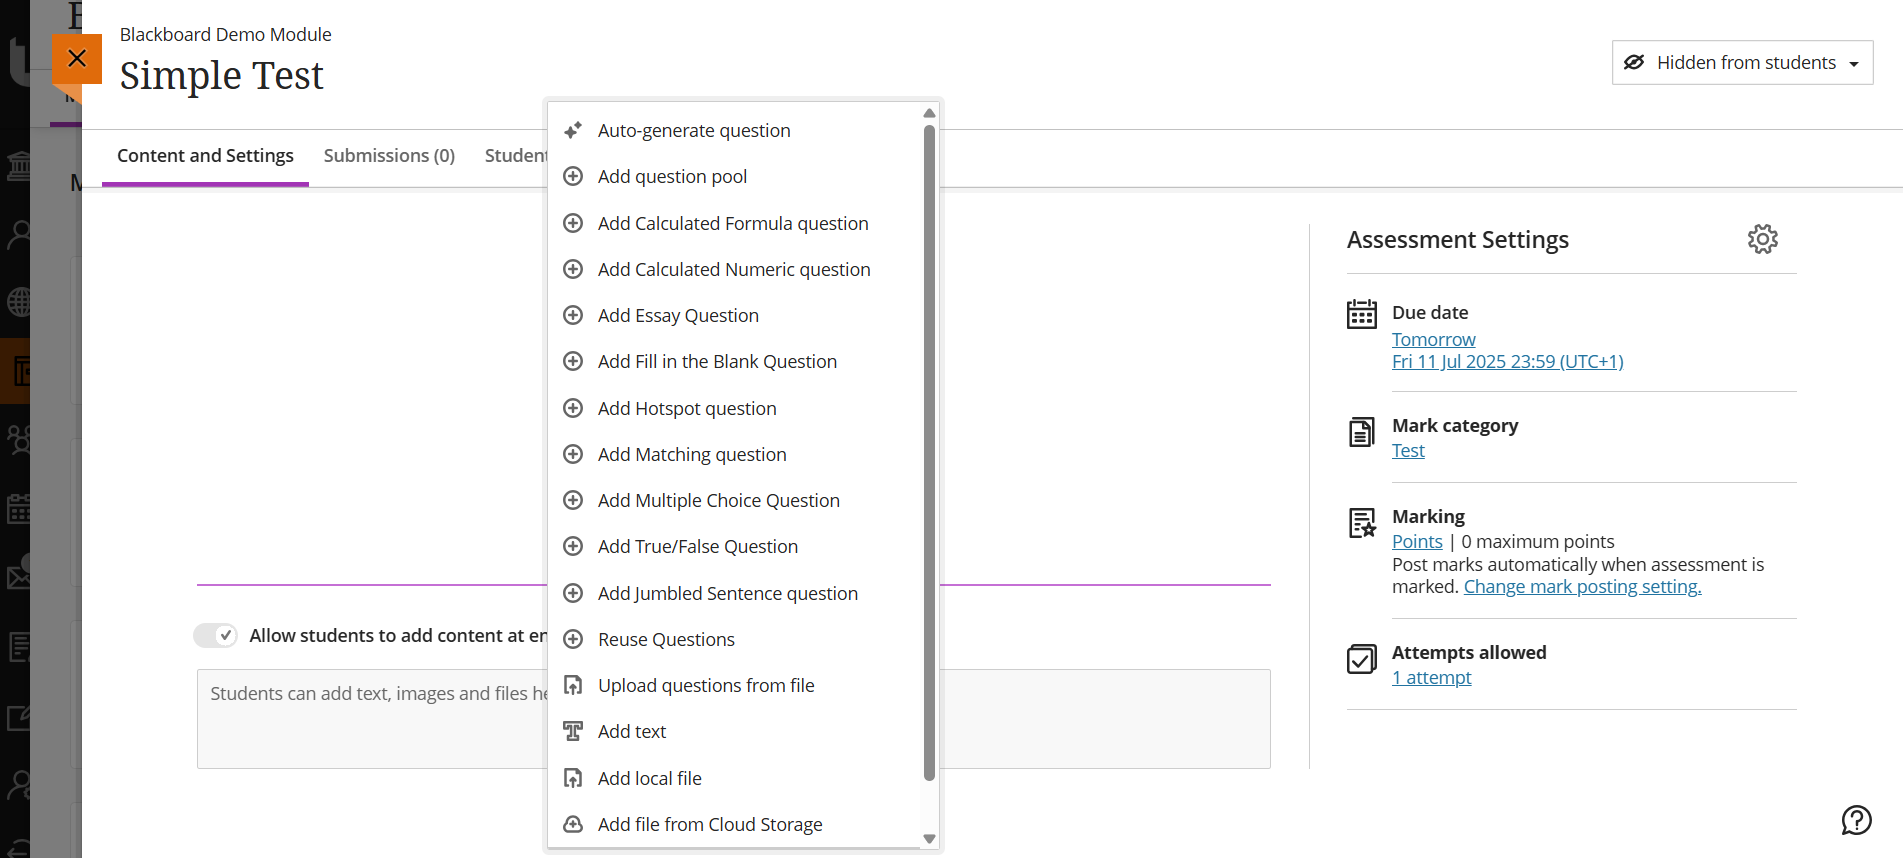
- Under Content and Settings click on the Plus icon to begin adding questions.
- Instructions can be added by selecting Add Text. Note if adding a text item the randomise questions option will not be available.
Question Types
Ultra has a wide range of question types for creating Tests, most question types can be automatically graded:
- Calculated Formula
- Calculated Numeric
- Essay (No automated grading)
- Fill in the Blank
- Hotspot
- Matching questions
- Multiple Choice
- True/False
- Jumbled Sentence
You can allow partial credit and negative credit for answers to Multiple Choice, Multiple Answer and Matching question types. Selecting this option means that you can specify what percentage of the total points should be awarded for each incorrect answer. You can also allow negative scores for incorrect answers.
Once you have created questions and Tests in Ultra there are options for reusing these into new Tests with either a Question Pool or a Reuse Question type.
Using a Question Pool question type allows you to select a number of questions from your existing Tests and display a select number to students each time they take the Test. If you change a question, it’s reflected anywhere that question is displayed.
Choosing the Reuse Question option brings in an exact copy of the question(s) into your Test. Creating a copy means you can then change the question text, change your answer options and change your feedback – you may well be reusing that question because it’s pretty close to what you want to ask but it’s not perfect, in which case reusing the question means you can amend it.
Further guidance on each of the Test question types in Blackboard Ultra
Note: Don’t delete the Test in Ultra if you want to use any of the questions again, simply hide visibility to students to stop them from taking the test.
Adding a Question
The following takes you through the process of adding a question to a test. For illustrative purposes, a typical multiple choice question will be used; the process for adding other question types is very similar.
- Under Content and Settings click on the Plus icon to begin adding questions. Select Add Multiple Choice question type.
- Enter the text of the question itself in the Question Text box. You can add videos and images to the question if needed.
- Next, provide possible answer Options. By default, Blackboard will provide space for three answer options, but you can add more by clicking Add Option. To remove an option, click the trash can icon. Use the check box to identify the correct answer. You can select multiple answer options if required, and you can toggle the Allow partial and negative credit to give greater flexibility.
- If required, toggle Automated Feedback to show students both a correct and incorrect answer to the question. This is entirely optional but can be used to signpost students to materials which may help them with the answer should they answer it incorrectly. You can change automated feedback settings in the test settings.
- Check the points value is correct for the question.
- Finally, click Save to keep your question.
- Once you have finished adding questions to your Test check the Test Settings by clicking on the cog icon.
Test Settings
Details & information
- Provide a Due Date and Time for which students will need to complete the test.
- Randomise questions and randomise answers to randomly order these for each student. This can be useful if you have students taking the test together and don’t want their answer options to be the same.
Marking and submissions
- Specify the number of Attempts Allowed for each student.
- Mark using a specified value Points is the default percentage and Letter are additional options
Assessment results
- You can customise when your assessment feedback and results are displayed to students. If you add manually marked questions, scores and answers won’t be released until after you’ve posted the mark. Students can see when their results will be released.
Additional Tools
- Additional options are provided for including options to add an access code and Time limits to the test. Students with extra time limit accommodations will not have the test limits applied to them.
Group Test
Tests can be assigned to groups from here. Groups created from the Test will only be available to that test. To create a reusable group create a group set from the module Actions & Details menu first.
Description
Add a description to help your students identify the purpose of the test. This will be visible in the Module Content view.
Deploying the Test
Several useful test configuration options can be configured including:
Show or hide the test: Students can’t see a test until you choose to show it. You can create all your content ahead of time and choose what you want students to see based on your schedule. You can also set availability conditions based on date, time, and performance on other items in the course Gradebook. On the Course Content page, students can see when you set the test to show.
Provide a due date: Due dates appear on the calendar and in the activity stream. Late submissions appear with a Late label in the course Gradebook. Encourage students to review what’s due now and what’s ahead so they can ask questions as soon as possible.
For tests and quizzes, deadline dates can be set however in most situations staff will want to use a conditional release. Configuring the Release Conditions means that the assessment will become available at a specific date and time and will no longer be available after the configured date and time.
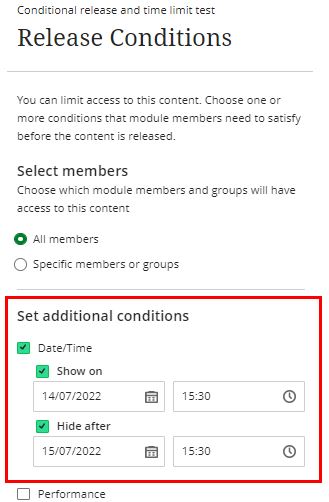
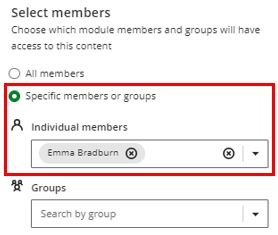
For example, a test can be created that has release conditions set based on a date and time for showing and hiding the quiz. This release condition can also be set for all or specific students.
Multiple Release Conditions can also be set for a single test. For example, if a release condition has been configured for all members of a module, additional Release Conditions can also be configured for students or groups of students with accommodations or legitimate reasons for being unable to attempt the assessment (mitigating circumstances such as illness or personal emergencies, in line with the Universities policies and procedures.
Add a time limit: Each person has a limited amount of time to submit the test. The test attempts are saved and submitted automatically when time is up. You can also allow students to work past the time limit. At this time, you can’t add a time limit to group tests.
Prohibit late submissions: Once you add a Due Date, you can enforce a hard deadline and prevent late submissions. In-progress and saved attempts will auto-submit at the due date and time. Students will receive a submission receipt email. If a student has a “Due Date Accommodation” in place, this deadline will not affect them.
Randomize questions and answers: You can randomize questions and their answers to support practice/drilling activities and help students avoid academic dishonesty. You can use one or both settings, so tests appear differently for each student. You can’t randomize questions in a test with text blocks or attachments.
Determine the number of attempts: You can let your students submit more than one attempt at a test. When you allow multiple attempts, you can also choose how the final grade is calculated. At this time, you can’t allow multiple attempts on a group test.
Reviewing Test attempts
You can view Test attempts from:
- Activity stream – you’re alerted when student submissions are ready for grading. Select the link to go to the Gradebook.
- Gradebook – In a module, you can access the Gradebook on the navigation bar. You can see who has made submissions and start grading.
- The Test – select a test on the Course Content page and select the Submissions to link to see how many students have completed the test.
Question analysis reports can be run for assessments with questions. You can run a report before all submissions are in if you want to check the quality of your questions and make changes.
More on running a question analysis report
For more information please contact the Digital Learning Specialist team.