
Introduction
This guide looks at how to create a Test (sometimes referred to as a Quiz) in your Blackboard module. Before creating a Test, it’s important to make some decisions about what you are creating and why. Our pedagogical guide to Blackboard Quizzes discusses the benefits of using tests in your Blackboard module and explains some of the techniques you can use to make the most of them, including the use of Pools to build up banks of questions which can be reused and randomly drawn upon to generate tests automatically.
Creating a Test
Tests can be added in any Module Content area within your module. For example, you can add a test at the end of every week, added in each weekly folder, or have a test within the Assessment section of the module.
 |
 |
- Navigate to where you want to add your test, and click on the Plus icon. Select Create and from the side panel that appears click Test in the Assessment section.
- Give the Test a name (it will default to the current date and time)
- Under Content and Settings click on the Plus icon to begin adding questions.
- Specific Instructions can be added by selecting Add Text. Please note that this will disable the randomise option, even if selected.
Question Types
Ultra has a wide range of question types for creating Tests. Most question types can be automatically graded:
- Calculated Formula
- Calculated Numeric
- Essay (No automated grading)
- Fill in the Blank
- Hotspot
- Matching questions
- Multiple Choice
- True/False
- Jumbled Sentence
You can allow partial credit and negative credit for answers to Multiple Choice, Multiple Answer and Matching question types. Selecting this option means that you can specify what percentage of the total points should be awarded for each incorrect answer. You can also allow negative scores for incorrect answers.
Once you have created questions and Tests in Ultra there are options for reusing these into new Tests with either the Question Pool or a Reuse Question option.
Using a Question Pool question type allows you to select either an entire existing test or specific questions that already exist in other tests in the module. You then decide how many questions to display (you will be prompted with the total number of questions to begin with). When the student attempts the test, they will be presented with a random selection from the previous tests. Note that if you make a change to the original question, that change will also be reflected in the pool.
Choosing the Reuse Question option brings in a copy of the question(s) into your Test. If you edit this copy, you are not editing the original question, allowing you to tweak specific questions to suit the need of the current test without having to completely rewrite individual questions.
You can find further guidance on each of the Test question types in Blackboard Ultra
Adding a Question
The following takes you through the process of adding a question to a test. For illustrative purposes, a typical multiple choice question will be used; the process for adding other question types is very similar.
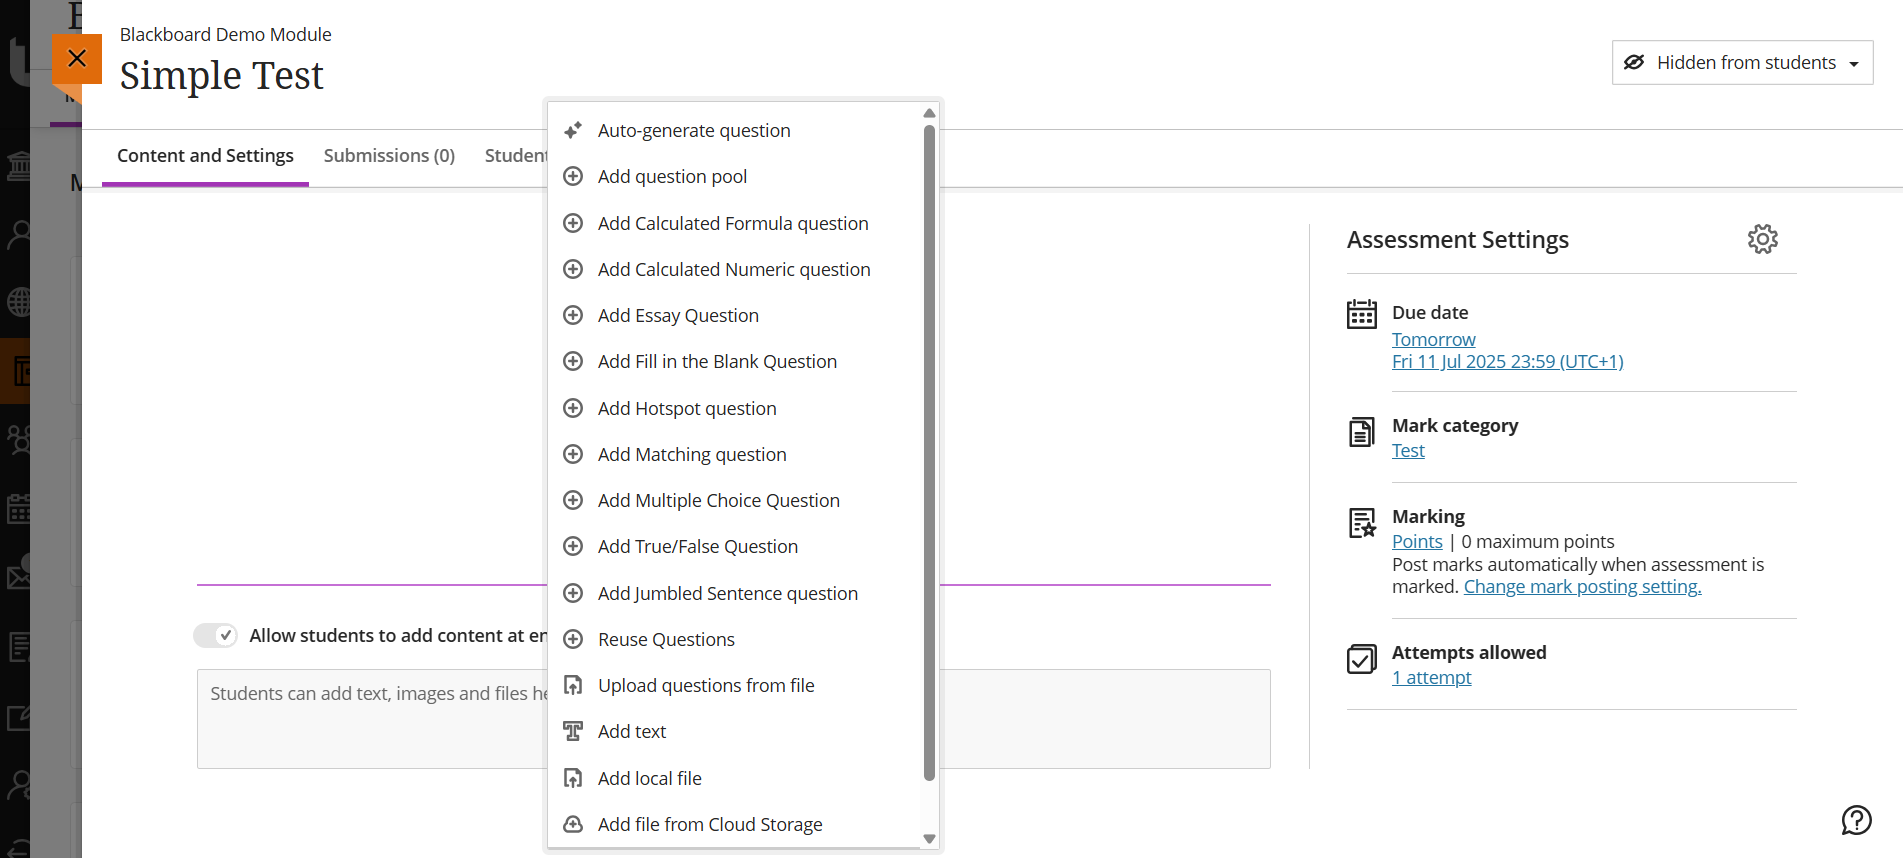
- Once in the test canvas, click the PLUS icon to add a new question. You will be presented with a list of the different question types. Select Add Multiple Choice question type.
- Enter the text of the question itself in the Question Text box. You can add videos and images to the question if needed.
- Next, provide possible answer Options. By default, Blackboard will provide space for four answer options, but you can add more by clicking Add Option. To remove an option, click the trash can icon. Use the check box to identify the correct answer. You can select multiple answer options if required, and you can toggle the Allow partial and negative credit to give greater flexibility.
- By default, the multiple choice question type assumes there will be single answer. However, you can change this by selecting multiple correct answers and then adjusting the Students can select up to parameter to reflect this.
- If required, toggle Automated Feedback to show students both a correct and incorrect answer to the question. This is entirely optional but can be used to signpost students to materials which may help them with the answer should they answer it incorrectly. You can change automated feedback settings in the test settings.
- Question metadata can be added to allow greater visibility for searching for specific question based on titles and tags if you intend to use the question at a later date and/or in a Question Bank.
- Check the points value is correct for the question. Extra Credit questions don’t count towards the test total, but can be used to provide extra points if appropriate.
- Finally, click Save to keep your question.
- Once you have finished adding questions to your Test check the Test Settings by clicking on the cog icon.
Test Settings
Details & information
- Provide a Due Date and Time for which students will need to complete the test. You have the option to determine No Due Date if required. By providing a Due Date, this will create an entry in the Students calendar, allowing them to manage their time more effectively. However, if the test is set to be Hidden from students, it will not appear in their calendar to avoid any confusion.
- You have options to Prohibit late submissions, as well as the ability to stop any new attempts after the due date. These options can be used it you need to restrict student access to a test, but still keep it visible.
- *Note If students have submitted attempts, you cannot change the due date to a date in the past. If the due date has passed, you can’t select the Prohibit late submission setting.
Presentation Options
- Display one question at a time will only show students one question at a time, which can be useful for more complex questions or for tests that you need the students to go through one at a time. When selected, you get a secondary option to prohibit backtracking. Selecting this will block students from returning to a previous question.
- Randomise questions and randomise answers to randomly order these for each student. This can be useful if you have students taking the test together and don’t want their answer options to be the same. Please note that should you use the Add Text option and/or a Page Break, the Randomise questions option will no longer work.
- If you are using Page Breaks in your test, you will get the option to Randomise Pages.
Marking and submissions
- Specify the number of Attempts Allowed for each student. By default, this is set to 1 but you can determine a set number of attempt, or allow Unlimited Attempts. This can be useful for formative tests to allow students the ability to test themselves to build their confidence.
- Mark using a specified value Points is the default percentage and Letter are additional options
- Maximum points will automatically be populated based on the points you have allocated to the various questions. Please note that this score does not reflect any Extra Credit questions.
- Like a regular assignment, you have the options to anonymous student names, and allow delegated marking
- By default, the Post assessment marks automatically is turned on. Below (under Assessment results), you have the options to control how feedback is given to students.
Assessment results
- You can customise when your assessment feedback and results are displayed to students. If you add manually marked questions, scores and answers won’t be released until after you’ve posted the mark. Students can see when their results will be released.
Additional Tools
- Additional options are provided for including options to add an Access code and Time limits to the test. Any student who has an Accommodation will have their given accommodation automatically applied. If a time limit is set, when the student begins the test, they will be prompted for how long they have and the time remaining will always be visible at the top of the page. They have the option to hide the actual time remaining.
Group Tests
It is possible to assign tests to groups. Click Assign to groups to begin the process. If your module already has groups created, and they are visible, you can use these groups by clicking on the drop down list for Group Students. Alternatively, you can create your group from within this panel. However, you cannot rename the group from this location – it will default to the current date as the title. It is possible to rename the Group Set (not the Group Name) from within the Group page from the main Module Content area. With a Group allocation, one student will submit on behalf of the group. When they submit, their entries will be recorded for all group members.
Description
Add a description to help your students identify the purpose of the test. This will be visible in the Module Content view, before they enter into the test itself.
Deploying the Test
Several useful test configuration options can be configured including:
Show or hide the test: By default, tests are created in a “Hidden From Students” state (like all items in Blackboard). Students can’t see a test until you choose to show it, allowing you time to develop your test. You can then either make the test “visible to students” or use a specific release condition (outlined below).
Release Conditions: As mentioned previously, you can set the due dates to control access and availability of tests. However, it is also possible to use Release Conditions. If you are in the Module Content, access the Release Conditions underneath the test title. If you are already in the test canvas, access Release Conditions in the top right of the screen.
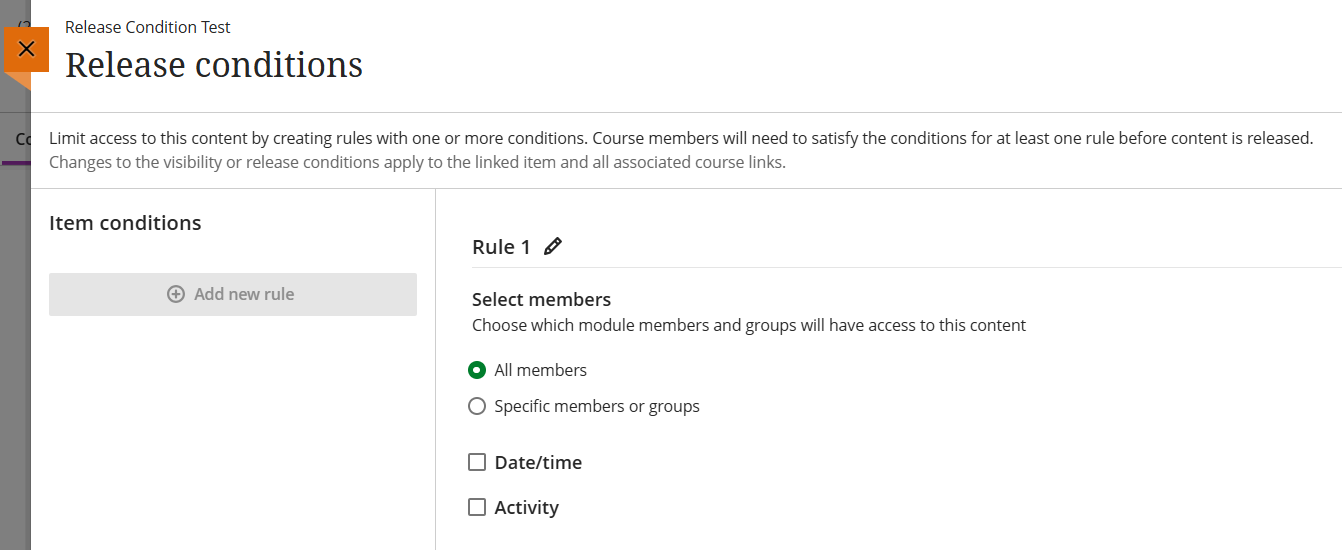
Members: You can use Release Condition to make the test visible to either everyone in the module (All Members) or only to individuals and/or groups.
Date/Time: Using the Access From and Access Until dates and times, you can control when students see the test. When setting dates/times, after you have saved those dates, you will get an additional option to either show or hide the test.
Activity: You can control access to the test based on other items within the module. This can be other tests/assignments but also content items, such as PDFs or Documents. Start the process by locating the item in question. Once selected, determine the requirement that needs to be met. What requirements are presented will depend on the item. For example, if you select a graded item, you can set requirements that incorporate a possible score, or attempt, or simply that the student has opened the test. Similarly, if the item selected is a Document, then the requirement would be limited to be whether the student has opened that document.
Multiple Release Conditions can be set for a single test. For example, if a release condition has been configured for all members of a module, additional Release Conditions can also be configured for students or groups of students with accommodations or legitimate reasons for being unable to attempt the assessment (mitigating circumstances such as illness or personal emergencies, in line with the Universities policies and procedures.
Reviewing Test attempts
You can view Test attempts from:
- Activity stream – you’re alerted when student submissions are ready for grading. Select the link to go to the Gradebook.
- Gradebook – In a module, you can access the Gradebook on the navigation bar. You can see who has made submissions and start grading.
- The Test – select a test on the Module Content page and select the Submissions to link to see how many students have completed the test.
Question analysis reports can be run for assessments with questions. You can run a report before all submissions are in if you want to check the quality of your questions and make changes.
More on running a question analysis report
For more information please contact the Digital Learning Specialist team.