
You might already have PowerPoint slides that contain audio narration and as we see students shift to using mobile devices to access this content we need to ensure that this content is accessible to them. Embedded audio and audio narration contained within PowerPoint slides is not compatible with mobile devices, so when students download your slides on mobile devices they do not hear the audio contained within them.
This guide shows you how to convert a PowerPoint presentation to a video that can be uploaded to our streaming video platform, ReView. ReView can also automatically transcribe the audio contained within your presentation and provide subtitles to students who require them.
Before you start
You will need to have the most up-to-date version of Microsoft Office 365 installed on your computer to do this. When you open PowerPoint, you should see a graphic similar to this:
If you don’t have the Microsoft Office 365 version of PowerPoint installed on your computer, you can do the following:
- If you are using a University laptop or desktop computer, please contact the IT Service Desk to have Office updated.
- If you are using your own personal device, log into https://portal.office.com with your University account and choose “Install Office > Office 365 apps” to download Microsoft Office 365.
Embedded audio
Before the release of Microsoft Office 365, you might have embedded audio directly onto each slide of your presentation, if you’ve previously done this you might be familiar with seeing a speaker icon on the slides that have audio narrations on them. If you’re converting a presentation that already has audio embedded on the slides in this way, when you convert it to a video the audio on each slide will play automatically.
Record Slide Show
If you’re creating a new presentation that doesn’t already have audio narration on it, PowerPoint now has the option to “Record Slide Show” instead of directly embedding audio on each slide.
Once you’ve finished editing your slide content go to Slide Show > Record Slide Show
- If you have a camera connected to your computer you can optionally choose to use this, or not, by clicking the camera icon in the bottom right corner of the screen.
- If you have notes on your slides you can choose to display them on your screen whilst you record your narration, but these will not be included in the video that is produced.
- When you’re ready, click the Record button in the top left of the screen.
- Narrate each slide, using the navigation buttons to progress through your presentation.
- At any point you can choose to Stop or Replay using the buttons in the top left of the screen.
- If you make a mistake you can use the Clear > Clear Recordings on Current Slide option.
- When you’re finished, click the X icon in the top right of the screen. All of your narrations and timings are automatically applied to the slides for you.
- You can now click Slide Show > From Beginning to review your narration.
- If you haven’t already, ensure that you have saved you presentation.
Create a video
- Open the presentation that you want to convert to a video.
- Preview the presentation by using the Slide Show > From the Beginning option to ensure that your audio narration can be heard.
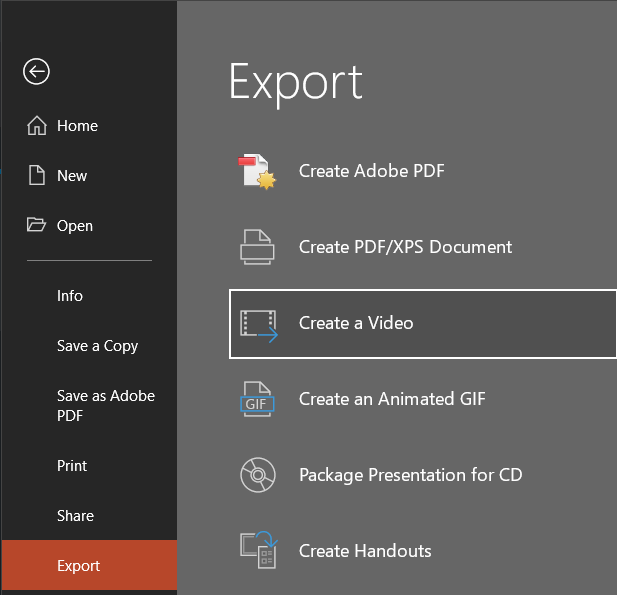
- Click File > Export > Create a Video
- Ensure that Full HD (1080p) and Use Recorded Timings and Narrations are selected.
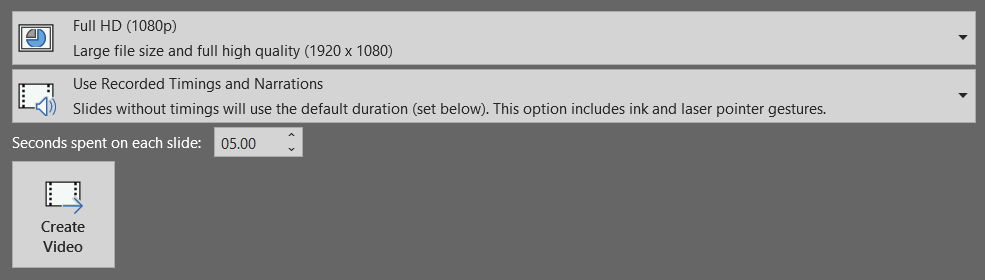
- The Seconds spent on each slide value is used for slides that contain no audio narration or timings, the default is 5 seconds.
- Click Create Video
- Choose where to save the video on your computer and click Save.
- Creating the video can take a few minutes, you can see the progress in the bottom toolbar of PowerPoint.
- Once the export is complete, locate the video file on your computer and view it to ensure the content is played back correctly.
Upload your video to ReView
You now need to upload your video to ReView, our video hosting platform. Instructions on how to do this can be found here: https://eatsupport.tees.ac.uk/staff/knowledgebase/uploading-external-video-content-in-review/
Adding Captions
ReView can automatically generate a transcript of your audio for you, but you need to turn this feature on for each video. Instructions on how to do this can be found here: https://eatsupport.tees.ac.uk/staff/knowledgebase/captions-in-review-panopto/