
This guide introduces the use of Blackboard Ultra Assignments as an assessment tool. It will demonstrate how to add an assignment to a Blackboard module and explore the various configuration settings available.
Contents
- What is a Blackboard Ultra Assignment?
- How to set up an Assignment
- Building and configuring assignment content
- Assignment settings
- How students upload work to assignments
1. Blackboard Ultra Assignments
An Assignment is Blackboard’s facility for electronic submission of a file or files for assessment. Blackboard’s Assignment tool can be used to add assignments to any content area in your module. You can also add a file or document with instructions. Depending on the school’s Blackboard template, a folder may have been specifically created for the assignment(s) and their related content. You can also make a group assignment and release it to one or more groups in your course.
When you create an assignment, a new Gradebook item is created automatically to retrieve grade completed assignments.
2. How to set up an assignment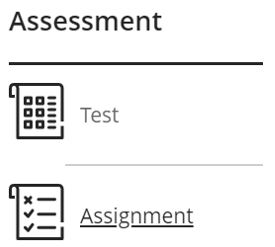
On the Module Content page, hover your mouse over the space where you want to add the assignment and click the PLUS icon. From the menu, select Create and select Assignment from the side panel that appears. The New Assignment page opens.
New Assignment page
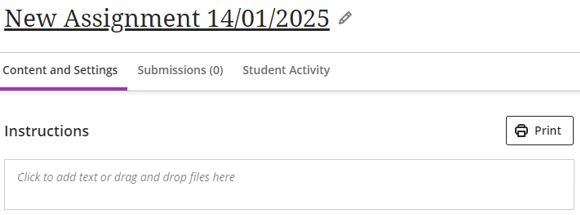 When you create an assignment, the title defaults to the current date. It is strongly recommended to rename the assignment with a meaningful title. Once added, the title appears as the link students select to view the assessment materials.
3. Build assignment content
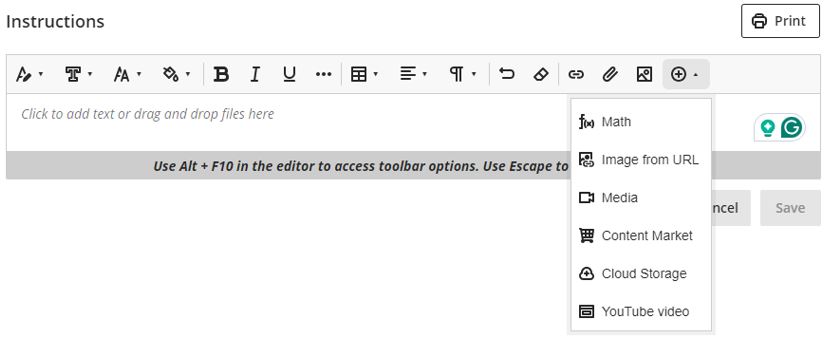
Once the new assignment has been created, the user interface will show an Instructions heading and a text box into which the assignment instruction content can be added. It is possible to add the following content:
Text (with all standard formatting options), supporting files (such as the assessment criteria and additional instructions), links to online resources, images, video, mathematical notation, items from the Content Market (such as videos stored in the ReView Video Library), items from Cloud Storage and YouTube videos. This can be achieved by clicking the Plus icon on the main screen and selecting the appropriate choice.
Accepted File Formats
Blackboard assignments have many accepted file formats,and each single file can be up to 1gb in size. To use inline grading with Bb Annotate in the Blackboard Gradebook, submissions will need to be in a supported file format, such as Adobe PDF, Microsoft Word and Microsoft PowerPoint.
Availability to students

Like all content created in Blackboard Ultra, newly created assignments will be hidden from student view. This can be adjusted in the top right of the screen. You can keep it hidden, make it visible, or use Release Conditions to define when you want the assignment to be available.
Accommodations
Any accommodations that may be in place for students with support plans will automatically be applied to the assignment. You can read more about Accommodations here: https://eatsupport.tees.ac.uk/staff/knowledgebase/accommodations-and-exceptions-in-blackboard-ultra/
4. Assignment settings
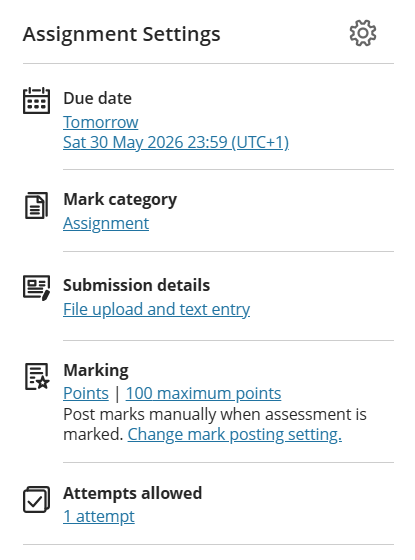
From the main Assignment page, the most common settings can be configured (as shown to the let).
- Due date: Due dates appear on the calendar and in the activity stream. Late submissions appear with a Late label in the module Gradebook.
- Marking category: State the type of assignment (Assignment is the default category)
- Submission details: By default, an assignment will accept both file uploads and text entries. You can configure this (documented below).
- Marking: Specify the type of marks to use for the assessment (such as Points, percentage, pass/fail etc.)
- Attempts Allowed: Allow students to submit more than one attempt at an assignment.
Selecting the Assignment Settings Cog will open up all the available settings.
Details & Information:
Due Date
- No due date: For assessments with optional submission requirements.
- Prohibit late submissions: Stop students being able to submit their completed assignments late. Students have the option to “Save and close”, which keeps the assignment in a draft state until they are ready to submit. Selecting this option will automatically submit any draft assignments.
- Prohibit new attempts after due date: Students can’t start new attempts once the due date and time have passed.
- Allow Class Conversations: This is an interactive discussion space allowing students and module leaders to engage in focused discussions and ask questions directly related to the content, facilitating collaborative learning and deeper engagement.
- Submission details: The default submission method is for Online Submissions. However, there may be times when this isn’t appropriate – for example, oral defences, interviews, presentations and so on. If there is to be no student submissions, change the submission method to Offline Submissions. This prevents students from uploading any content. Please note, you can’t use the Offline Submissions if you have enabled the Prohibit Late Submissions option.
Formative Tools:
Formative Assessment: This option is to mark and distinguish the assessment as ‘formative’. Module leaders would use this option to monitor student learning and provide immediate feedback that can be used to improve instruction and enhance student performance. Formative assessments help both you and your students to identify areas of strength and areas that need further development.
Marking & Submission:
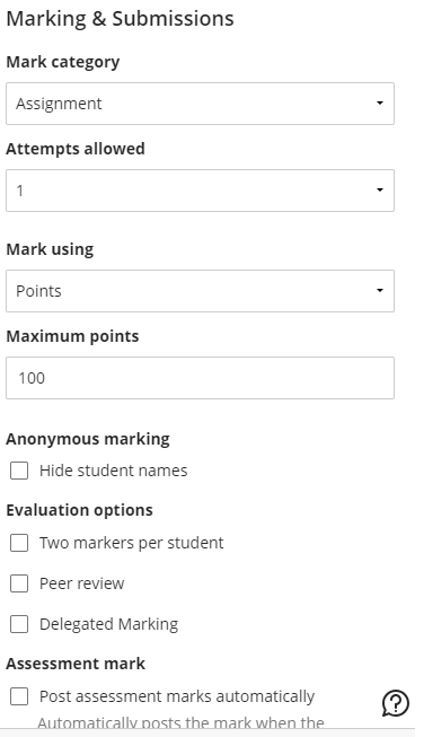
- Mark Category: Set the assessment category. By default, the assessment type is set to ‘Assignment’. This can be changed should you need to manipulate content in the Gradebook more effectively.
- Attempts Allowed: Set the Number of Attempts at an assignment that students are permitted. When this is enabled, it is also possible to choose how the final grade is calculated from those attempts – you can choose to mark the last attempt, the first attempt or all attempts. Select from 1 up to 10 attempts or Unlimited.
- Mark Using: Specify the marking schema (type of marks to use for the assessment) these include types such as defaults like points, percentage, but also any customised schemas you may have created.
- Maximum Points: By default, this is set to 100. You can change this to suit your needs, selecting from a range of 0 to 99,999).
- Anonymous marking. Student names are hidden while the assignment is assessed grade. (It is only possible to add text and files to anonymously graded assignments). More information on anonymous grading.
- Evaluation options: The Two markers per student option allows the allocation of two staff to assess the student’s work and a third member of staff (called the reconciler) who decides on the final grade and feedback. Assessments can also be configured to be Peer-reviewed to allow students to mark each other’s work. This can be used to improve how invested students are in the assessment task and better understand the assessing process. Delegated Marking allows delegated marking (sometimes referred to as Parallel Marking) to be assigned to the assignment.
- Assessment mark: The Post assessment marks automatically will automatically post the mark when the assessment has been marked. The feature covers both automatically and manually marked assignments and tests with auto-marked question types. For assignments, this is turned off by default.
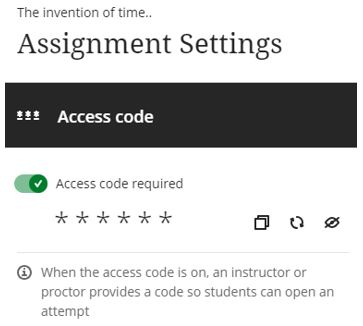
Assessment Security: Access Code
- This feature provides increased security to assignments. When enabled, the module leader provides a code that must be used by students to access and attempt the assignment.
Additional Tools:
- Time Limit: Add a time limit (in minutes) to the assignment. Additional options exist that control how submissions are handled if a student is working on the assignment when the time limit expires.
- Use marking rubric: A rubric is a scoring tool that you can use to evaluate graded work based on defined key criteria. For more information on the rubrics that can be created in Blackboard see the Create a new rubric or associate an existing rubric.
- Goals & Standards: Align content items to Goals to report goal coverage information for the module. It is possible to use goals to measure student achievement across programs and curricula. You can also align individual questions to goals. For more information see aligning content with goals.
- Assigned groups: You can create an assignment for one or more groups of students. By default, you assign a grade to each group, but you can change a group member’s individual grade. For more information, see Groups in Blackboard.
- Add an optional assessment description: Provide students with more information about the assignment, the description appears with the assignment title on the Module Content page. Its maximum length is 750 characters.
Once you have configured the required settings, click Save at the end of the settings panel.
When finished building the assignment, close the Assignment panel by clicking the orange x in the top left-hand corner. The assignment will be saved and can be viewed/edited in the Module Content area by the module leader(s).
5. How students upload work to assignments
Depending on the parameters of the assignment, students can submit their work using the following workflow:
- First, they navigate to the assignment. They can do this via the Module Content space, or go directly to the Gradebook.
- They will be presented with assignment specific information such as Due Date, how many points and how many attempts. If you have added a Description, this is visible here.
- Once they are ready to proceed, they would click on View Instructions.
- On the next page, students will see any Assignment Instructions you may have given. Depending on the assignment, they can then go ahead and either type in their submission and/or upload the appropriate file(s). Unlike Turnitin, students can submit multiple files as one submission.
- Once uploaded, they have the option to Save and Close or Submit. Save and Close would be used if the student is not ready to finish their submission. It puts their attempt in a “Draft” state. Clicking Submit will finalise their submission. They will be prompted to let them now they are about to make their final submission.
- Once submitted, students have the option to download a digital receipt, but the submission details will also be emailed to them for their records.
- It is strongly recommended to encourage students to check their work after they have made their final submission. This will ensure that the submission has been completed and is an accurate representation of what they were expecting to submit. They can do this by going back to the assignment. The interface will now say View Submission – by clicking this, they can view the submission they have made.
For more information, please check Blackboard’s guidance on Creating and Editing Assignments.
For more information, please contact the Digital Learning Specialist team.