
This guide explains the difference between Learning Modules and Folders as the two types of containers that can be used to organise course content and the key differences between them and how these differences can be used to enhance the student experience.
Two-level structure: Think about how you want to structure your course before adding content is important. The mobile-first approach to the design of Blackboard Ultra courses means that you can only create two levels. Students won’t get lost looking for materials, therefore the content (especially when using portable small-screen devices such as Smart Phones and Tablets) is easier to manage.
Functionality difference between learning modules and folders as storage units in Blackboard Ultra.
the following table summarises and compares the differences between the two container types.
| Folders | Learning Modules |
| Both serve as a containing element for any BBU item type | |
| Students and instructors see content the same way: ‘Vertically’. | Students and instructors experience modules differently. For students, learning module content is presented sequentially, with navigation arrows that are used to move through the content ‘Horizontally’.
Instructors switch to Student Preview to understand this functionality better. |
| To interact with content, students open and close each item. | Can use ‘Advance in sequence’ to automatically move to the next document. |
| Cannot add a Learning Module to a Content Folder. | Can add one level of Folders to a Learning Module, meaning each folder can only contain content items, but not additional folders. |
| Can help immerse the student in the concept you are teaching because students can navigate the next content item without distractions or extra clicks. | |
Organise Content with Folders
To create a folder:
- Hover your mouse where you want to add a folder and click the plus icon > Create.
- In the Create Item panel, select Folder from the list.
- Click the pen icon and give the Folder a name.
- When folders are created, they’re hidden from students. You can change the visibility to ‘Visible to students’ or you can set ‘Release conditions.
- Add a description to help students understand what content the folder contains.
- Click Save once you have made the changes.
Organising Content with Learning Modules
To create a learning module:
- Hover your mouse where you want to add the learning module and click the plus icon > Create.
- In the Create Item panel, select Learning Module from the list.
- Click the pen icon and give the learning module a name.
- When learning modules are created, they’re hidden from students. You can change the visibility to ‘Visible to students’ or you can set ‘Release conditions.
- Add a description to help students understand what content the learning module contains.
- Click Save once you have made the changes.
Learning Modules allow additional functionality over folders in that an image can be applied to a Learning Module. Additionally, a Learning Module can allow for a controlled sequence of navigation, as explained below.
Control sequence navigation
Sequential learning: Learning modules allow you to present content in a structured and sequential manner, guiding students through the course material step by step.
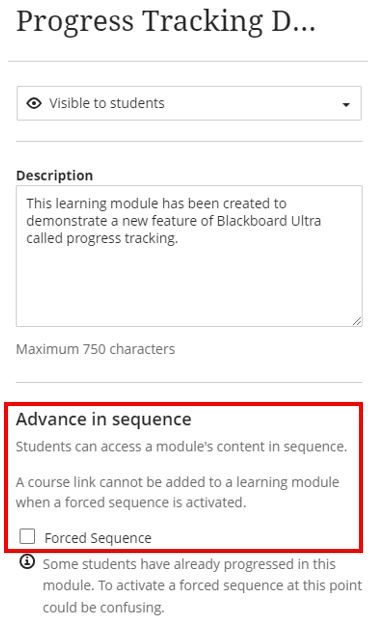
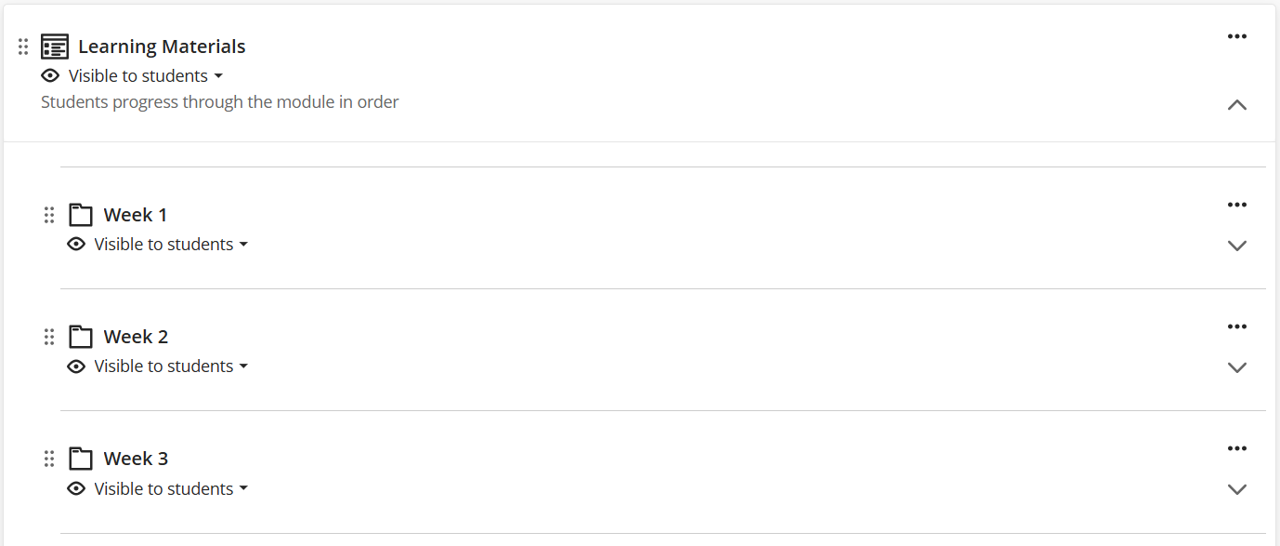
By selecting Forced Sequence, students navigate through the content in order. Take a look at the following Learning Module, taken from the Staff View. As staff, we can access all the folders.
If we now compare the same Learning Module from the Student View:
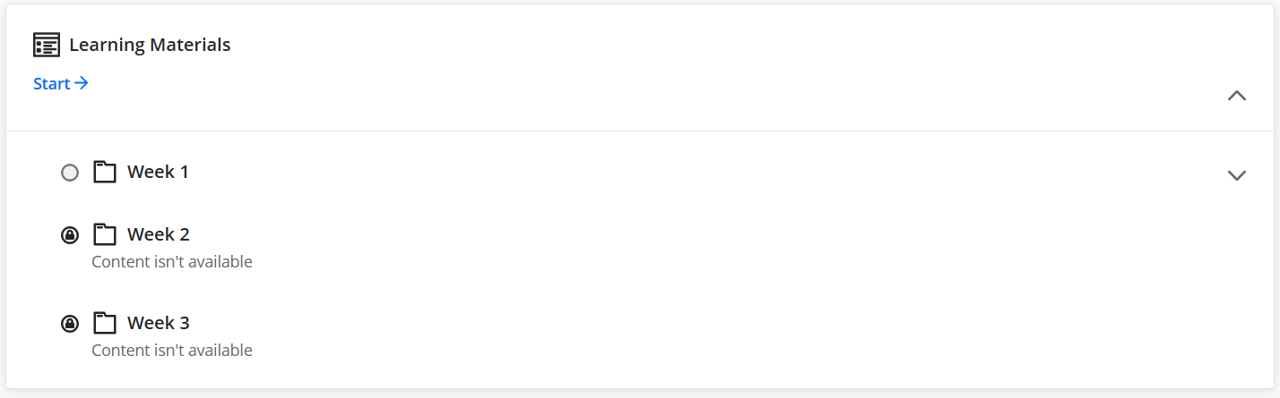
The student can see all the folders within the Learning Module, but notice the “Lock” icon for Week 2 and Week 3. Only by reviewing all the content in Week 1 can the student access the content in Week 2. Similarity, the student can only access the content in Week 3 when both Week 1 and Week 2 have been completed.
Release Conditions
In Blackboard Ultra, you can control access to specific content based on date, users, groups, or performance. This functionality is referred to as Release Conditions. You can create Release Conditions for a wide range of items such as Leaning Modules Folders, Documents, Tests, Assignments, Discussion Boards and so on.
Release conditions can be found in several locations. For example, it can be located under different content items.
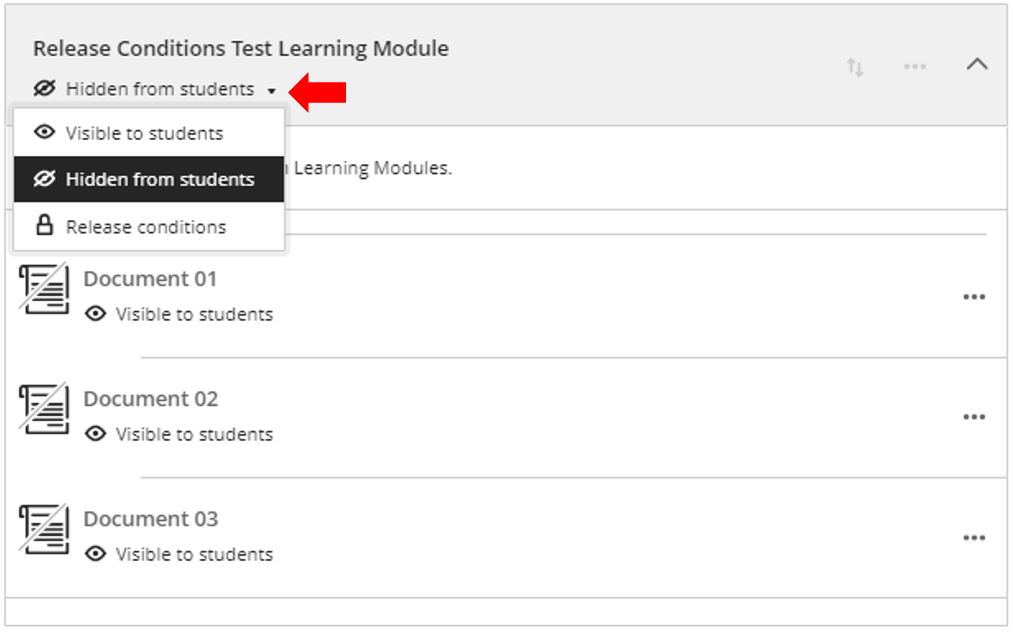
You can also find visibility settings at the top right of your screen when you specific items. Open the item you want to edit and select Release conditions in the visibility menu.
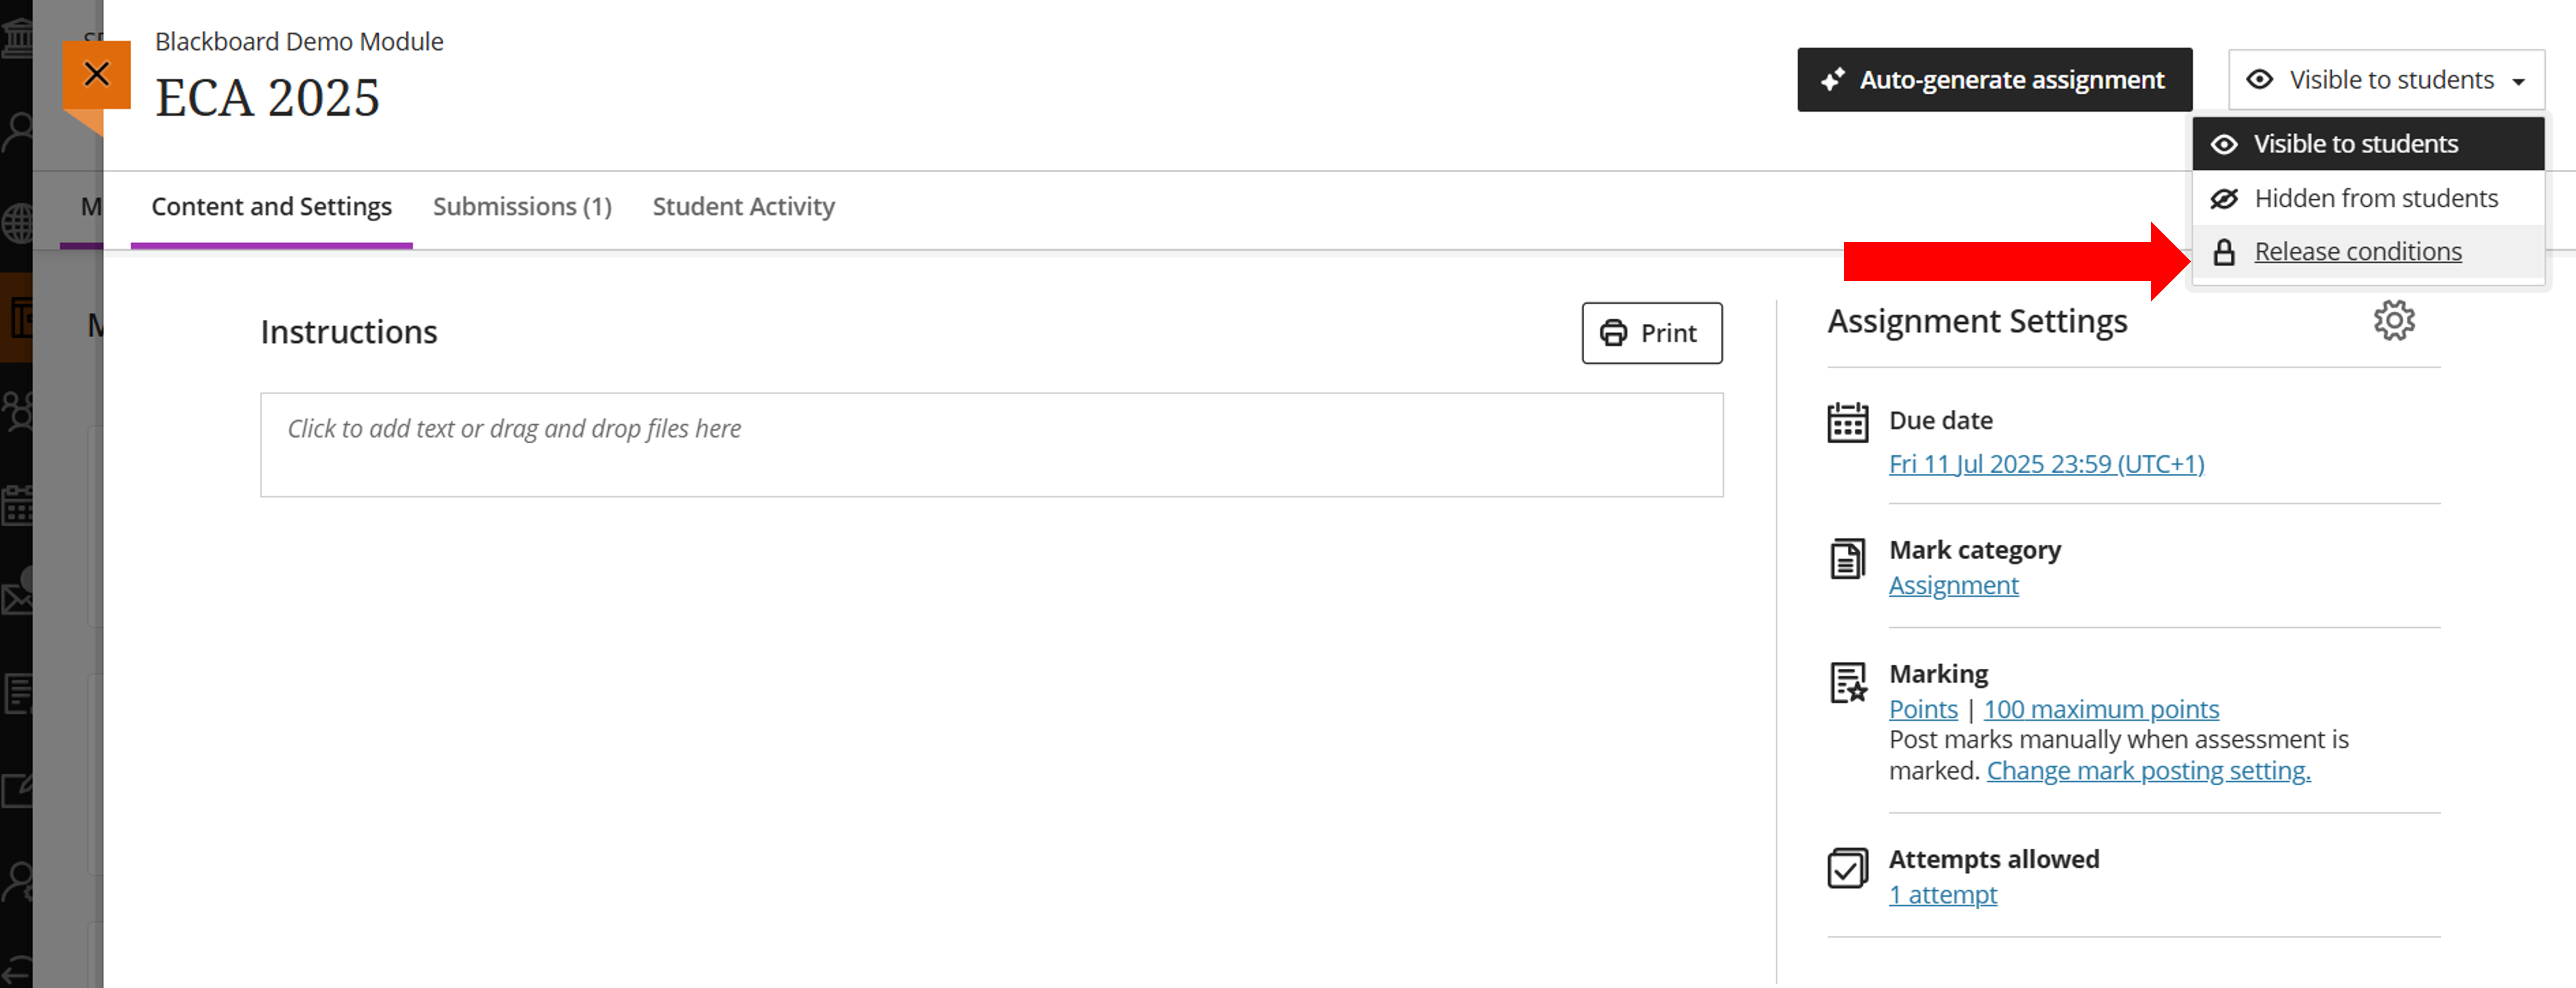
Once selected, the following page will be displayed.
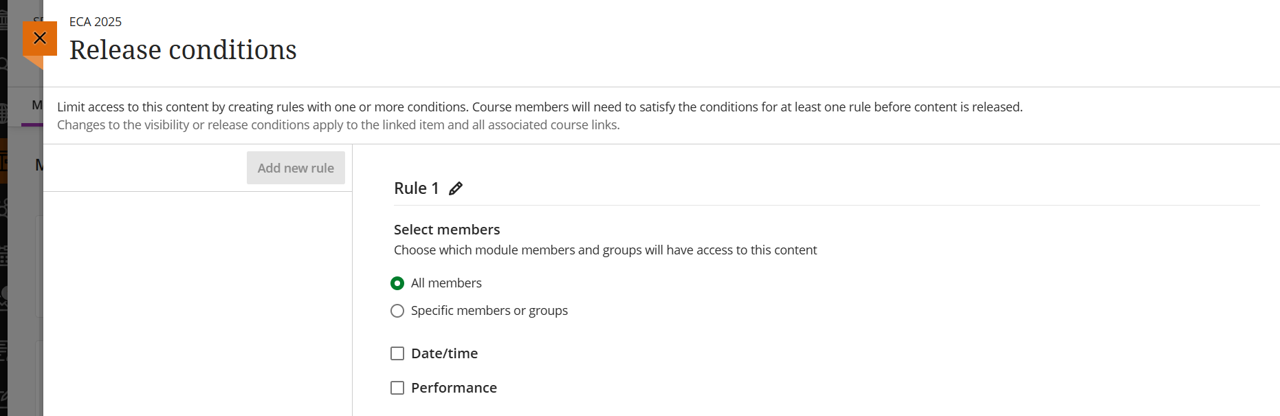
Release Condition Rules
You will see that Release Conditions are created as “rules”. You can create multiple rules for one item, but only one rule can be selected at any one time. If required, you can rename rules.
Select Members
Start by deciding if you want to the Release Condition to apply to All Members or Specific Members or Groups. If you select Specific Members or Groups, you can then select individual students and groups at the same time.
Date/Time Range (optional)
Next, you can choose if you want to select a Date/Time range. If so, check the Date/Time box and enter the Access From and/or the Access Until date and times. You can select either/or dates to suit your preference.
Performance (optional)
If your module has markable items (that is, items that are graded in any way), you can also define a Performance criteria. By selecting this option, you select a markable item and then set the requirement (such as 40 points or higher, or Attempt Submitted). If you want to add more than one markable item, do so by clicking Add Performance Criteria and add more items.
Visibility
Once you are satisfied with your rule, click Save. Here’s a typical example of a Release Condition Rule:
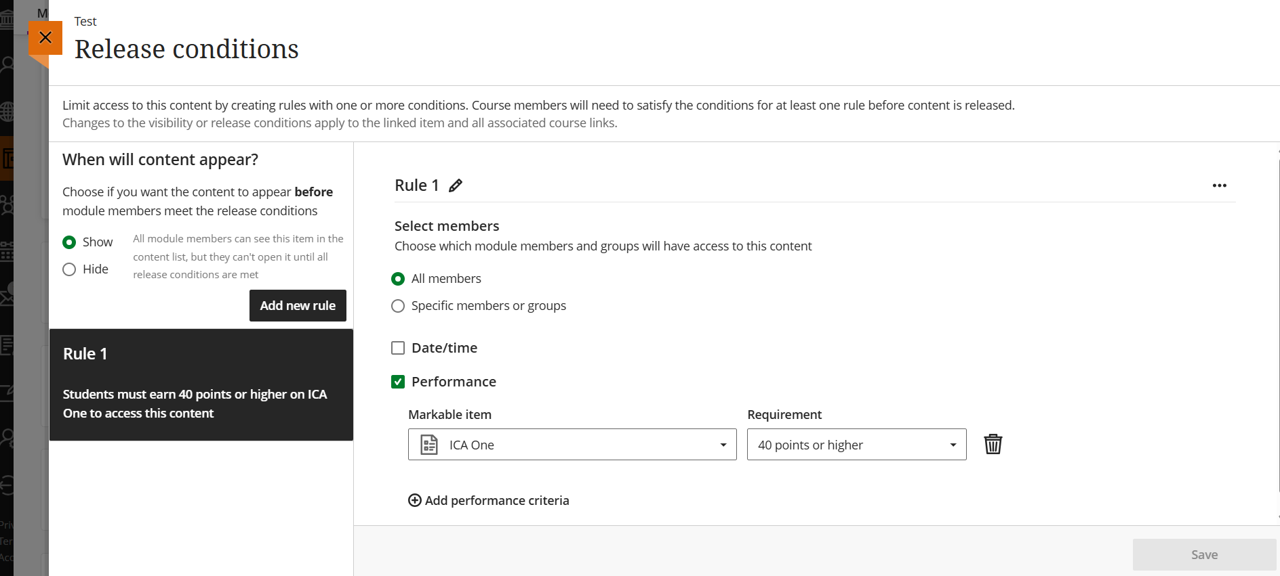
The final step is to decide “When will content appear” (top left of the Release Conditions page). You can select Show or Hide.
If you select Hide, the item is invisible until the Rule Conditions are met.
If the rule is for All Members, and you select Show, students can see the link to the item but won’t be able to access it until the conditions are met. They will be informed of what these conditions are.
If the rule is for Specific Members or Groups, and you select Show only those members you have selected will see the link. As above, they won’t be able to access it until the rule conditions are met. All other students NOT selected will not see the link at all.