
This guide introduces the use of discussion boards as a teaching, learning and assessment tool. The guide will demonstrate how to add a discussion board to a Blackboard module and explore the various configuration settings available.
Discussion boards provide a space for students to interact academically and socially with their peers. Discussion boards can greatly enrich the educational experience by fostering engagement, encouraging diverse perspectives, and improving communication skills. Discussion boards can also be graded and therefore used as part of a final assessment.
This article is broken into two sections:
- Where and how to create a link to the discussion board
- How to create the discussion board itself
Creating Discussion Board Links
A discussion board can be added directly within your Module Content page. By doing so, it can be accessed by students within a certain context. For example, you might have a folder entitled “Introductions” and you could place the discussion board within this folder to allow students to introduce themselves to the cohort. This will also create a link to the discussion board within the Discussions space of the module.
Alternatively, you can create a discussion board directly within the Discussions area of the module. That is, it won’t appear in the Module Content space, but only from the Discussions space.
Option One – Create your discussion on the course content page
Locate where you would like to add the discussion board and select the plus sign > Create.
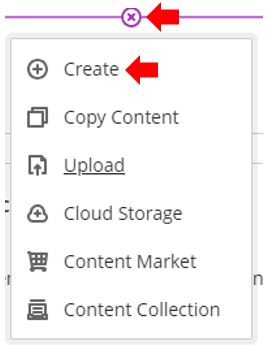
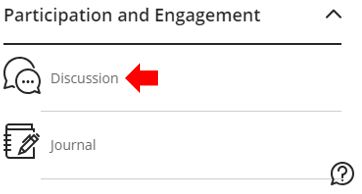
On the Create Item panel, select Discussion.
Open Two – Create your discussion on the Discussion page:
Select Discussions on the navigation bar at the top of your Blackboard page.

At the top right of the page, click the New Discussion button.
Creating Your Discussion
Regardless of which option you selected, you can now create your discussion board.
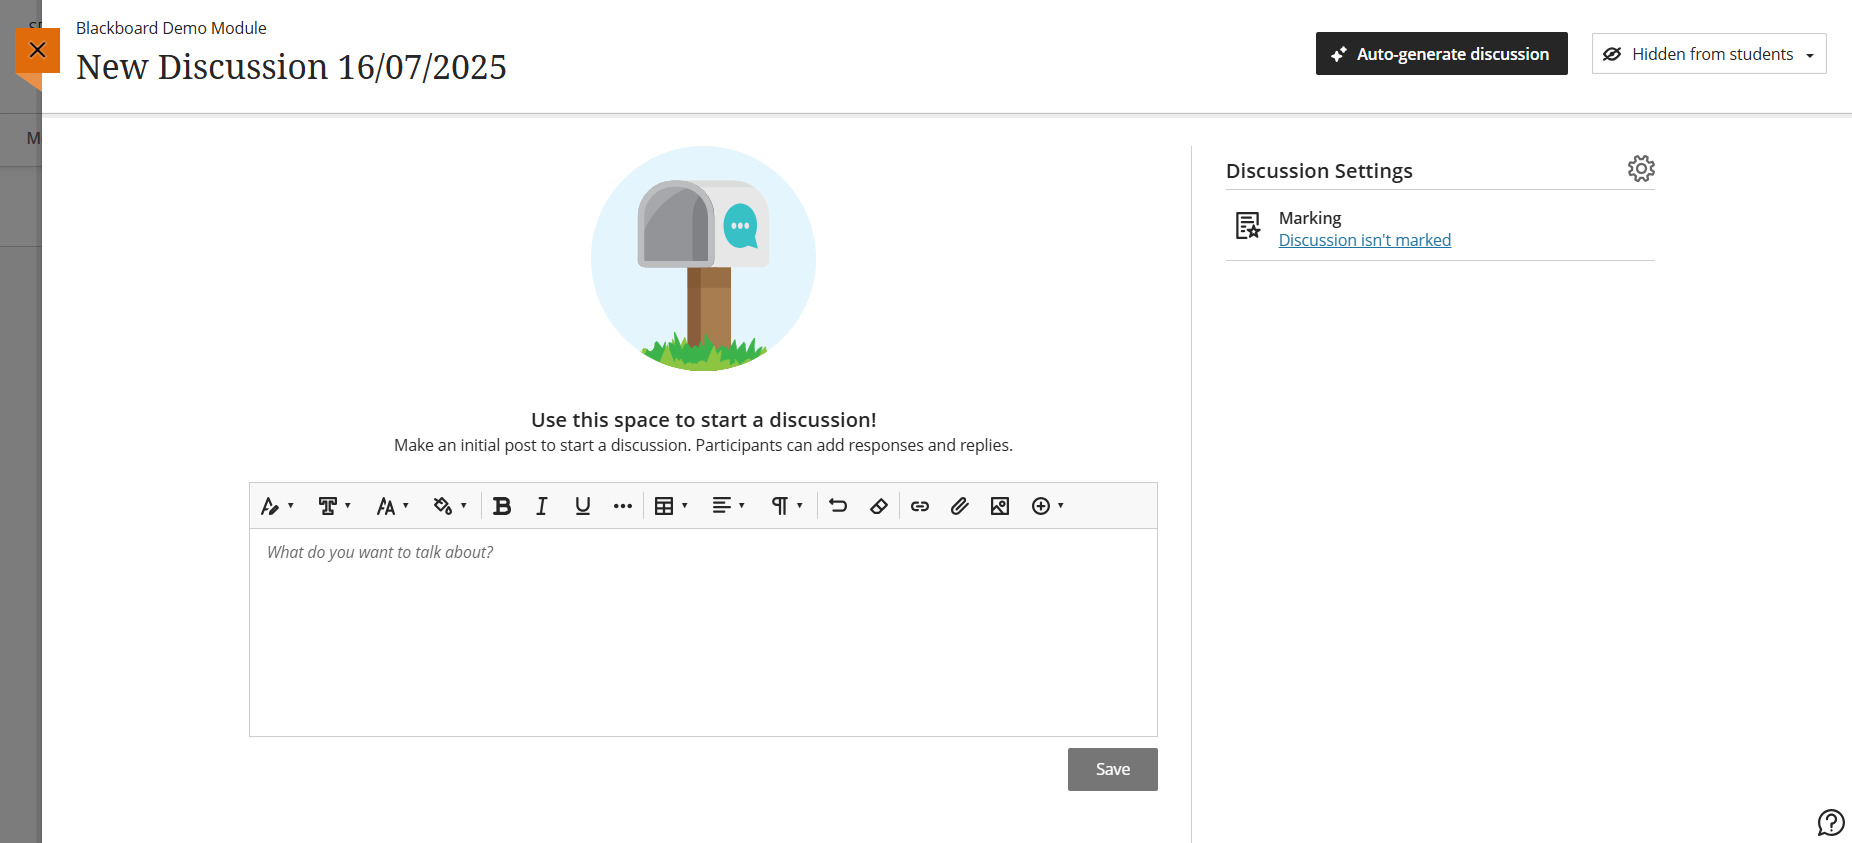
Begin by entering a meaningful and descriptive title. By default, it will be called New Discussion followed by the current date. Click on this title to change it to something more appropriate.
In the Text Editor, under where it says “Use this space to start a discussion”, enter the discussion topic as well as any other relevant instructions. This is what you want the students to discuss. You can include text, images, videos and so on. Alternatively, you can get Blackboard’s Design Assistant to help you generate discussion ideas by clicking the Auto-generate discussion option in the top right of the screen. Any posts either staff or students make are called Responses, as they are responses to the Discussion Topic.
Once you have given the purpose of the discussion board, the cog icon in the top right will appear. Click this to open the Discussion Settings panel, as shown below.
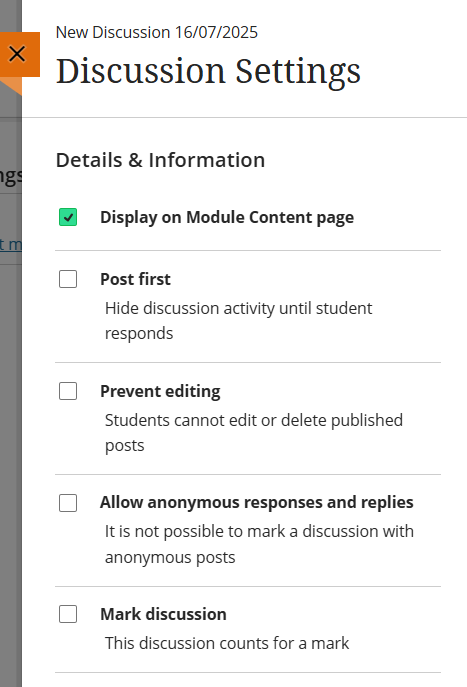
By default, the option to Display on Module Content page is selected. If you have created the discussion board from within, say, a specific folder, this is not an issue. However, if you have created the discussion board specifically to only appear within the Discussions space, you will need to uncheck this option. If you leave it checked, it will create a link to the discussion board within the Module Content area, at the very bottom of the page.
Post First encourages students to take part. If they don’t make any posts, they will only see the Discussion Topic, and not any of the individual posts that may have been made. If you select this option, students will be notified of this, and it will inform them that any responses and replies will appear when they post a response.
Prevent editing will stop students from making any changes to their responses. You might want to consider this if you are interested in observing the progress of a discussion from start to finish. If selected, students cannot make any changes to their responses they make. However, as Instructor/Module Leader, you can both Edit and Delete responses students make.
Allow anonymous responses and replies gives students the option to post their reply anonymously. If this option is selected, the Discussion board cannot be marked. Even if you remove the anonymous option at a later date, those posts will initially remain anonymous. However, you have the option to Reveal Author by clicking the ellipses (three dots) next to an anonymous post.
Mark Discussion will allow you to grade student engagement. By selecting this option, an associated space in the Gradebook will appear, allowing you to mark and give feedback on student activity. Please note that if you have selected the Anonymous option at any time you cannot assess a discussion board, even if you revoke the anonymous option later.
Additional Tools include the Group Discussion option, which is used to assign students to discussion groups.
Making Your Discussion Available
Once you have created your discussion board, and configured it appropriately, change the Visibility to Visible to Students in the top right hand corner of the screen. If required, you can also apply Release Conditions to the board.