
It is possible to integrate multiple-choice questions directly within Blackboard documents. This feature allows module leaders to embed interactive questions and provide automated feedback to students to help motivate and engage learners. Students benefit from instant feedback on their responses and have unlimited attempts to answer correctly.
Module leaders can monitor student engagement and performance through detailed metrics such as:
- Number of students participating.
- Total number of attempts.
- Average number of attempts to reach the correct answer.
- Maximum number of attempts to reach the correct answer.
- Level of difficulty metric.
- Percentage of students selecting each answer option.
Add Knowledge Check
To add a knowledge check, add a new content item in the document at the desired location by clicking the Plus icon and selecting Knowledge Check, as highlighted below: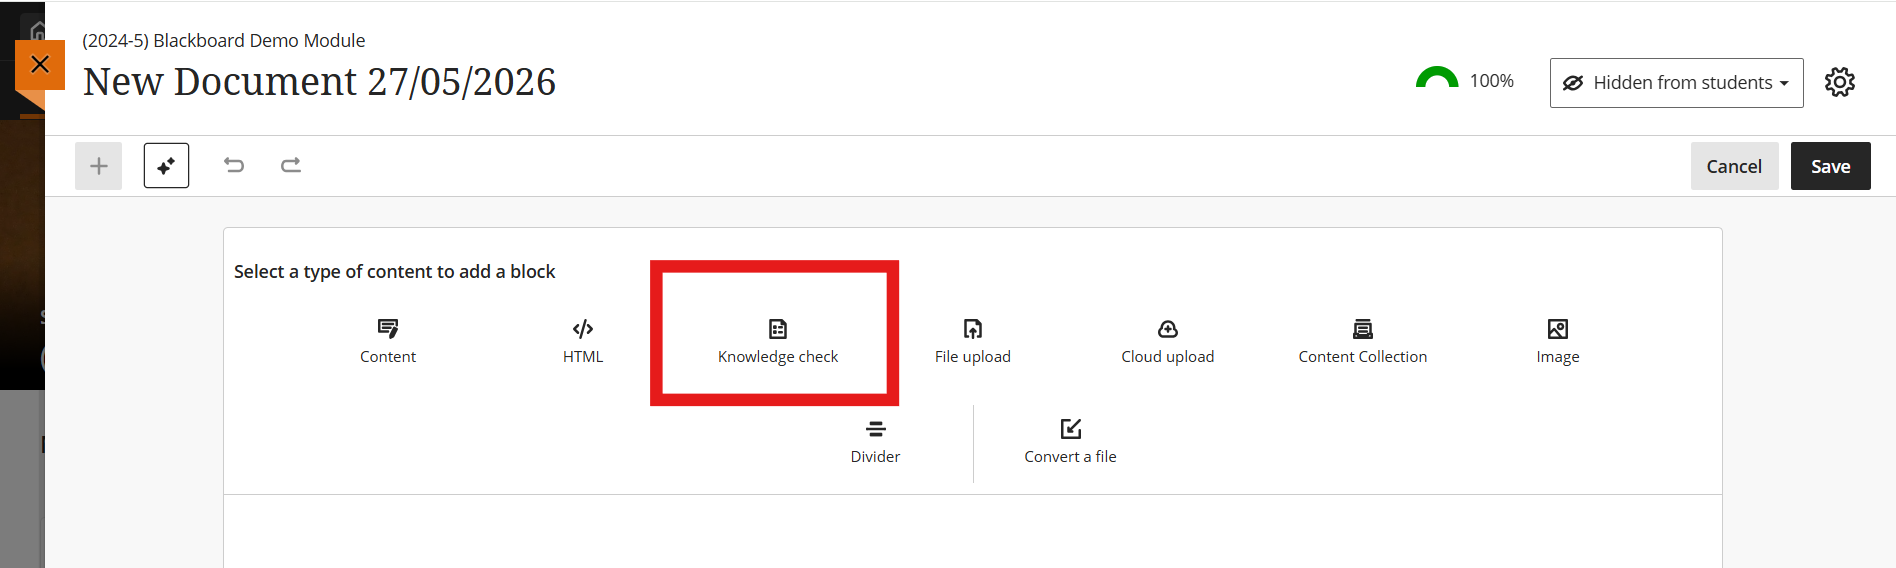
Fill in the Question Details. This includes the Question Text, potential answers (called Options), and correct/incorrect Answer Feedback.
By default, you are presented with the space to add two possible answers. Add more answers by clicking “Add Option”. Determine which is the correct option by clicking the check box next to it. If required, you can select more than one option to be correct.
In the “Students can select up to” drop down list, determine how many options a student can pick. If you have chosen more than one option to be correct, you will need to ensure this is reflected in the amount of options a student can select. For example, you have four options, and have chosen two to be correct. You then need to allow students to select up to at least two options.
Whilst the correct/incorrect answer feedback is prepopulated with some generic text, it is strongly recommended you adjust this to aid students in their learning journey. This can be used to point students towards appropriate material to help them answer the question if so desired.
Click Save when you are satisfied with your question. Remember you can switch to Student Preview if you want to test it out, and understand the student experience.
Edit the Knowledge Check
Once the question has been added to the Document, you can edit it if required. This also lets you use the “Style” options that can be deployed in a Blackboard Document, making the Knowledge Check stand out from standard text. To edit the Knowledge Check, first click on “Edit Content” to edit the Document in the top right of the screen. Now, hover your mouse over the Knowledge Check. By doing so, it will turn purple as shown below, and you will be presented with the various edit icons:

Going from left to right, the various icons explained:
- Pencil icon (far left) – click this if you want to edit the Knowledge Check text in some way.
- 6 dots – this allows you to move the Knowledge Check. Click on the 6 dots, and keep your mouse button held down. You can now drag the Knowledge Check into a different location in the Document.
- Easel icon – this allows you to select from one of the pre-set Document styles: Question, Tip, Key Point or Next Steps. If you’ve already selected a Style but no longer want to use it, you can select Reset Styling to remove it.
- Trash Can icon (far right) – click to delete the Knowledge Check
When finished, click Save in the top right hand corner (or cancel if you don’t want to save your edits).
Check Student Progress
When students have engaged with the Knowledge Check, you (the tutor) will see this engagement automatically from within the Blackboard Document, as shown below. Students don’t see this information – they will only see their engagement with the question itself.
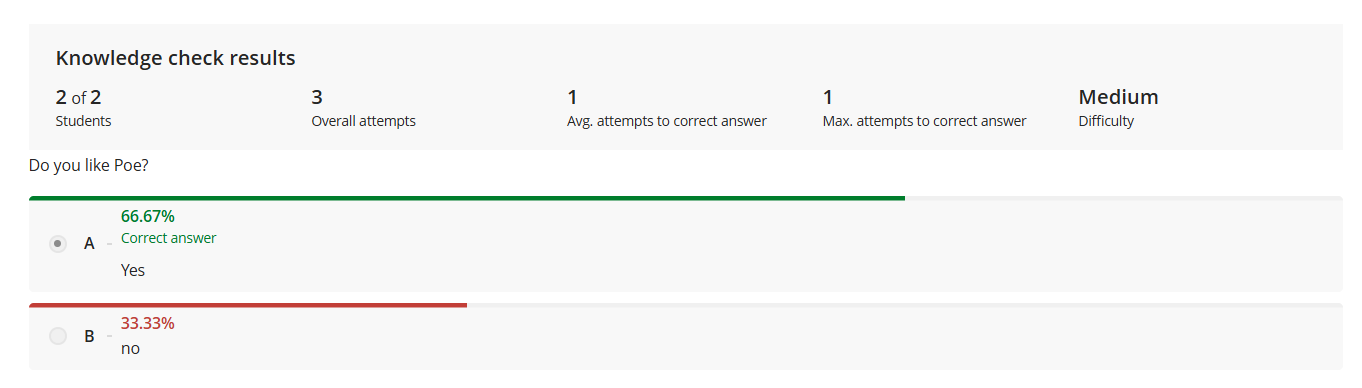 Over on the left, you can see that there are 2 students in the module and both students have attempted this question. Next, it shows that there have been 3 overall attempts. This is because students can attempt each knowledge check as many times as they like, and this is thus recorded. We can then see the average number of attempts it takes for a student to get the right answer as well as the maximum number of attempts it has taken a student to get the right answer. Finally, the system attempts to determine the complexity of the question – in this case, it has rated the question as “Medium”.
Underneath, the same information is displayed graphically.
Please note that a Knowledge Check doesn’t allow you to see the names of each student, only a record of the number of students. Additionally, you can’t see the results to a Knowledge Check in the Gradebook – only in the Document where it sits. Similarly, you can’t use a Knowledge Check to drive Release Conditions. For this level of interactivity, you need to create a regular Blackboard Test.
What next?
More information about Knowledge Checks in Blackboard can be found in the Anthology support video.