
What is a rubric?
A rubric can be used to evaluate students’ work based on defined criteria and scales. Instructors can create and share rubrics, allowing other instructors to upload the rubrics to their modules.
How can students use rubrics?
Students can use a rubric to organise their efforts to meet the requirements of the graded work. When you allow students access to rubrics before they complete their work, you provide transparency into your grading methods.
How do I create or import a Turnitin Rubric?
- If creating a rubric for a new assignment: Set up the assignment as usual and ensure you have completed filling out the assignment details.
- If creating a rubric for an existing assignment: Select a previously created assignment to create a rubric for, select the green Edit button at the top right.
![]()
A step-by-step guide to the Turnitin Rubric creation process
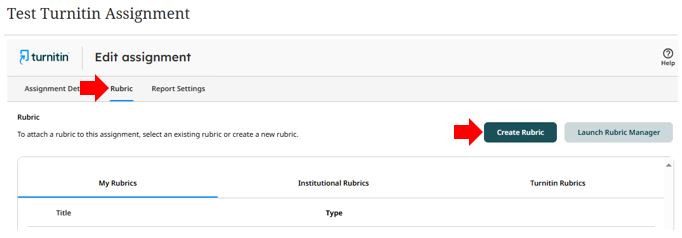
1. Select the Rubric tab from the top of the screen.
2. Select the Create Rubric button at the top right.
3. Select the Create New Rubric tile and then select Next at the bottom right.
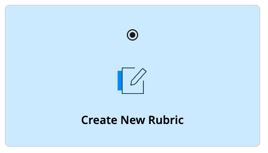
(You may see an ‘Import previously created Rubrics’ option that will need to be completed before being able to create any new Rubrics)
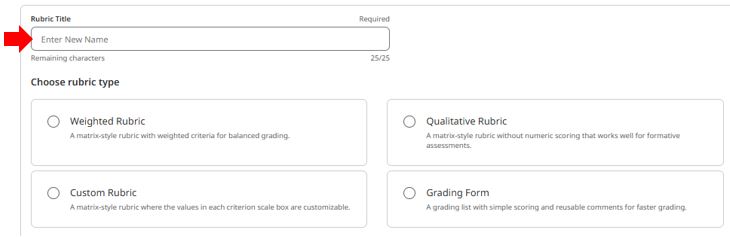
4. Enter a title for your rubric or grading form. (Maximum of 25 characters)
5. Choose the rubric type from the available options. (Covered in more detail below)
6. Depending on the type of rubric selected, you can set optional additional Rubric Options or Rubric Scoring settings.
a. For weighted rubrics, you can set a custom number of criterion rows and scale columns up to 50. You can also choose to enable ranged scoring and/or equal criterion weights.
b. For qualitative and custom rubrics, you can set a custom number of criterion rows and scale columns up to 50.
c. For grading forms, you can set the number of criterion rows up to 50.
Types of Rubrics that can be created in Turnitin
- Weighted: Provides weighted criteria for balanced grading.
- Qualitative: Provides standard feedback but has no numeric scoring.
- Custom: Enter any value directly into each rubric cell.
- Grading Form: A grading list with simple scoring and reusable comments for faster grading
Rubrics Video Guide
The following video will take you through the basics of creating rubrics, focusing on Weighted Rubrics.
Weighted (Step-by-step guide)
- Weighted rubrics also provide ranged scoring, which allows you to select a score within a range for each criterion.
- The criteria percentages combined must equal 100%, as each criterion represents a percentage of the student’s overall grade.
- The maximum grade value for this type of rubric will be the same as the highest scale value entered.
1. To edit the title, weight, or description value of a criterion, directly select the relevant cell. Select the Save button to save your changes.
2. If required, use the icons to the right of each criterion row to reposition the row, add additional rows, or delete the row.
To reorder a criterion row, select the arrow icon. From the modal that appears, select Move up or Move down. To add an additional row, select the + icon. Then, select Add row above or Add row below. To delete a criterion row, select the red trash can icon.
3. To enter the scale title or value, select a scale title cell. Select the Save button to save your changes. If you have chosen to enable ranged scoring when creating the weighted rubric, you will see slightly different options:
4. Optionally, you can use the icons above each scale title to reposition the entire column, add additional columns, or delete the column.
To reorder a scale column, select the arrow icon. From the modal that appears, select Move left or Move right. To add extra scale columns, select the + icon. Then, select Add column to the left or Add column to the right. To delete a scale column, select the trash can icon.
5. To enter a scale description, select a scale description cell. Select the Save button to save your changes.
6. Once the entire rubric is complete, select the Save button at the bottom right. A message will appear informing you whether the action was successful.
Qualitative (Step-by-step guide)
- Qualitative rubrics do not use numeric scoring.
- The scale and criteria used for this type of rubric are more descriptive than measurable.
1. To edit the title, weight, or description value of a criterion, directly select the relevant cell. Select the Save button to save your changes.
2. Optionally, you can use the icons to the right of each criterion row to reposition the row, add additional rows, or delete the row.
3. To reorder a criterion row, select the arrow icon. From the modal that appears, select Move up or Move down. To add an additional criterion row, select the + icon. Then, select Add row above or Add row below. To delete a criterion row, select the red trash can icon.
4. To enter the scale title, select the scale title cell. Select the Save button to save your changes.
5. Optionally, you can use the icons above each scale title to reposition the entire column, add additional columns, or delete the column.
To reorder a scale column, select the arrow icon. From the modal that appears, select Move left or Move right. To add extra scale columns, select the + icon. Then, select Add column to the left or Add column to the right. To delete a scale column, select the trash can icon.
5. To enter a scale description, select a scale description cell. Select the Save button to save your changes.
6. Once the entire rubric is complete, select the Save button at the bottom right. A message will appear at the bottom left of the page to let you know whether the action was successful.
Custom (Step-by-step guide)
- Descriptive scales and criteria can be entered, while each rubric cell can be allocated its own point value as well as written feedback.
1. To edit the title or description of a criterion, directly select the relevant cell. Select the Save button to save your changes.
2. Optionally, you can use the icons to the right of each criterion row to reposition the row, add additional rows, or delete the row.
To reorder a criterion row, select the arrow icon. Then, from the modal that appears, select Move up or Move down. To add an additional criterion row, select the + icon. Then, select Add row above or Add row below. To delete a criterion row, select the red trash can icon.
3. To enter the scale title, select the scale title cell. Select the Save button to save your changes.
4. Optionally, you can use the icons above each scale title to reposition the entire column, add additional columns, or delete the column.
To reorder a scale column, select the arrow icon. From the modal that appears, select Move left or Move right. To add extra scale columns, select the + icon. Then, select Add column to the left or Add column to the right. To delete a scale column, select the trash can icon.
5. To enter a scale description and points, select a scale description cell. Select the Save button to save your changes.
6. Once complete, select the Save button at the bottom right. A message will appear at the bottom left of the page to let you know whether the action was successful.
Grading Form (Step-by-step guide)
- A type of grading list with simple scoring and reusable comments for faster grading that can be used for providing feedback with or without the use of numerical scoring or scaled criteria.
- More descriptive than measurable, each criterion is standard as opposed to having scaled levels like in rubrics.
1. To edit the title of a criterion, directly select the relevant field. Select the Save button to save your changes.
2. Optionally, you can use the icons to the right of each criterion row to reposition the row, add additional rows, or delete the row.
To reorder a criterion row, select the arrow icon. From the modal that appears, select Move up or Move down. To add additional criterion rows, select the + icon. Then, select Add row above or Add row below. To delete a criterion row, select the red trash can icon.
3. To enter a description for a criterion, select a criterion description cell. Select the Save button to save your changes.
4. Once the entire grading form is complete, select the Save button at the bottom right. A message will appear at the bottom left of the page to let you know whether the action was successful.
For more information on understanding, using and setting up Rubrics in Turnitin, please follow this link to Turnitin’s Rubric resource page.
For further support, please contact the Digital Learning team via elearning@tees.ac.uk.