
This guide has been created to inform and support staff on Microsoft OneNote accessibility & inclusivity. It explores tools and practices to ensure that OneNote notebooks are accessible to all users.
This guide covers essential topics such as using the Microsoft Accessibility Checker to identify and address accessibility issues, leveraging Immersive Reader for improved reading comprehension, and implementing best practices to create accessible OneNote notebooks. This guide provides the knowledge and tools to create inclusive learning and working environments within OneNote.
Contents
- What is Microsoft Accessibility Checker?
- Immersive Reader for reading comprehension
- Best practices for making a OneNote Notebook accessible
What is Microsoft Accessibility Checker?
Accessibility Checker is available in all Microsoft Office applications; it reviews content and identifies accessibility issues. It explains why each issue might be a potential problem for someone with a disability. Accessibility Checker also suggests how you can resolve the issues that appear.
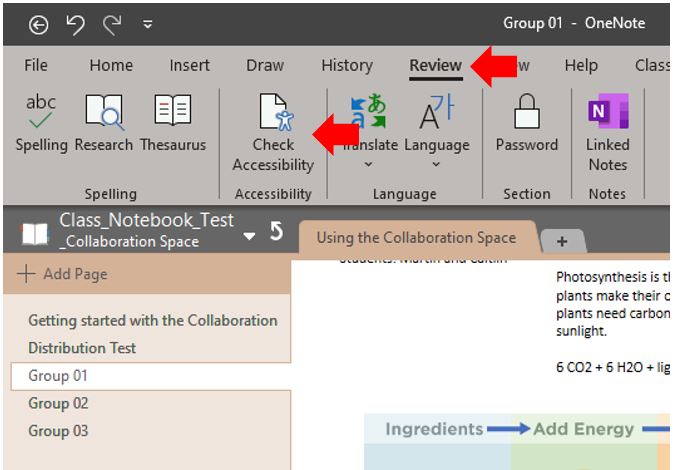
To access Accessibility Checker, select Review > Check Accessibility.
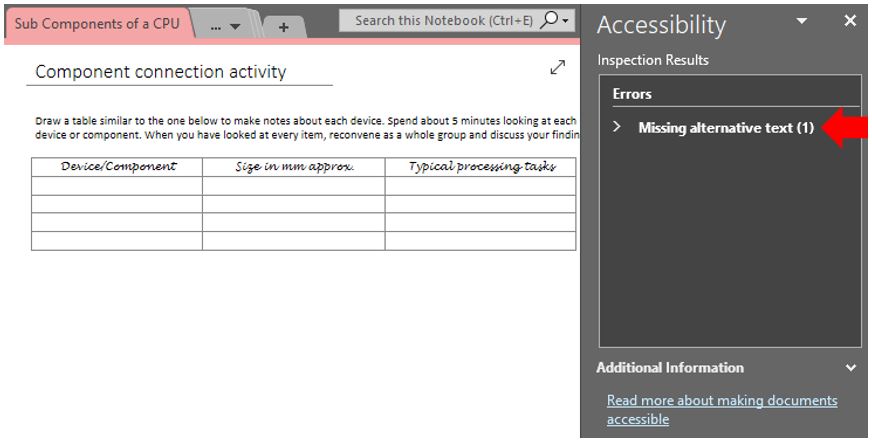
The Accessibility pane opens, and you can now review and fix accessibility issues. For more info, go to Improve accessibility with the Accessibility Checker.
Immersive Reader for Reading Comprehension
The Immersive Reader is a part of OneNote Learning Tools. The full-screen reader makes it easy for students of all abilities to read and comprehend any document.
For OneNote for Windows 10, Mac, or iPad, open OneNote. Select View > Immersive Reader.
On the Immersive Reader, you can change text properties, line spacing, fonts, and background colour. A feature called Parts of Speech helps readers understand complex sentences by highlighting nouns, verbs, adjectives, etc. in a sentence.
Voice options read aloud sentences and improve accessibility. This includes a picture dictionary that explains a word with an image and its audio pronunciation.
Best practices for making OneNote notebooks accessible
The following are best practices for creating OneNote notebooks to ensure they are inclusive, accessible and meet the necessary Teesside University accessibility requirements to support people with disabilities. The table below includes links to online resources that support staff in implementing fixes to identified accessibility design problems.
| What to fix | How to find it | Why it needs fixing | How to fix it |
| Include alternative text with all visuals and embedded files. | To find missing alternative text, use the Accessibility Checker. | Alternative text helps people who can’t see the screen to understand what’s important in images, other visuals, and embedded files. | Add alt text to visuals and embedded files |
| Add meaningful and accurate hyperlink text. | To determine whether hyperlink text makes sense as standalone information, visually scan your notebook. | People who use screen readers sometimes scan a list of links. | Add accessible hyperlink text |
| Give section groups, sections, and pages unique names, and remove empty items. | To determine whether you have named all content and deleted empty items, visually scan your notebook. | Notebooks with content named descriptively make it easier to find specific information. This also helps people who use screen readers as they can know what an item contains without opening it. | Rename sections and section groups
Delete unused sections and section groups |
| Make sure that colour is not the only means of conveying information. | Use the Automatic font colour for your text. Visually scan your notebook for instances of colour coding. | People who are blind, have low vision, or are colourblind might miss out on the meaning conveyed by particular colours. | Use accessible text colour and formatting |
| If you must use tables, create a simple table structure for data only, and specify column header information. | To ensure that tables don’t contain split cells, merged cells, or nested tables, use the Accessibility Checker. | Screen readers keep track of their location in a table by counting table cells. Screen readers also use header information to identify rows and columns. | Use table headers |
| Use a larger font size (18pt or larger), sans serif fonts, and sufficient white space. | To find potential issues related to fonts or white space, review your slides for areas that look crowded or illegible. | People who have dyslexia describe seeing text merge or distort. | Use accessible text colour and formatting |
| Make audio and video files accessible to people who are blind or have low vision or people who are deaf or hard of hearing. | Where possible, ensure that audio and video files have subtitles, closed captions, or video descriptions before being inserted into OneNote. | Make audio and video files accessible | |
| Use built-in headings and styles. | Screen reader software recognizes built-in heading styles as headings and enables people to navigate by heading.
In addition, people with reading disorders such as dyslexia depend on headings to help them structure information. |
Use headings to organize the information in your notes into small chunks which are arranged in a logical order.
To find headings that are not in a logical order, use the Accessibility Checker. |
Apply built-in heading styles |