
Every module on Blackboard has access to Blackboard Collaborate. Similar to Teams or Zoom, it is a video conferencing product, but with additional features to make it more useful for online teaching. This is why the university normally recommends using Collaborate rather than Teams for online learning and teaching.
You can access it through the Blackboard Collaborate link in the left hand menu in any of your modules.
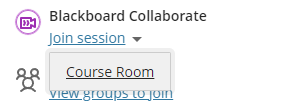
Click on Join Session to see a list of different rooms that are available to you. Every module has a Course Room which is accessible to everyone studying or teaching that module (but no one else). Other rooms will become available as created by your module leader.
Accessing a Collaborate Session
To start, click or tap on Course Room.
The first time you access the Course Room, you will be prompted to ask if Collaborate can access your microphone and webcam. Say Yes or Allow to these requests.
If you don’t have either a microphone or webcam, simply click Don’t Allow. Once you have granted (or otherwise) permission to microphones and webcams, you will be in the Course Room.
If anyone else is in the room, you will see them in the main panel. At the bottom of the screen, you will see four icons:
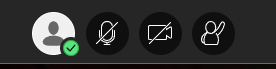
From left to right, these are:
- General User Panel
This contains emoticons for giving feedback, and the Agree / Disagree buttons. - Share Audio
By default, your microphone is disabled even if you granted access. Should you wish to talk, click the microphone icon and your microphone will be enabled. Your tutor will guide you on this. - Share Video
By default, your webcam is also disabled. Should you wish others to see you (assuming you have a webcam), click the icon to enable it. - Raise Hand
By clicking this icon, a notification will be sent to the moderator (presumably your course tutor) that you have a question.
Collaborate Panel
The collaborate panel allows you to text chat to other participants. In the bottom right of the screen, there is an icon with two arrows pointing left. Click this to open the Collaborate panel.
At the bottom of the Collaborate panel, you will see four icons:
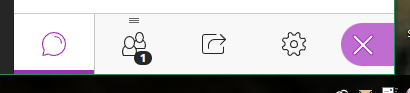
- Chat
When you open the Collaborate panel, this is where you are placed.The first time you try this, you should see a panel that says Everyone. Click this to open the chat room. You can now type a message in the box at the bottom that says “Say something”. When you press Enter, your text message will be displayed in the room. - Attendees
This shows you a list of all the people in the chat room. Students are generally in the space as Participants, and course tutors are Moderators.Should you wish to share some work, your tutor will need to change your role to Presenter. - Share Content
If you are enrolled in the room as a Presenter, you can share content.If you are a Presenter, you can share a whiteboard, share your screen or share a file (images, PowerPoints or PDFs). To stop sharing, click the white circle with a small square in it (when you hover your mouse over it, it’ll say Stop Sharing) - Settings
You can change your Audio and Video settings. This allows you to control the volume as well as some settings for both devices.Notification Settings allow you to control the level of notifications that you get from Collaborate.
Click the X in the purple icon to close the Collaboration panel.
Leaving the session
When you have finished with Collaborate, click the icon in the top left of the screen – it’s the one that has three horizontal lines. This opens the Session Menu.
In the Session Menu, you can now see the option to Leave Session. Click this and you will be out of the room. You can now close the browser tab.