Introduction
A Question Bank is a pool of questions based on a specific subject. These banks are then used to rapidly create tests, providing your students with a rich, varied and comprehensive array of questions. These tests in turn can allow students to revise, self-study, test themselves, get an understanding of where they are in their learning journey and benchmark where they are.
Using the Design Assistant, the process of creating question banks is rapidly sped up. The tool has the ability to interrogate existing content in your module in order to develop the question bank. This can be Blackboard Documents, but also Ms Word documents and Ms PowerPoints, creating rich and varied questions on a deep and wide range of material in a matter of minutes.
Video Tutorial
Step One – Create Question Banks
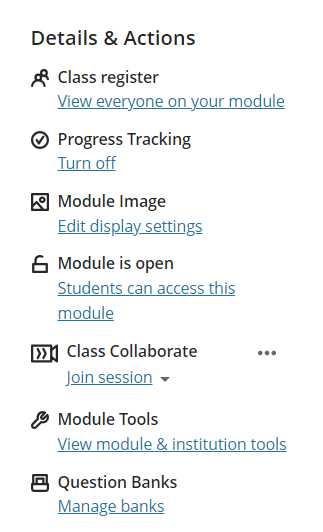
In the module, locate the Details and Actions panel, on the right of the page, and click on Manage Banks under Question Banks.
You will now be taken to the Question Bank interface. If you’ve already created question banks, they will be listed here.

Click the Plus icon at the top of the list to create a new question bank.
If your question bank is going to contain a mixture of manually created questions and automatically generated questions, select New. If your question bank is purely going to consist of automatically generated questions, select Auto-Generate. Selecting New will then provide you with the option to add your own questions, and use the Auto-Generate option.
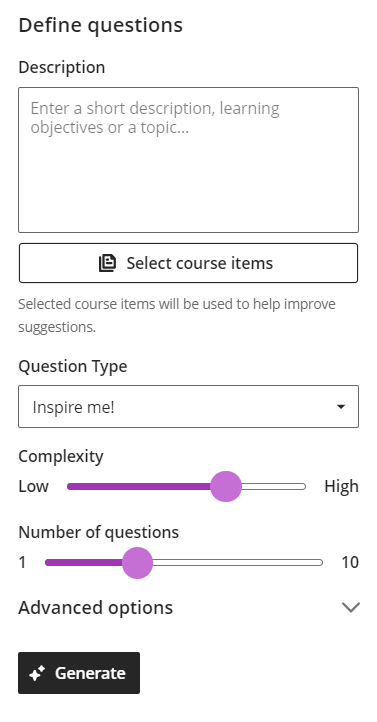
Either route of generating questions automatically will take you to the Auto-Generate canvas. The system will automatically generate a few questions based on the module title, and so you will most likely need to define your questions.
- If you wish, you can supply some in-depth text in the Description box. This could be about the topic you are working on, intended audience and so on. You can type up to 2000 characters in this space.
- By clicking on Select Course Items you can point the tool at existing course items already located in the module. This can be Ms Word documents, Ms PowerPoints, Adobe PDFs as well as Blackboard Documents. You can choose multiple items and spaces in your module. When you have selected all the appropriate items, click on Select Items to continue.
- Under Question Type, you can select the type of question you want the tool to create. At time of writing, this includes Essay, Fill in the Blanks, Matching, Multiple Choice or True/False questions. However, if you want a mix of question types, use the “Inspire Me!” option.
- Adjust the Complexity slider as required. These range from Low to High, representing different education levels with Low being equivalent to Primary School and High being PhD Level.
- Adjust the Number of Questions slider to determine how many questions to generate. At time of writing, this is limited from 1 to 10 questions.
- Under Advanced Options, you can change the language of the questions.
- Click Generate
The Design Assistant will generate your questions according to your requirements. If the questions generated are not appropriate for your needs, you can adjust the settings under Define Questions and click the Generate button again. Select any (or all) of the questions that you wish to use by clicking the check box next to the question. At this stage, you cannot edit the questions, but you can edit then after you have added them to the test (detailed in Step Two below). Click Add to Question Bank button in the bottom right of the screen to continue.
If you selected the Auto-generate option (that is, the option to entirely generate the question bank automatically), you will be taken to the list of Question Banks, with a small pop up indicating a new Question Bank has been created (as per screen shot below). Click on Go To Bank to begin the editing process.
Alternatively, the new bank will be listed with the generic title Generated Bank along with todays date and time. Click on the appropriate generated bank to begin the edit process, as documented below.
If you selected the New option (that is, to manually create questions as well as automatically generate questions), you will automatically be taken to the list of questions, ready for editing.
Step Two – Edit the Title and Questions
It is recommended to rename the Question Bank to something meaningful. Hover your mouse over where it says New Question Bank or Generated Bank (it will vary depending on the route you chose above), and click once on the title. You can now rename it as appropriate. In addition, you can provide a useful description of the bank.
You can then edit the questions if required by clicking the three dots next to each question. It is essential that you thoroughly check the questions for accuracy and bias. Once you have finished editing the questions, you can now deploy the bank as usual.
For more information on deploying bank, please follow this guide: https://eatsupport.tees.ac.uk/staff/knowledgebase/setting-up-question-pools-in-blackboard-ultra/


