Course accessibility report
This guide introduces the Course Accessibility Reporting Tool included within Blackboard Ultra. It also includes an explanation as to what this feature is and why you would use it.
A great feature offered by Blackboard Ally is the course accessibility report. This report allows you to easily view all content for any of the courses you have designed and built or might simply be delivering on. This report includes:
- an overall accessibility score for a course
- a section containing content with easy issues to fix
- a section containing content that is the lowest-scoring
- content organized into categories based on their accessibility issues
The report provides the best way to identify inaccessible content and how to update that content to make it more accessible.
The course accessibility report acts as a complement to the existing accessibility indicators. It provides an accessibility summary and overview at the course level.
To access this report:
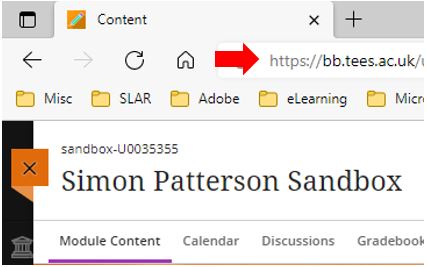
Access Blackboard Ultra (https://bb.tees.ac.uk) and open the specific module to run the accessibility report for.
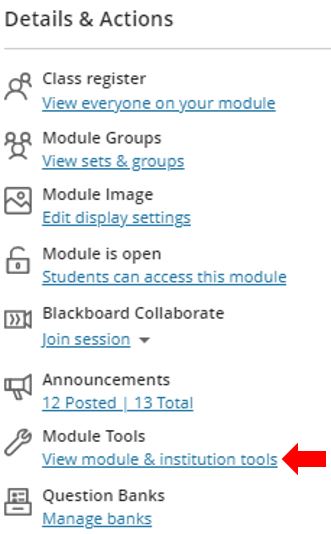
Go to the Module Tools in the Details & Actions menu.
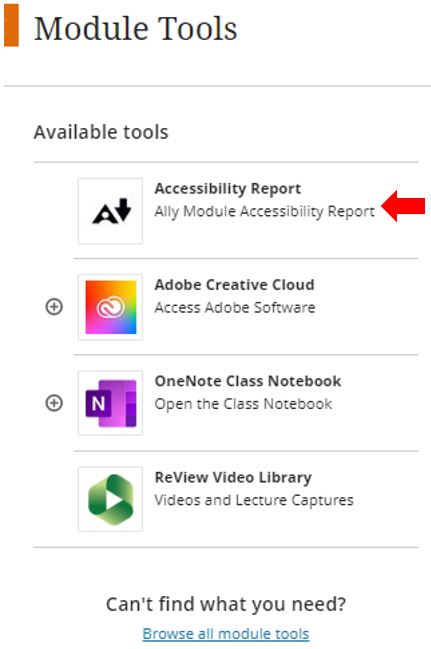
Click the “Accessibility Report” from the list of available tools.
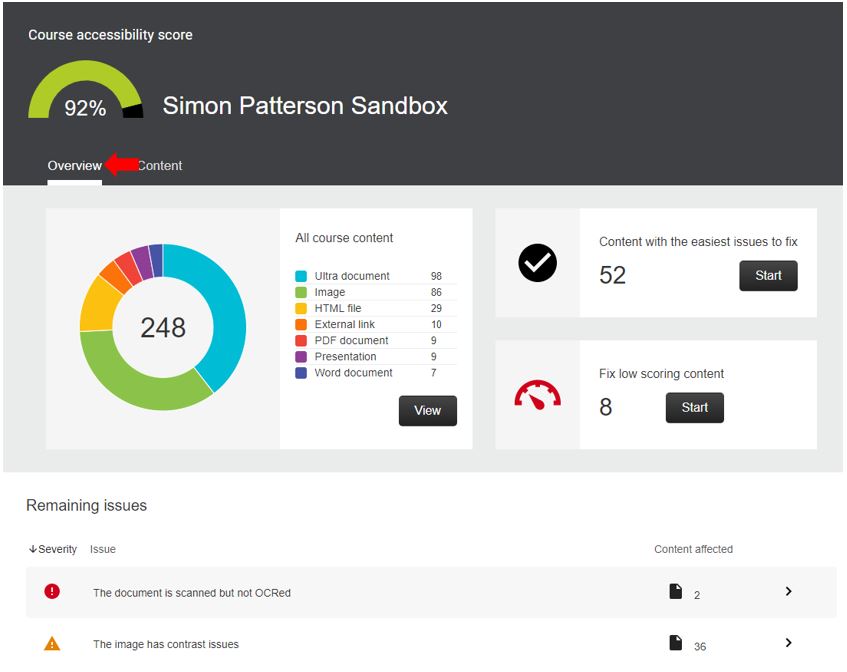
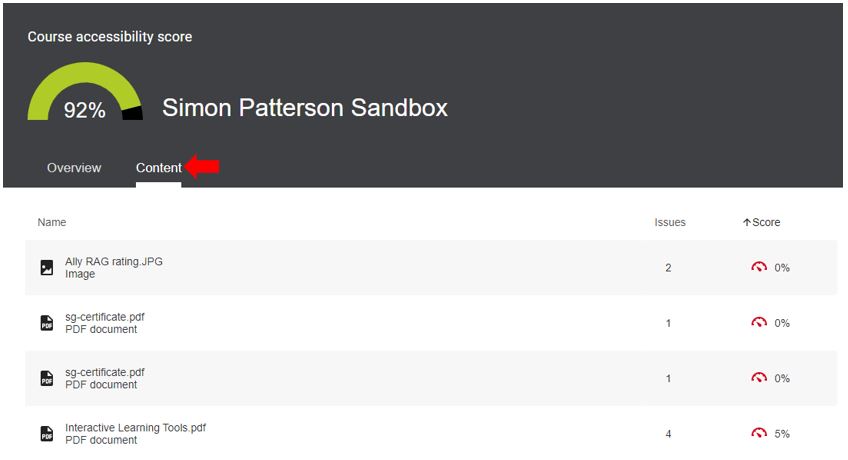
Ally’s course accessibility report includes Overview and Content tabs so that you can get the big picture as well as specific details about the accessibility of your digital course content.
- The Overview tab shows the accessibility score for the course, course content grouped by content type, and a list of all issues identified in the course
- The Content tab shows you the content with accessibility issues.
Accessibility score
At the top of the report is an accessibility score for the entire course. Scores range from Low to Perfect. The higher the score the fewer the issues.
All course content
See all content in your course grouped by content type. Select Start to go to the Content tab and start fixing issues.
Currently, Ally checks files in these formats:
- PDF files
- Microsoft® Word files
- Microsoft® PowerPoint® files
- OpenOffice/LibreOffice files
- Uploaded HTML files
- Image files (JPG, JPEG, GIF, PNG, BMP, TIFF)
- WYSIWYG/VTBE content
- YouTubeTM videos embedded in WYSIWYG/VTBE content
Choose what to fix first
Use the report to help you decide what to fix first. For example, content with the most severe issues first or start with the content that’s easiest to fix.
Choose between Content with the easiest issues to fix and fix low scoring content. See how many pieces of content you’ll be fixing. Select Start.
Remaining issues
Issues are listed in order of priority from severe to minor. Those at the top of the list should be addressed first. Ally looks at the number of students impacted, how often the issue occurs, and the accessibility score to determine the priority.
Select an issue to see all the pieces of content that have that issue. Select a piece of content to open the Instructor Feedback panel to fix the issue.
How to Add an Image Description with Ally
- Select an accessibility score icon
- Click inside of the Image Description text box
- Add an image description
- Select the Add button to save
How to upload a document from the accessibility report
- Select an accessibility score icon
- Select Browse to find a file to upload
- Locate your new file to upload
- Select the Open button to save the new file

