*NOTE This guide was created on the 17th of January 2025. Please note that some features or instructions may differ slightly from the current version due to regular SaaS updates.
This guide introduces the use of Blackboard Ultra Collaborate a synchronous learning environment that provides a real-time virtual classroom environment. Collaborate provides an interactive online teaching and collaboration platform. It offers features including live audio and video, content sharing, breakout rooms and participation management. It includes tools for session recording, engagement tracking and accessibility support.
Contents
- How to access Collaborate?
- What is a course room?
- Creating ‘Collaborate’ sessions.
- How to join a Collaborate session.
- Using Blackboard Collaborate and Blackboard.
- The Collaborate User Interface
- Participants Panel
- Breakout Groups
- Sharing Files Panel
- Preparing a Collaborate session
1. How to access Collaborate?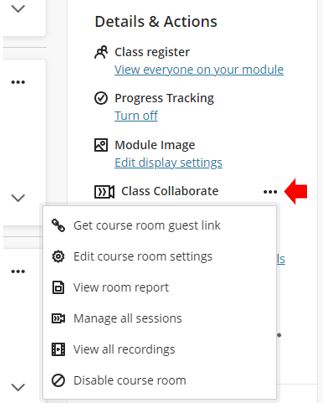
- Open the Blackboard module in question and access Class Collaborate from the Details & Actions menu.
- Next to Class Collaborate, click the more options (three dots …). A new dialogue menu will open. Options here include:
- The course room guest link.
- Edit the course room settings.
- View the course room attendance report.
- Disable the course room.
- View all scheduled sessions and watch recordings.
(These options will be discussed later in the following guidance.
2. What is a Collaborate Course Room?
A Course Room is created and made available (open) by default and linked to each Module in Blackboard. Course rooms provide a convenient starting point for both planned and impromptu lessons. A purple camera icon appears when members of the module enter (join) the Course Room.
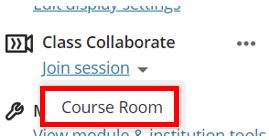
Select Join Session and Course Room to join this default session.
It is possible to disable the course room as it may confuse students if a lot of sessions running concurrently.
- Open the More options from the Collaborate menu by clicking on the three dots …
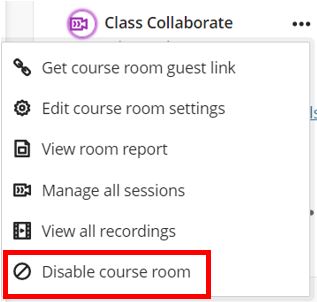
- Select Disable course room to prevent students and other course members from accessing it.
- The Join session link changes to say Room disabled.
You can re-enable the course room from this same menu.
3. Creating ‘Collaborate’ sessions.
Module Leaders can create a real-time (on-the-fly) Collaborate session and/or set up future sessions (for example to be used during the timetabled labs for the coming semester for a module). This type of Collaborate session should be created and joined via the Blackboard module in which the session is planned.
Blackboard Collaborate generates a unique session link to help each session be identified and can be reused multiple times.
To create a session
1. Open the More options (three dots …) on the Collaborate menu.
2. Select Manage all sessions.
3. Click Create a Session.
4. Once the new session has been created, it will need the event details (in the left-hand side panel) configuring.
Event Details Menu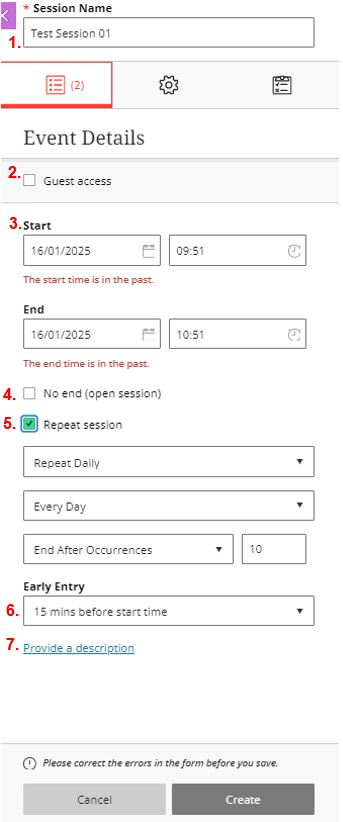
1. Enter a Session Name
2. Tick Guest access if you would like to send a link to a lecturer or guest speaker outside the University.
3. Enter the start date and time and end date and time if the session is planned for the future.
4. Enabling the No end (open session) will allow the session to run for longer (it is important to remember that once complete the session will need to be manually stopped). Note that selecting this option will disable the End at date and Time.
5. Selecting the Repeat session option will expand the configuration options to include:
a. When to repeat the session (daily, weekly or monthly).
b. Frequency of repeating (every day/week/month, every other day/week/month) etc.
c. When to stop the repeating of the session (End after a defined number of occurrences or after a certain date).
6. By default all Collaborate sessions are configured to allow students to enter 15 minutes early however this can be changed to not allow early entry or allow up to 60 minutes early entry.
7. Although not mandatory, it is good practice to describe the session. Click the Provide a description link text to able this feature,
After completing the Event Details continue to configure the Session Settings by clicking on the cog icon.
Session Settings Menu
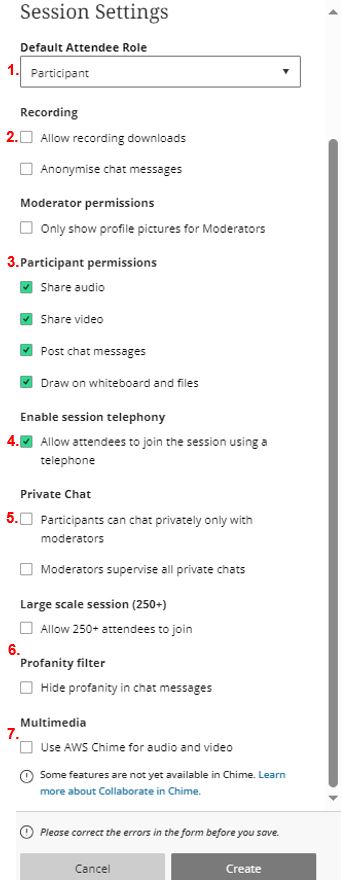 1. Set the Session attendee role (by default it is set to Participant but can be changed to Presenter or Moderator).
2. Tick Allow recording downloads to be able to download and edit session recordings.
3. The participant permissions can be configured to allow attendees to:
a. Share Audio
b. Share Video
c. Post Chat Messages
d. Draw on the whiteboard
These settings can be enabled/disabled during the session.
4. It is possible that students might struggle to join a session if they have a poor internet connection, configure Allow attendees to join the session using a telephone option to allow students to call up a number so can still listen in to the session instead.
5. Turn this setting on or off if you want students to be able to chat with each other privately and if moderators can monitor all private chats.
6. If more than 250 participants will join the session, enable the Allow 250+ option. (maximum number of participants is 500).
7. Click the Profanity filter to block inappropriate words (Module leaders and moderators will see the words).
Click Create to save all session settings.
4. How to join a Collaborate session.
To join a session use the following instructions:
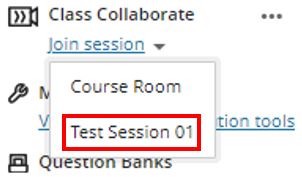
- From the Details & Actions menu select Join session dropdown.
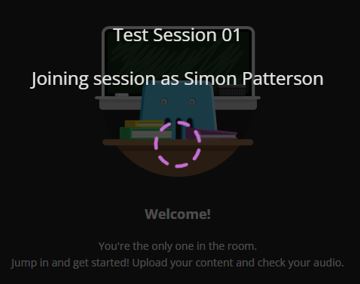
- Select the session to join.
 |
 |
5. Using Blackboard Collaborate and Blackboard.
Blackboard Collaborate and Blackboard Ultra are designed to work together seamlessly, creating a combined experience for both module leaders and students. For example, a student can access course materials in Blackboard Ultra in one browser tab and switch to a live session in Collaborate in another tab. This allows students to transition smoothly between asynchronous learning resources and synchronous live classes, enhancing their overall learning experience.
6. The Collaborate User Interface.
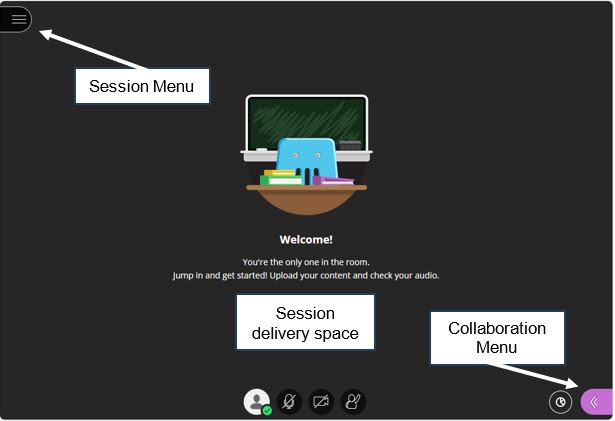
The meeting room layout is made of three sections, the Session menu, Collaborate panel and the media space.
- Session menu: The session menu is located in the upper-left corner and contains the meeting’s technical controls. From here it is possible to start and stop recordings, get help and exit the meeting.
- Collaborate menu: The Collaborate menu is located on the lower-right corner and contains the meeting’s collaboration tools including chatting, view participants, share presentations, view meeting settings and setup camera and microphone configurations.
- Session delivery space: The media space is located at the centre of the screen. It displays session content and contains presentation slide controls, whiteboard tools, and personal camera and microphone controls.
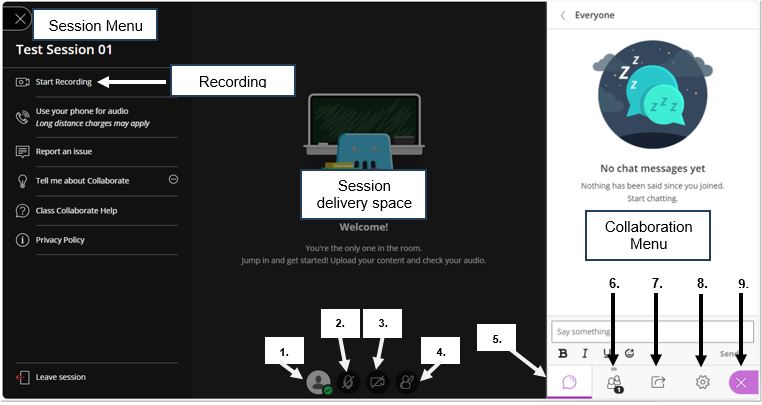
Collaborate meeting room layout (expanded view)
General Session Menu items
- To access the ‘My Status and Settings’ panel: Clicking this will open the Collaborate settings window which can be used to give feedback using emoticons. It will also allow agreeing and disagreeing by clicking on the corresponding button.
- Microphone: Allows you to mute or unmute the microphone.
- Video: Allows you to toggle your camera off and on again.
- Raise/lower Hand: Virtually hand raise so the module leader knows you want to comment or raise a question
Collaborate Menu
- Chat: Chat facility for all or specific participants in the session.
- Participants: Displays a list of all participants in the session.
- Shared Content: Allows presenters or moderators to share content (screens, applications, files). See the Share files below.
- My Settings: Allows you to change Audio/Video and Notification settings
- Close Menu: Closes the Collaborate panel
7. Participants Panel
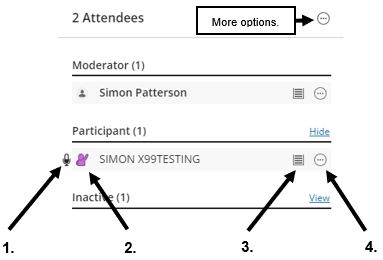
The participants’ panel displays all participants in the session room. There are also options available to change participant rights, change participant roles, and mute one or all participants.
- Microphone on
- Participant hand is up
- Participant connection strength
- The participant controls: Mute, Pin Video, Send a chat message, Make moderator, Make presenter, Make captioner, Lower hand and Remove from the session.
8. Breakout Groups
Collaborate Breakout Groups allow session participants to join groups separate from the main virtual classroom. Participants in the group can chat, share files, collaborate on the whiteboard and video call privately from the main group.
Breakout groups are designed for group collaboration independent from the main session and overall class group. Participants can privately share files, and video call within their group.
Only Moderators can enable and set up Breakout Groups.
To set up and configure breakout Groups use the following instructions:
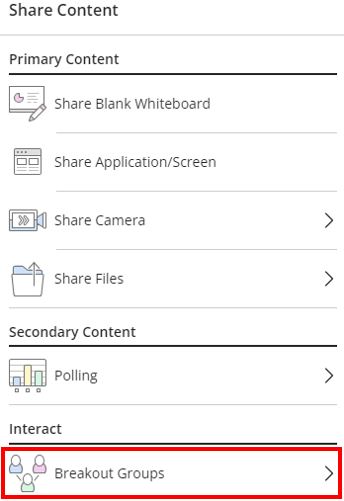
1. Open the Share Content panel from the Collaborate panel
2. Select Breakout Groups
3. Assigning students to Breakout Groups: Moderators can assign groups by using either ‘Randomly assign’ or ‘Custom assignment’.
There is also a box below the dropdown menu that you can check if you want participants to be able to switch groups. If you do not want them to be able to switch groups, do not check the box.
Custom assignment: There are two techniques for assigning session participants to Breakout Groups using the Custom Assignment option.
Randomly Assign: The Randomly Assign in the dropdown menu automatically moves participants into breakout groups.
 It is possible to include the module leader delivering the session and other moderators into the group(s) by checking the Include moderators in group assignment box.
If you would like more than two breakout groups, you can choose a different number from the dropdown menu in the Number of Groups area. When you change the number, the description below will change to tell you how the participants will be grouped.
If not satisfied with group assignments (how participants have been assigned), click the Reassign participants button. This allows participants to be moved to different groups by clicking/dragging them or by clicking on the three dots to the right of their names.
Naming a breakout group: Breakout groups can be assigned different names. Click on the name and type in a new name.
It is also possible to delete a group by clicking on the trash can button to the right of the group name. Any participants in the breakout group you delete will be transferred back to the Main Room.
Creating a new breakout group: Additional breakout groups can also be created. Click on the plus sign (+) in the circle centred over the area with the name.
Accessing breakout groups: Moderators can be assigned to the Main Group or any breakout groups that have been created. Click on the three dots (…) to the right of your name and choose the breakout group from the list that opens or by clicking and dragging your name to the breakout group of your choosing.
Starting the breakout group: Once everything is set up and correctly configured, click the Start button at the bottom of the panel to enable session participants to be automatically moved and start interacting in their assigned breakout groups.
End Breakout Groups: Only Moderators can end the breakout groups and return to the main room. To do this select End.
9. Sharing Files Panel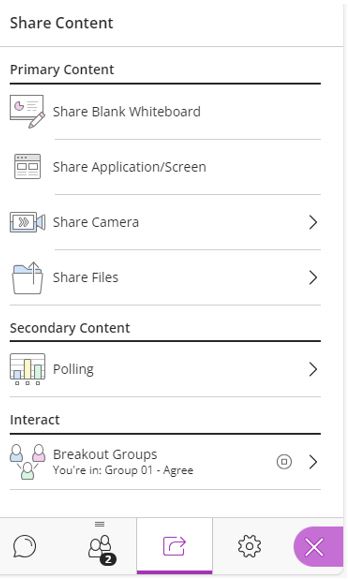
This section provides the facility to share various resources from the Module Leaders system.
It is possible to share:
- A Blank Whiteboard
- A single application (Such as a PowerPoint presentation) or a complete screen (so anything open on that screen will be visible to the session participants).
- Share what is visible through an attached camera.
- Upload, share and use a file such as a Microsoft PowerPoint presentation or a Microsoft Word document activity. The maximum file size to be uploaded is 60MB.
To share a PowerPoint presentation:
- Click the Collaborate menu icon and then click Share.
- Click Share Files.
- Click Add files and navigate to the location of the PPT or PPTX file on your computer. Select the file and click Open. Collaborate will convert the file into a format it can present, click the ‘Share now’ button to complete this process.
The following is an example of a shared presentation in Collaborate. The most useful tools and features have been identified.
10. Preparing a Collaborate session.
Before a session begins, configure the camera and microphone to ensure the visuals and sound are working correctly. Ensure that attendees to the session are provided with the appropriate meeting privileges so that they can participate.
For more information, please contact the Digital Learning Specialist team.
This guide was created on the 17th of January 2025. Please note that due to regular SaaS updates, some features or instructions may differ slightly from the current version.

