
Introduction
This guide will introduce the process of creating custom calculations in the Gradebook. Calculated options in BBU allow you to automatically generate values based on rules, formulas, or data already captured elsewhere in the system. Instead of relying on manual entry, calculated fields ensure consistency, reduce errors, and streamline workflows. This guide provides an overview of how calculated fields work, and the steps to create and manage your own calculations within Blackboard Ultra, with some worked examples to illustrate some common themes.
Set Up
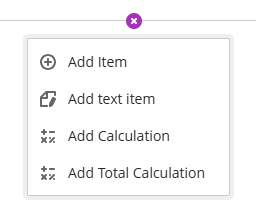 Go into the appropriate module and access the Gradebook from the top menu. Hover your mouse over the space where you want to create the custom calculation and click the plus icon, as shown to the left.
From the small menu that appears, select Add Calculation.
Alternatively, you can get access to the calculation page by creating an Overall Grade and selecting Advance. However, this space will focus on a weighted total and will automatically include some features for running totals and so on.
If you are wanting to focus on creating your own Overall Grade (rather than use Blackboards Overall Grade), select Add Total Calculation.
For the rest of this guide, will will focus on Add Calculation.
When you first select Add Calculation, it will give it a generic name followed by the date you create it. It is recommended you rename this to something more meaningful. In addition, you can add a description of the formula, which may be useful for later reference or for other colleagues enrolled in the module. As with most things in Blackboard, it is created in a “Hidden From Students” state, as indicated in the top right hand corner of the screen.
Begin by deciding on ow you want to display the calculation to the students via the Mark Schema – Points, Percentage or any custom schema you may have created. You can edit this at any time.
Interface
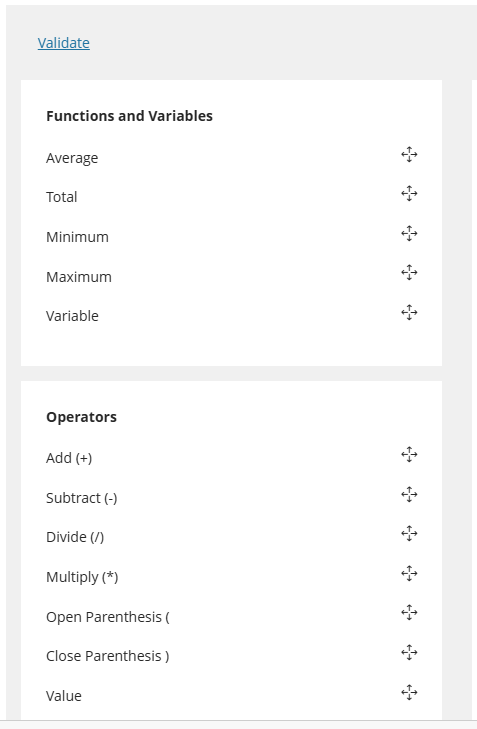 To our left, we can see the general Calculation Interface.
In the top left hand corner, you have the Validate option. When you have created your calculation and click Save, the system will validate it. If for whatever reason your calculation is invalid, you will get a red error message, and the system will attempt to identify where the problem is, allowing you to modify your calculation. If everything is ok, it will display a green tick. You can also click Validate at any time to check your calculation.
Underneath the Validate button you will see two panels: Functions & Variables, and Operators. Under each panel are a list of different options you can use. The system allows you to use any combination of these tools.
Functions and Variables
When you select a specific Function, this will be added to the main interface window. When it is added to the main interface, click it from the main panel to determine the categories and/or individual items to be used as part of the calculation.
Average – this function will return the average of a range of items.
Total – this will add up all the items/categories you select.
Minimum – this function will return the lowest value of all selected categories/items.
Maximum – this will return the highest value of all selected categories/items
Variable – this will allow you to create a calculation using a single item (not category)
Operators
These can be used in conjunction with the Functions and Variables to allow you to develop your own custom calculation. Use the Value operator to include a number (see Example 4 below).
All elements can be moved around the main interface once selected. To remove an element, click the trash can icon.
To help explain how the Functions work, here are some examples of potential items found in the Gradebook. For each item, the category is listed (where appropriate), and a score for one student, Joe Bloggs, is given.
- ICA One (category Assignment). Joe scored 30/100
- Test (category Test). Joe scored 50/100
- ECA One (category Assignment). Joe scored 70/100
- Final Assignment (no Category) Joe scored 50/100
Example 1 – Using the “Average” Function

Explanation: This example uses the Average function, selecting Assignment as category. It would return a result of 50 out of 100 for Joe. This is the Average of ICA (30/100) and ECA (70/100). Test is a different category and Final has no category, so neither are included.
Example 2

Function: This example uses the Total function, selecting Assignment AND ICA AND ECA. It would return a result of 200 out of 400. Selecting the category Assignment would include both the ICA and ECA, and then by selecting the ICA and ECA individually would include them again into the result.
Example 3

Function: This example uses the Minimum function. In the example, all four items have been selected but no categories. This would return 30 out of 100, as ICA is the lowest result.
Example 4
![]()
Operators: Whilst rather complicated looking, this calculation is (ICA*0.6)+(ECA*0.4). In other words, 60% of the ICA and 40% of the ECA giving us a weighted total of the ICA (60%) and ECA (40%). To add the ICA and ECA, we use the “Variable” Function, and to add both the 0.6 and 0.4, we use the “Value” Operator.