
Many assessments will make use of audio, including pre-recorded narration, sound effects, background music, and more. Premiere Rush provides easy-to-master tools for recording and editing audio. Examples of adding Audio include:
- Record narration for a recorded video (without needing to leave Premiere Rush.)
- Refine audio clips (without needing additional software for audio editing.)
Audio clips are edited on the timeline, using many of the same techniques used for editing video clips (the Audio panel provides some tools for refining and enhancing audio clips used in your project, these tools will be explored later in this guide.)
Setting up a new project
Video Guide
- Within Adobe Premier Rush, click Create New Project and enter a Project Name
- Use the storage options to search for the first piece of media you would like to include (As all projects must include at least one piece of media, for audio-only projects, it is suggested to upload a single or multiple image file/s to import to start the project and use as a backdrop during the audio playback, exporting audio-only projects is only available in Adobe Premier Pro).
- Click on the media and it will highlight it in blue and add a number. This will be the first content to appear on the timeline.
- Additional options can be configured by clicking on the Settings Cog (to the right of the Project Name) including; Aspect Ratio, Auto Reframe mismatched clips and Pan & Zoom photos. Audio projects such as podcasts will not require these configuration settings to be altered.
- Click on Create on the bottom right-hand side.
- The preview monitor at the top of the screen shows the point in the clip where the playhead (a tool used to identify your current location on the project timeline) is currently.
Recording a voiceover
Video Guide
Step-by-step instructions
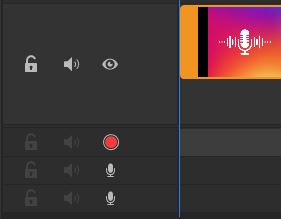
To access the voice recording features of Premier Rush click the View menu and select Track Controls (or via the icon in the bottom left corner of the screen or by pressing Ctrl+T). You can also Sequence menu and select Add and then Voiceover. All of these options will add three audio channels to the timeline.
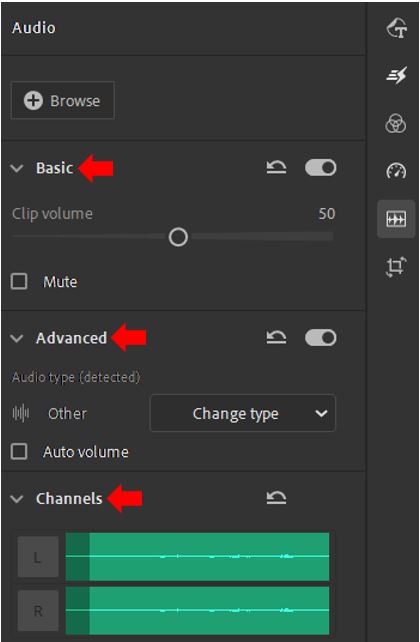
The audio configuration options will be unavailable until you have recorded your first sound clip, these can be accessed via the Audio Menu button ![]() or the keyboard shortcut Ctrl+S. once recorded you can access the Audio menu and configure Basic, Advanced and Channel configuration options.
or the keyboard shortcut Ctrl+S. once recorded you can access the Audio menu and configure Basic, Advanced and Channel configuration options.
To start a voiceover recording, on the first audio track on the timeline click on the microphone icon ![]() which will turn to a red Record button
which will turn to a red Record button ![]() (click again) to start recording.
(click again) to start recording.
After recording a voice clip, it is suggested that it is played back to verify it is suitable, move to the beginning of the timeline and play the complete recording.
Editing recorded audio
After recording audio, the clip can be edited. This includes splitting up a recorded clip into multiple clips, as well as adjusting various sound-related options so the clip sounds its best.
Enhancing recorded audio
Depending on the environment where the voiceover is recorded and the microphone used adjustments to the recording may be required to eliminate background noise or enhance audio quality.
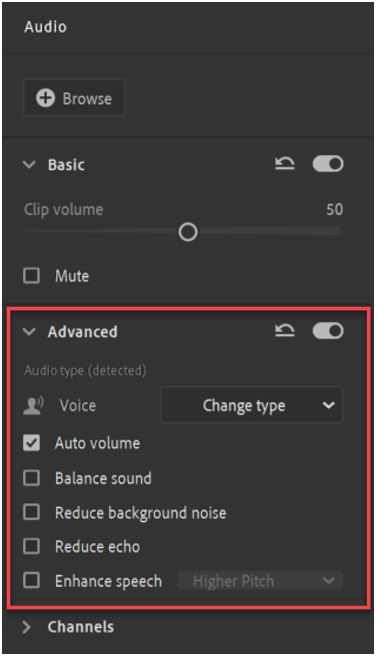
The tools used to do this are in the Advanced section of the Audio panel:
Adobe Premiere Rush automatically detects what type of audio is being worked on and suggests appropriate adjustments.
Setting audio type to voice
1. Select the voiceover clip, in the timeline (If you do not select the audio clip, the Advanced audio options will not be available) open the Audio Panel, in the Panel Dock. ![]()
2. To expand the Advanced options for editing audio, in the Audio Panel.
3. To change the audio type to voice, if necessary, in the Advanced section of the Audio panel. Other advanced audio options can also be experimented with including:
- Auto volume,
- Balanced sound,
- Reduced background noise,
- Reduce echo,
- Enhance Speech,
Splitting an audio clip
Video Guide
Step-by-step instructions
To make a split, on the timeline, press & drag the playhead to the position you want to split the clip.
Open the Clip menu and click the Split button (or use the keyboard shortcut S).
Moving the narration clips into place on the timeline.
To move a clip into position, simply press and drag it into position on the timeline.
Adding pre-recorded audio
To add background music or other audio files to a project, use the Media Browser.
Premiere Rush includes a library of music that is free to use in your projects without crediting the original creator, so for today’s purposes, we’ll be using music from the Soundtracks library in Premiere Rush.
- Navigate to the Soundtracks collection.
- Preview some of the available audio tracks.
- Select and add a piece of audio.
- The inserted audio can be trimmed to the required length.
- Transitions can be added to audio clips so that they fade out.
Ducking background music
When adding background music to a video, for people to better hear any narration, one suggestion is to lower the volume of the background music. This technique is called “Ducking”. Adobe Premiere Rush provides the option to automatically duck music against any clips labelled as voice clips. This option is in the Audio panel.
To set the background music to automatically duck during narration, in the Advanced section of the Audio panel, click the Auto duck checkbox.