
Photoshop is the biggest name in image editing, but it has a reputation as a complicated and difficult app to use. While it’s certainly feature packed, it’s nowhere near as difficult to get the hang of as it first appears. Let’s look at how to learn Photoshop without getting stuck in the weeds.
The number of tools and features is insane and incredibly intimidating, but the reality is you only need to learn a subset of them for each task. If you’re only interested in editing images, you can ignore huge amounts of the things to do with paths, shapes, vectors, and the like (at least initially). Similarly, if you’re interested in design, you don’t need any of the photo specific tools.
Starting your custom workspace
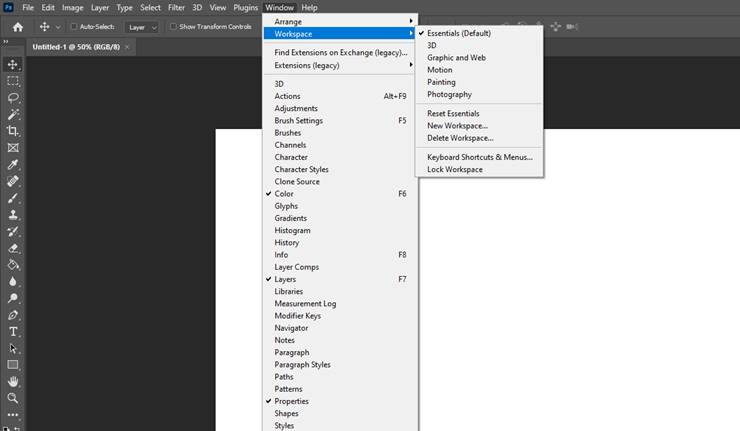
You’re going to want to move your panels and palettes around in an effort to get comfortable with your new install. In this area of your screen, you’ll see various “Workspaces,” which are the various arrangements of said palettes and panels. This can be helpful, because you might want a different arrangement for editing photos than you’ll use if you are also a painter or designer. For now we are going to leave this as ‘Essentials default.’
Customising the Toolbox
The toolbox is where you get all your mouse or cursor-based tools. By default, it is locked to the side of the screen in a panel area. By clicking the ![]() arrow, you can bring up a condensed version in your panel. The
arrow, you can bring up a condensed version in your panel. The ![]() is a toggle, that will switch between the two versions. You can also click and drag the
is a toggle, that will switch between the two versions. You can also click and drag the ![]() to create a “free floating” version of the toolbox.
to create a “free floating” version of the toolbox.
![]()
The aforementioned double column format of the toolbox (below). Now that we’ve identified that we can change the shape of the toolbox, let’s briefly look at what’s available in it

The Options Palette
At the top of your screen, directly under your menus, you’ll see the options palette. When you select different tools, you’ll have the various options you can edit here. Each tool is complex without these options, and can become extremely powerful with knowledge of its options.
![]()
The Toolbox
![]() Rectangular Marquee Tool: Shortcut key
Rectangular Marquee Tool: Shortcut key ![]() . The basic selection tool, marquee, AKA “Marching Ants” allows you to select areas of layers or flattened photographs. Shift + M will cycle through to the various other selection tools, including the ellipse tool. You can hold Shift while drawing marquees to create squares.
. The basic selection tool, marquee, AKA “Marching Ants” allows you to select areas of layers or flattened photographs. Shift + M will cycle through to the various other selection tools, including the ellipse tool. You can hold Shift while drawing marquees to create squares.
![]() Move Tool: Shortcut key
Move Tool: Shortcut key ![]() . The basic move tool. Once you select an area, choose the move tool to move it around. You can also move whole layers without selecting them.
. The basic move tool. Once you select an area, choose the move tool to move it around. You can also move whole layers without selecting them.
![]() Lasso Tool: Shortcut key
Lasso Tool: Shortcut key ![]() . Another selection tool, allows you to draw quick, shaped selections around parts of your image. Shift + L will cycle through the alternate lasso tools, including Polygonal Lasso and Magnetic Lasso tools.
. Another selection tool, allows you to draw quick, shaped selections around parts of your image. Shift + L will cycle through the alternate lasso tools, including Polygonal Lasso and Magnetic Lasso tools.
![]() Quick Selection Tool: Shortcut key
Quick Selection Tool: Shortcut key ![]() . A rough selection tool that works like a paintbrush. Brush around in an area, and Photoshop will read your image and try and guess what you’re trying to select. Press Shift + W to get the indispensable magic wand tool, which is a Bucket Fill or Flood style tool for selections.
. A rough selection tool that works like a paintbrush. Brush around in an area, and Photoshop will read your image and try and guess what you’re trying to select. Press Shift + W to get the indispensable magic wand tool, which is a Bucket Fill or Flood style tool for selections.
![]() Crop Tool: Shortcut key
Crop Tool: Shortcut key ![]() . Draws rectangular selections, then cuts your image down to the rectangle you draw. Very useful for straightening crooked images. Press Shift + C to pick the Slice Tool and Slice Select tools, useful for creating multiple images from a single one, usually for web content.
. Draws rectangular selections, then cuts your image down to the rectangle you draw. Very useful for straightening crooked images. Press Shift + C to pick the Slice Tool and Slice Select tools, useful for creating multiple images from a single one, usually for web content.
![]() Eyedropper Tool: Shortcut key
Eyedropper Tool: Shortcut key ![]() . Picks a colour from any document you have open. Shift + I will cycle through the tools: Colour Sampler, Ruler, and Note Tool.
. Picks a colour from any document you have open. Shift + I will cycle through the tools: Colour Sampler, Ruler, and Note Tool.
![]() Spot Healing Brush Tool: Shortcut key
Spot Healing Brush Tool: Shortcut key ![]() . Useful for erasing blemishes, scratches or unwanted noise from images automatically by painting over them. Press Shift + J to find the Healing Brush, Patch Tool, and Red Eye tools
. Useful for erasing blemishes, scratches or unwanted noise from images automatically by painting over them. Press Shift + J to find the Healing Brush, Patch Tool, and Red Eye tools
![]() Brush Tool: Shortcut key
Brush Tool: Shortcut key ![]() . The single most complex tool in the toolbox. Many articles on the brush tool to come, but for now, paint with left mouse clicks, and select different brush styles with right mouse clicks. Shift + B cycles through to the Pencil, Colour Replacement Tool, and Mixer Brushes, all worth experimentation.
. The single most complex tool in the toolbox. Many articles on the brush tool to come, but for now, paint with left mouse clicks, and select different brush styles with right mouse clicks. Shift + B cycles through to the Pencil, Colour Replacement Tool, and Mixer Brushes, all worth experimentation.
![]() Clone Stamp Tool: Shortcut key
Clone Stamp Tool: Shortcut key ![]() . Another photo-editing brush, Alt and Click to set a “Source” and then paint with the Left mouse button to copy from your source. Shift + S also gives you the pattern stamp tool.
. Another photo-editing brush, Alt and Click to set a “Source” and then paint with the Left mouse button to copy from your source. Shift + S also gives you the pattern stamp tool.
![]() History Brush Tool: Shortcut key
History Brush Tool: Shortcut key ![]() . Working in tandem with your History Palette, you can paint “back in time,” so to speak. Use a filter, then selectively undo parts of it with the History Brush. The Art History Brush is buried underneath here, accessible with a Shift + Y.
. Working in tandem with your History Palette, you can paint “back in time,” so to speak. Use a filter, then selectively undo parts of it with the History Brush. The Art History Brush is buried underneath here, accessible with a Shift + Y.
![]() Eraser Tool: Shortcut key
Eraser Tool: Shortcut key ![]() . Erases layers to transparency, and locked or Background Layers down to the Background Colour. Shift + E will cycle through the Magic Eraser and the Background Eraser tool.
. Erases layers to transparency, and locked or Background Layers down to the Background Colour. Shift + E will cycle through the Magic Eraser and the Background Eraser tool.
![]() Gradient Tool: Shortcut key
Gradient Tool: Shortcut key ![]() . Clicking and dragging will fill your layer with a basic gradient using your foreground and background tools. The options palette has a lot of different gradients to use. Hidden under the Gradient Tool is the Paint Bucket Tool. Shift + G will cycle through to it. Use the Paint Bucket to fill areas of similar colour in your image.
. Clicking and dragging will fill your layer with a basic gradient using your foreground and background tools. The options palette has a lot of different gradients to use. Hidden under the Gradient Tool is the Paint Bucket Tool. Shift + G will cycle through to it. Use the Paint Bucket to fill areas of similar colour in your image.
![]() Blur, Sharpen, and Smudge Tools: By default, no shortcut key. These are three photo editing tools that do exactly what they say. Smudge, in particular, can create excellent painterly effects in your images. Left click and hold to bring up the contextual menu and pick the “buried” Sharpen and Smudge tools.
Blur, Sharpen, and Smudge Tools: By default, no shortcut key. These are three photo editing tools that do exactly what they say. Smudge, in particular, can create excellent painterly effects in your images. Left click and hold to bring up the contextual menu and pick the “buried” Sharpen and Smudge tools.
![]() Dodge and Burn Tools: Shortcut key
Dodge and Burn Tools: Shortcut key ![]() . Dodge and Burn are photo editing tools that lighten and darken images, respectively. This tool is not the zoom tool, as confusing as it may look. Shift + O cycles between the two of them.
. Dodge and Burn are photo editing tools that lighten and darken images, respectively. This tool is not the zoom tool, as confusing as it may look. Shift + O cycles between the two of them.
![]() Pen Tool: Shortcut key
Pen Tool: Shortcut key ![]() . A nightmarish frustration for beginner users, the Pen Tool is tough to get used to, but a favourite of Photoshop Pros. Similar to the Pen Tool in Adobe Illustrator, works in tandem with the Paths Palette. Shift + P will give you alternate Pen tools related to working with paths.
. A nightmarish frustration for beginner users, the Pen Tool is tough to get used to, but a favourite of Photoshop Pros. Similar to the Pen Tool in Adobe Illustrator, works in tandem with the Paths Palette. Shift + P will give you alternate Pen tools related to working with paths.
![]() Type Tool: Shortcut key
Type Tool: Shortcut key ![]() . Allows you to set typography, by default horizontally. Shift + T will give you the Vertical Type Tool, as well as the Type Mask Tools.
. Allows you to set typography, by default horizontally. Shift + T will give you the Vertical Type Tool, as well as the Type Mask Tools.
![]() Path Selection and Direct Selection Tools: Shortcut key
Path Selection and Direct Selection Tools: Shortcut key ![]() . More tools made for editing paths in the path palette. Ignore unless you’re trying to learn the Pen Tool. Path selection picks whole paths, while Direct Selection picks line segments or points within paths. Cycle with Shift + A.
. More tools made for editing paths in the path palette. Ignore unless you’re trying to learn the Pen Tool. Path selection picks whole paths, while Direct Selection picks line segments or points within paths. Cycle with Shift + A.
![]() Custom Shape Tool: Shortcut key
Custom Shape Tool: Shortcut key ![]() . Bizarre tool for creating clipart type vector shapes from a library in the options palette. Shift + U will also give you the more helpful tools for rectangles, polygons, and lines, all helpful for learning paths in Photoshop without suffering through the pen tool.
. Bizarre tool for creating clipart type vector shapes from a library in the options palette. Shift + U will also give you the more helpful tools for rectangles, polygons, and lines, all helpful for learning paths in Photoshop without suffering through the pen tool.
![]() Zoom Tool: Shortcut key
Zoom Tool: Shortcut key ![]() . Yes, this is the real zoom tool and not the Dodge tool. Zoom in with left clicks, zoom out with ALT plus Left Clicks. This is likely the most basic tool in the toolbox.
. Yes, this is the real zoom tool and not the Dodge tool. Zoom in with left clicks, zoom out with ALT plus Left Clicks. This is likely the most basic tool in the toolbox.
![]() Hand Tool: Shortcut key
Hand Tool: Shortcut key ![]() . Scrolls your document without using the scroll wheel or scroll arrows. Press and hold the Space Bar at any time to use the quick Hand Tool, release Space to return to your previous tool.
. Scrolls your document without using the scroll wheel or scroll arrows. Press and hold the Space Bar at any time to use the quick Hand Tool, release Space to return to your previous tool.
 Background/Foreground: The active colours you are painting with. The top colour is Foreground, the back Background.
 ![]() swaps the two colours.
swaps the two colours. ![]() reverts them to the default colours, black and white.
reverts them to the default colours, black and white.
![]() Quick Mask Mode: Shortcut key
Quick Mask Mode: Shortcut key ![]() . An alternate mode for creating complex selections with the Brush, Eraser, and Paint Bucket tools. The Q key toggles to and from Quick Mask Mode.
. An alternate mode for creating complex selections with the Brush, Eraser, and Paint Bucket tools. The Q key toggles to and from Quick Mask Mode.