This guide has been produced to support staff when working with Adobe InDesign who want to share content. As well as this comprehensive guide, there is also an embedded video that demonstrates these techniques.
Video Tutorial
This video tutorial demonstrates the techniques described within this guide relating to sharing projects with other users within Adobe InDesign.
Share your InDesign Files
Share your documents with others using the Package command. If you need to send an InDesign file to someone, for example, so they can work on the document or print it. Certain things need to be sent along with the InDesign file including, linked graphics and fonts.
In this section of the guide, you will be introduced to:
- The package command to create a folder with a copy of the InDesign document, along with the necessary fonts and linked graphics
As covered previously, if you place graphics into your InDesign project, by default they are linked to an original graphics file outside of InDesign. You will need to send any linked graphics files along with the document. To see all the linked graphics in an open document, you can open the Links panel by choosing the Window menu and selecting Links. From here, you can see any graphics used in your document listed in the Links panel. In the example, there is only one in this document.
If you apply a font to text that another user might not have installed on their system, you will need to send a copy of the font file along with the InDesign file. You won’t need to send any Adobe fonts since users who open the InDesign file will be asked to synchronise those fonts directly from Adobe.
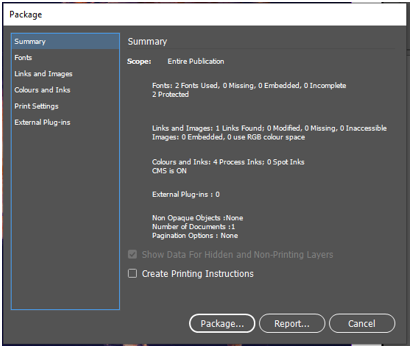
To package this example project which uses Adobe fonts in the linked image, from the File menu, select Package (or Ctrl + Shift + P). When you package a file using the Package command, InDesign creates a folder that contains a copy of the InDesign document, any necessary fonts, linked graphics, and a few other things. In the package dialogue box, there is a summary of the fonts used, linked images, colours and inks and external plugins. If there are any issues with the document or its packaging, it would show them here. If there are issues listed these need to be resolved before clicking the Package button.
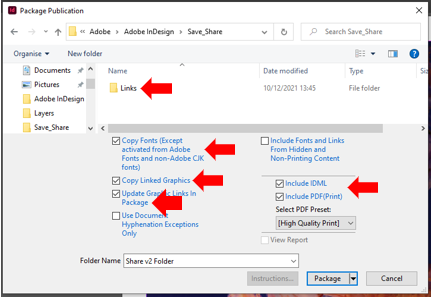
Once this button has been clicked, you can choose where the folder can be created, for example, your Teesside University OneDrive, HOMESPACE U drive etc. You can also change the name of the folder from the Folder Name text box. All the links in the document will be found and copied into the folder that InDesign creates. Any fonts used in the document will also be copied and placed in the folder except Adobe fonts. When another user opens this file using Adobe InDesign, they will be prompted to sync any Adobe font used. Graphics used in the InDesign file will also link to the newly copied graphics files in the newly created folder. The IDML file is also created which allowed for backward compatibility with previous versions of Adobe InDesign. Finally, a PDF document will also be created for printing or to show what the InDesign document should look like. Clicking Package and Ok will create the above discussed packaged output. You may receive a warning message informing you restrictions that might exist within Teesside University (or any organisation) relating to copyright law and compliance to it, you can click the Don’t show again and then click OK.

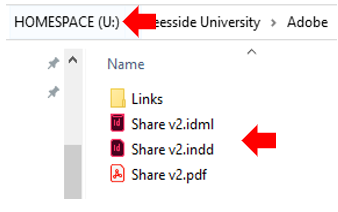
After the package is created, you can open the newly created folder. The folder will include:
- A copy of the InDesign document
- The links
- Any fonts (external and not Adobe stock)
- The IDML file
- The PDF
Sending this folder and its contents will ensure that the recipient receives all the content required to view, edit, or print the InDesign project. This is also a good way of collecting all of the files associated with a particular project.
Export as a PDF
Learn how to save your InDesign document as a PDF for sharing and printing.
If you need to send someone your InDesign project you can send them the InDesign file as well as all the dependant files like fonts and images. You can also export the InDesign document as a PDF file.
The PDF file will look like the original InDesign document and used (if saved properly) to print the InDesign project. The person you send the PDF document to will only need a free PDF viewer to view it.
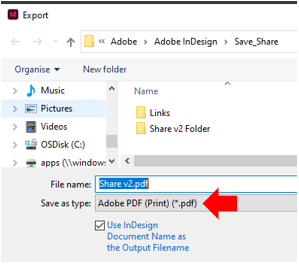
To save this document as a PDF file, open the File menu and select Export (or Ctrl+E). In the export dialogue box, choose a location to save the file. Click the Format menu to see a listing of export formats. By default, there are two PDF options, these include Print and Interactive. An interactive PDF preserves any interactivity such as Buttons and Links in a document. As the example is a static poster, the Adobe PDF (Print) option can be used (you can also change the name if required). Click Save to commit this save command.
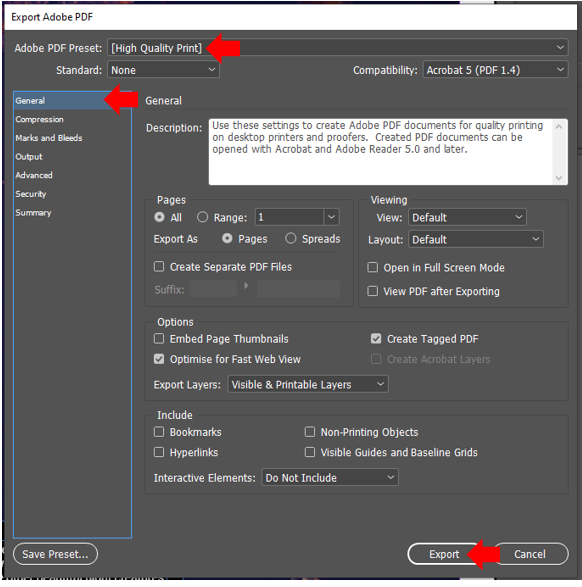
In the export Adobe PDF dialogue box that appears, start by choosing a pre-set quality depending on what your PDF is for. High Quality print will create a PDF you can print using a high-quality printer. Smallest File Size will optimize the document so it can be more eaily displayed on a website or attached to an email.
There is also several categories listed on the left that allow the export to be further customised however for basic export needs none of these advanced options will ne necessary. Click the Export button to export the InDesign project as a PDF.
Knowing which options to select when you export your InDesign files to PDF enables you to generate PDFs that are suitable for different uses including viewing, printing, commenting and more.