
Introduction
Learn the basics of editing content in Adobe InDesign, including how to create and edit frames, transform content, align, group content, work with guides, and more.
Create and edit frames for graphic elements
Frames in Adobe InDesign are an essential part of page layout. As well as holding graphics and text, frames can act as graphics elements. In this part of the guide, we will look at:
- Creating a frame using the frame tools
- Round the corners
- Apply a colour fill
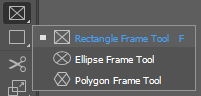 There are several different shapes that you can create, in the Tools panel on the left, press and hold down to reveal the sub menu to show the three different frame shapes available, these include: Rectangle, Ellipse and Polygon. These tools are used to create unassigned frames or frames that are also graphic design elements such as a colour box behind text that might be used to improve readability.
 Select the rectangle tool and come out into the page. You will create a frame with a colour that will go behind the text. Remember that holding the Shift key will maintain the proportions of the shape being created.
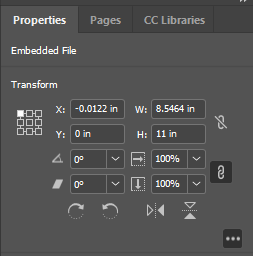
If you need to resize a frame to a specific size, with the frame selected the Properties panel will allow you to reconfigure the specific shape of the object. Change W: (Width) to 3.3in and H: (Height) to 1.6in.

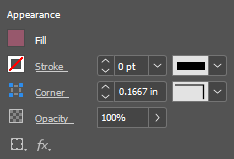 Frames created using this tool by default have their fill colour set to No Fill. Under Appearance in the Properties menu click the Fill icon and on the Swatches option, select a colour and apply it.
Shapes drawn with the Shapes tools by default have a Stroke (border) weight and colour applied by default. To remove the stroke set the weight value to zero.
Content can be arranged on a page based on a Stacking order.
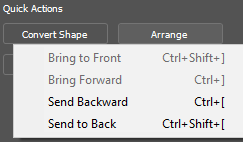 With the shape selected, under the Properties menu and Quick Actions click the Arrange button. Select the Send Backward option to move the coloured shape backward and behind the next object in the stacking order. You can then move the frame into position by using the Selection tool and drag the frame, so it is centred over the text.
 To round the corners of the shape (with the shape still selected), click the yellow box selected in the righthand of the shape, four yellow corner diamonds will appear. Drag the yellow cover to the left to round the corners. If you ever need to remove the rounded corners, just drag any of the yellow anchors back to the original corner position (this change will impact all corners of the object).
 You can also adjust the properties for the rounded corners in the Properties panel by a specific value. For example, if you need the corner radius to be a specific value you can control this specific value by updating the Corner value in the Appearance section of the Properties menu. Using this menu option, you can also choose other corner styles such as Fancy, Bevel and Inverse Rounded. Using this Corner value option will also allow you to be consistent across multiple shapes on a page if applying rounded corners to multiple objects. If you only want to apply corner changes to specific corners you can click on the Make All Settings the Same button and then select each specific corner and apply the specific value. The image shows changes being made to the bottom left-hand corner.
Rotate, flip, lock, and hide content
Content can be transformed using the Selection tool, Properties panel, and Transform tools.
Once frames have been created there are several different transformations that can be applied to them. In this part of the guide, we will look at:
- Rotating and flipping frame
- Locking and hiding content
 Transformations that can be applied to content can be found in Properties panel to the right of the document or the Transform panel located under the Window menu and Object and Layout.
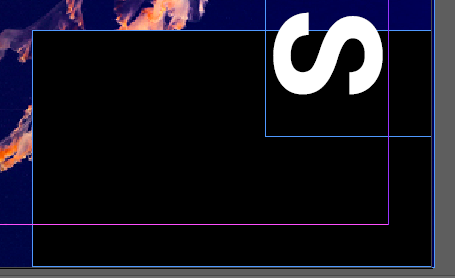
Use the Selection tool, select the background image, make sure not to select the Content Grabber as this will select the image rather than the content frame. In the Properties panel there are several options for transforming the content. More transforming options can be access by clicking the three dots in the bottom right of this section of the Properties panel.
Each of the points that are shown in the grid, represents a point on the selected frame. For example, the top left corner of the grid is the top left corner of the selected frame. By selecting the centre box in the grid it means that any transformational changes that are applied will be around the centre of the object. For example if you click on the Flip option now, the entire image will now flip from the central point.
 To rotate text, move the cursor just off the outside corner edge of the frame and a rotate arrow icon will appear. You can now move the mouse cursor up and down to alter the angle around the centre pivot (as you drag to change the angle a degrees percentage value will be displayed. Holding down the Shift key during the dragging will constrain the angle at 45° intervals.
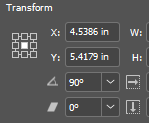
You can also use the Properties panel to enter a specific numeric value of degrees to rotate content. Setting it to zero will reset the rotate angle to its original position.
 Set the angle of rotation to 90° and move the text to the righthand side of the document. Once you are happy with the location of the text on the document you can lock it into position so that it cannot be mistakenly moved, resized or deleted in the future. Open the Object menu and select Lock or simply press Ctrl+L. The text now shows a lock icon in the top righthand corner of the frame to show that it is locked. If in the future you do need to make this content editable you will need to open the Object menu and select the Unlock all on Spread or Ctrl+Alt+L, this will unlock ALL locked content on the document. If you want to unlock just one item you can simply click on the padlock icon.
 When working on a document with multiple content it can sometimes be helpful to temporarily hide content to allow you to work in a simplified workspace. Use the Selection tool to select the text. From the Object menu, select the Hide option to temporarily hide the text. Once the changes have been made to the black shape, to unhide the text you will need to open the Object menu and select the Unlock all on Spread or Ctrl+Alt+L.
Align and group content
Aligning content with the Align panel and working with groups of content. In Adobe InDesign you may need to align objects to each other, for example to create a row or aligned images or you may want to keep objects together by creating a group.
In this part of the guide, we will look at:
- Align content with Smart Guides
- Group content and work with Groups
- Align content with the Align options
Use the Zoom feature to zoom in over the section of the document that includes the image of the spoon.
![]() As you move content, Smart Guides can help you align content and appear as temporary Snap-to guides. These Smart Guides are turned on by default and when nothing is selected can be found in the Properties panel under Guides. These guidelines inform you that you are now inline with these other objects.
As you move content, Smart Guides can help you align content and appear as temporary Snap-to guides. These Smart Guides are turned on by default and when nothing is selected can be found in the Properties panel under Guides. These guidelines inform you that you are now inline with these other objects.
 Now that the textbox and the red line are level it would be useful if these two pieces of content were grouped so if moved again, they will maintain the current alignment. To select multiple objects, you can press and hold the left mouse cursor and drag over the objects (this can sometimes select additional unwanted content, press the Shift key, and click the unwanted content to remove it from the selection). An easier way of selection multiple objects is to hold down the Shift key and click the objects you want in the group. To keep the objects together click the Group button at the bottom of the Properties panel. The content items are now grouped and treated like a single item. You can ungroup items using the same process (via the now updated Ungroup button).
 To align multiple objects, select all required content and then select one of the alignment options such as Align Left Edges.
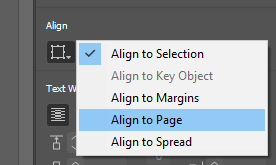 Open the View menu and click on the Fit Page to Window (or Ctrl+0). The background image needs to be aligned. Click to select the image, Properties panel and select the Align To menu and choose Align to Page so that the image aligns to the page and not to other objects or click the Align Horizontal Centre so that the image aligns to the horizontal centre of the page.