
This guide has been produced to inform staff on how to share & review documents in Adobe Acrobat DC. As well as this comprehensive guide, there is also an embedded video included at the end of the document that demonstrates some of these techniques.

Share:
Adobe Acrobat makes collecting feedback easy, here’s how to send your team a link and capture all their comments in one place. No more sending multiple email attachments or manually reconciling feedback.
- One email. One link: Make it easy for everyone. Send one email with one link to multiple reviewers. They’ll all have access to annotate the same PDF document wherever they are, on any device.
- Every comment in a single PDF: The easy-to-use commenting tools in Acrobat make teamwork and file sharing more efficient than ever. Reviewers can quickly leave comments, add @mentions, or search a document, all in the same online PDF.
- On any screen: Anyone can review and comment on your file from anywhere and in any browser, like Google Chrome. No sign-ups, sign-ins, or software is required.
- One way to manage everything: Track progress and get real-time updates when files have been opened or comments have been added. You can even send reminders, update deadlines, or close workflows with Acrobat document management.
Send for Comments:
You can automatically collect everyone’s comments in a single file. Track progress and even consolidate those comments.
Click here for more information.
Comment:
You can add comments to a PDF with highlights, sticky notes, a freehand drawing tool and mark-up tools.
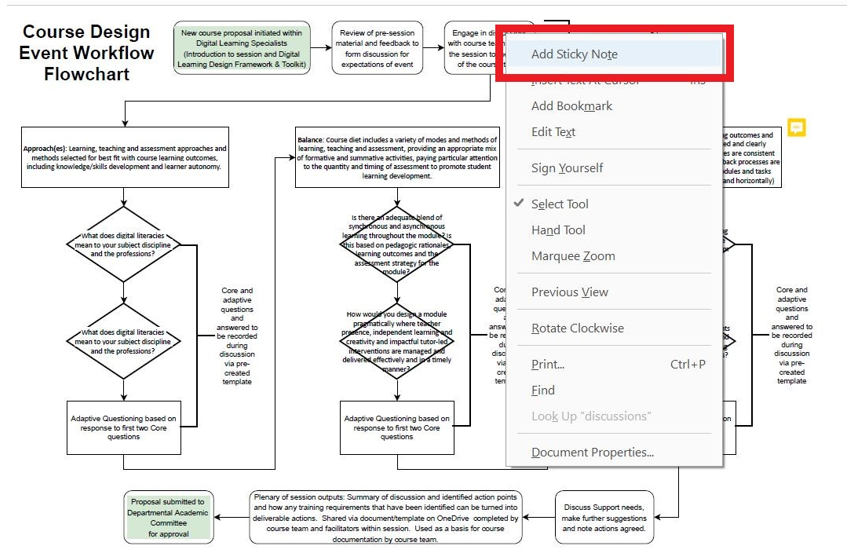
To add comments to a document, open the Comment tool and click the Add sticky note, drag to the location on the PDF you wish to add the comment.
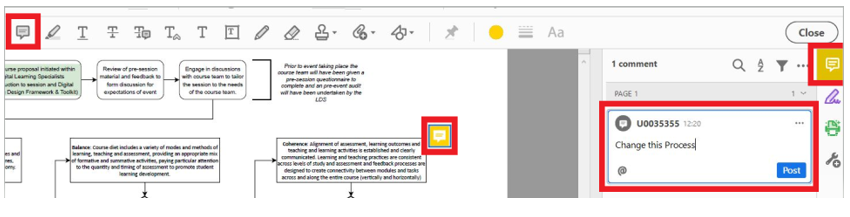
You can also select and right click on a selection of text to add a sticky note.
There is also a keyboard shortcut that can be used to add a comment. Press Control (Ctrl) and Six (6) at the same time to launch the comment functionality.
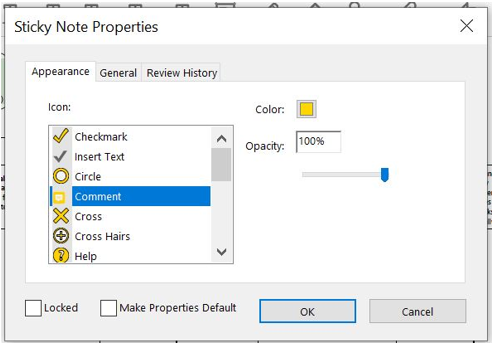
There are several configurable options associated with these comments. For example, if you right click on a comment you have added to your document and select Properties, you can change the icon being used to identify the comments, its colour and also its opacity. Using the other tabs in this menu, you can check or modify the author of the comment, change the subject name of the comment, lock the comment and review the history of changes made to the comment.
There are a variety of other commenting options available in this section of adobe that should be explored.

Click here for more information:
Stamp:
You apply a stamp to a PDF in much the same way you apply a rubber stamp to a paper document. You can choose from a list of predefined stamps, or you can create your own stamps. Dynamic stamps obtain information from your computer and from the Identity panel of the Preferences dialog box, allowing you to indicate name, date, and time information on the stamp.
Open the Stamps palette
- Choose Tools > Stamp > Stamps Palette.
- Choose Tools > Comment > Stamps > Show Stamps Palette.
Apply a stamp
Select a stamp by doing one of the following:
- Click the Stamp The most recently used stamp is selected.
- In the Stamps Palette, choose a category from the menu, and then select a stamp.
- Click the document page where you want to place the stamp, or drag a rectangle to define the size and placement of the stamp
- If you haven’t provided a name in the Identity preferences, the Identity Setup dialog box prompts you to do so.
Change a stamp’s location or appearance
Using the Select tool or the Hand tool, do any of the following:
- To move a stamp, drag it to a new location.
- To resize a stamp, click it, and then drag a corner handle.
- To rotate a stamp, click it, move the pointer over the handle at the top of the stamp, and drag when the rotate stamp icon appears.
- To delete a stamp, right-click the stamp and choose Delete.
- To change the stamp’s opacity or the colour of its pop-up note, right-click the stamp, and choose Properties. In the Appearance tab, set the opacity or colour.
Move a stamp to the favourites list
- Using the Select tool or the Hand tool, select a stamp markup on the page.
- In the secondary toolbar of the Comment tool, click the Stamp tool and choose Add Current Stamp to Favourites.
Create a custom stamp
You can create custom stamps from several different formats, including (but not limited to) PDF, JPEG, bitmap, Adobe® Illustrator® (AI), Adobe® Photoshop® (PSD), and Autodesk AutoCAD (DWT, DWG) files.
- Open the Stamps Palette by doing one of the following:
- Choose Tools > Stamp > Stamps Palette.
- Choose Tools > Comment > Stamps > Show Stamps Palette.
- Click Import and select the file.
- If the file has more than one page, scroll to the page you want, and then click OK.
- Choose a category from the menu or type a new category name, name the custom stamp, and then click OK.
Click here for more information.
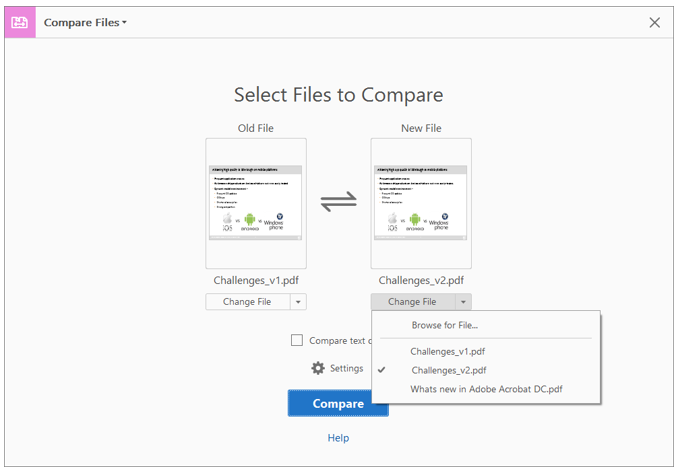
Compare Files:
This feature can be used to quickly pinpoint changes by comparing two versions of a PDF file. Acrobat analyses the files and presents a report detailing differences between the documents.
To compare files, do the following:
- Choose Tools > Compare Files.
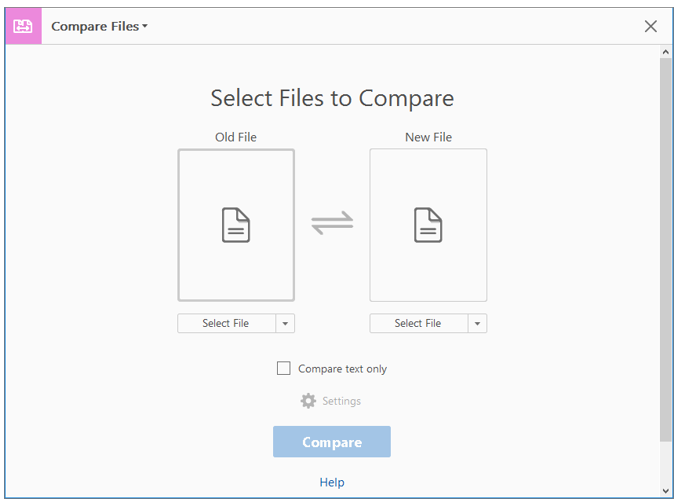
- Click Select File on the left to choose the older file version you want to compare. Click Select File on the right to choose the newer file version you want to compare.
- Click Change File and then choose an already opened file or browse to select your desired file. Click the Swap arrows icon between the thumbnails to swap the position of the old and new files.
- To ignore differences between the graphic elements, select the Compare Text Only checkbox.
- You can modify settings by clicking the Settings gear icon, which opens the following dialog box.
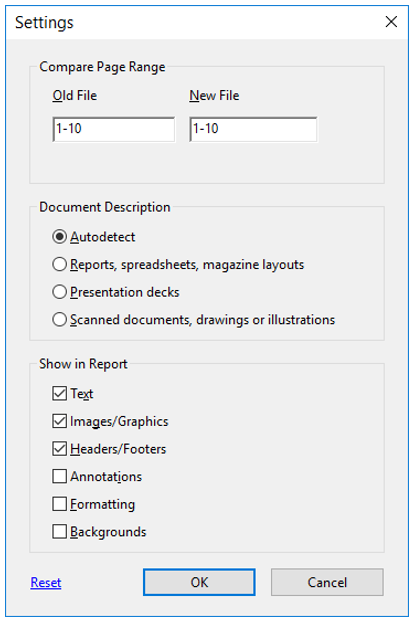
- You can limit the comparison to a portion of the documents by entering the page numbers in the Old File and New File
- Under Document Description, select the type of documents that you are comparing.
- Select Autodetect to let Acrobat decide.
- Reports, Spreadsheets, Magazine Layouts: Compares the content as one continuous text body, from end to end.
- Presentation Decks: Looks at each slide or page as a mini-document and matches ones that are similar. Then compares the content of each matching document. Identifies documents that have moved, such as slides in a presentation.
- Scanned Documents, drawings or illustrations Creates an image capture of each scanned page and compares pixels. Looks at each scanned page and matches ones that are similar. It also identifies pages that are in a different order. This option is useful for comparing images or architectural drawings.
Tip: If your document content can reflow across pages, select reports, spreadsheets, magazines layouts; otherwise select Presentation Decks. For comparing scanned files, select Scanned documents, drawings or illustrations.
- With either the reports or presentation options selected, the Compare Text Only option identifies only the text differences between two documents.
- With Scanned Documents selected, the text is compared separately from the graphics, and then the results are combined. In documents containing magazine advertisements that have text on top of background image art, a reflowed passage is compared in text-only mode. The artwork is compared separately in the background. The differences (both text and line art and images) are combined into a single results document.
- Show in Report, select the elements of the documents for which you want to see the differences in the compare report.
Note: The text option can be used with any document type. It is designed for comparing text in large documents (250 pages or more). It also compares text between documents that have background artwork on each page, which slows processing.
- Click OK.
- Click Compare.
Acrobat displays the results in a new document. The first page provides an easy-to-scan summary of all file differences.

a – Comparison timestamp
b – Compared files information
c – Total changes
d – Distribution of changes
e – Formatting changes
f – The hyperlink to take you to the first change
- Click the Go to First Change button to begin reviewing each difference in detail.
- Select how you want to review the differences.
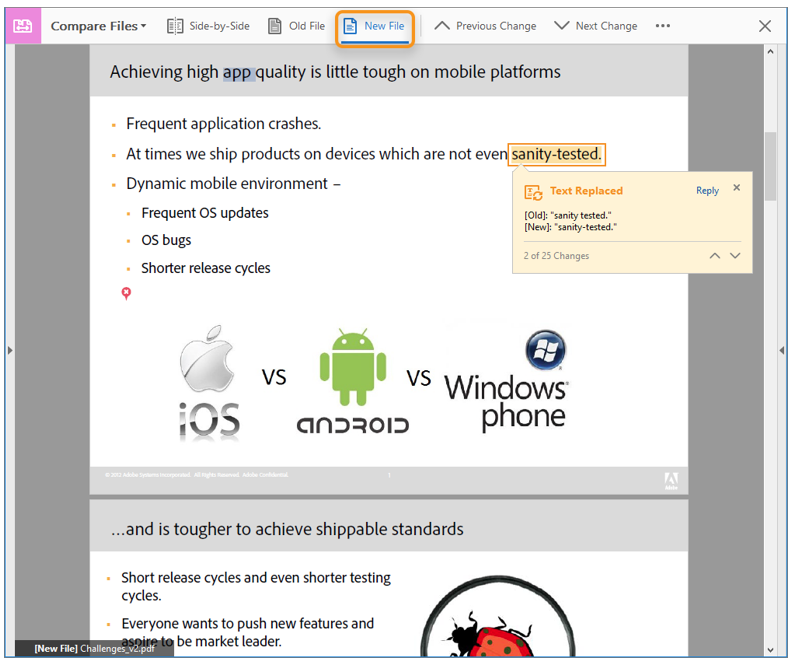
- Side-by-side view: Use the Side-by-Side (Ctrl+\) view to see a parallel view of results where the differences are shared in highlighted bands. The old file is displayed on the left and the new file is displayed on the right, with the changes highlighted in each band connecting across the files for easier review. Click a band to display a pop-up note detailing all of the changes within the band. You can also click the highlighted content to open the pop-up.
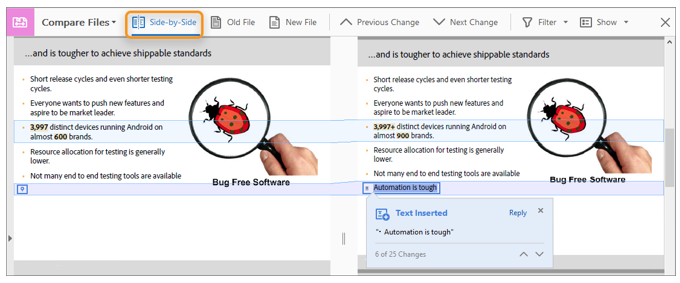
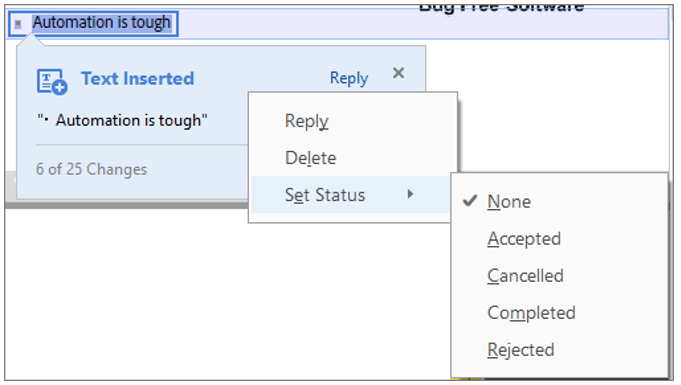
Right-click a change or its pop-up and set an appropriate status for the change.
- Single page view: Use the Old File or New File button (Ctrl+/) on the toolbar to see the individual file with all changes highlighted.
- To review all the changes:
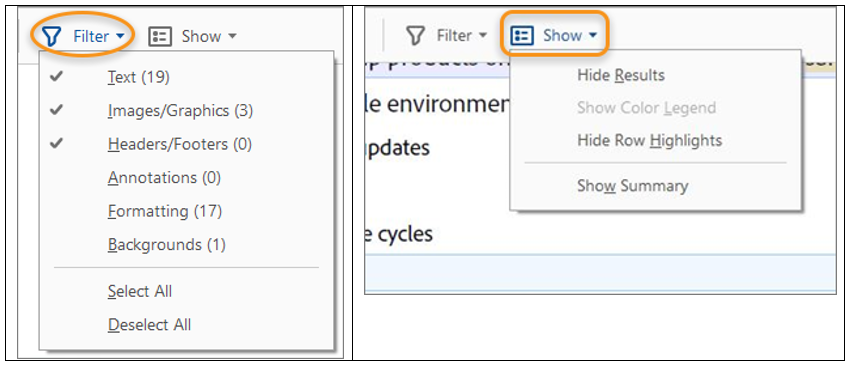
- Use the Filter and Show options: By default, annotations, formatting, and background differences are turned off. To see these changes in the report, select these options from the Filter menu in the toolbar. You can also filter comparison results by selecting specific types of changes in the Filter menu. From the Show menu, you can select an option to show or hide legends, row highlights, or results.
Use the Previous Change (Ctrl+.) or Next Change (Ctrl+,) button to go through the changes one-by-one.
![]()
The Previous Change and the Next Change button are also available in the pop-up notes detailing the changes.

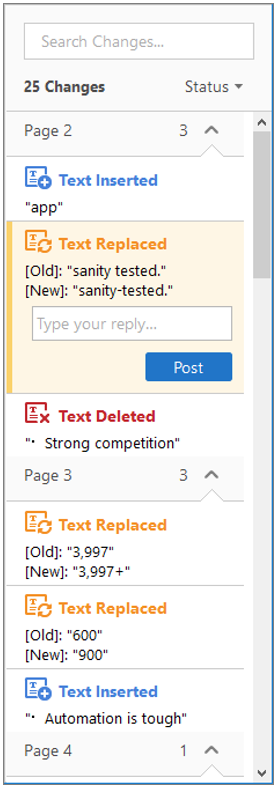
Use the right pane. Click the triangle at the centre of the right Acrobat window to open the right pane. This pane lists all the changes visible in the Compare Results report. Use the search text box to search for any specific change.
Save the Compare Results file (File > Save). Click the cross button at the top right of the toolbar to close the Compare Files tools.
Print comparison report
You can print a comparison report along with the summary of changes. Click the Print icon in the toolbar, and then click Print in the Print dialog box.
Click here for more information.
Measure:
Grids, guides, and measurements in PDFs, use grids to accurately line up text and objects in a document. When turned on, the grid is visible over the document. The Snap To Grid option aligns an object with the nearest grid line when you move the object.
- View grids: Use grids to accurately line up text and objects in a document. When turned on, the grid is visible over the document. The Snap To Grid option aligns an object with the nearest grid line when you move the object.
- View or hide the grid: Choose View > Show/Hide > Rulers & Grids > Grid. A check mark appears next to the command name when the grid is displayed.
- Turn the Snap To Grid option on or off: Choose View > Show/Hide > Rulers & Grids > Snap To Grid. A check mark appears next to the command name when the option is turned on.
- Change the grid appearance: In the Preferences dialog box under Categories, select Units & Guides.
To change grid settings, do any of the following:
- To change the spacing between grid lines, enter a value for Width Between Lines and Height Between Lines.
- To change the origin of the grid, enter a value for Grid Offset From Left Edge and Grid Offset From Top Edge.
- To change the number of subdivisions within each grid square, enter a value for Subdivisions. Subdivision lines are lighter than grid lines.
- To change the colour of the gridlines, click the Grid Line Colour square and choose a new colour from the Colour pop-up menu.
Click here for more information.
Video Tutorial
This video tutorial demonstrates the techniques described within this guide relating to sharing and reviewing documents in Adobe Acrobat DC.