
Protect:
If you’re working with sensitive information, you must protect it. Using this feature, you can easily encrypt with a password and apply permissions to PDF files to prevent copying, changing, or printing your PDFs.
- Secure files from your Office applications: Keep others from copying or editing your PDF document by specifically restricting editing in Microsoft Word, Excel, or PowerPoint.
- Add a password to your PDF file: Prevent unauthorized access to your PDF files by encrypting them with a certificate or password that recipients must enter before they can open or view them.
- Customize your protection: Apply protections to PDFs with the Publish Sensitive Information action in Acrobat Pro. You can redact, password protect a PDF, and save your file with edit and copy restrictions applied automatically.
- Simplify document security: Create custom security policies to help everyone apply PDF password protection and permissions the same way every time.
How to add passwords and permissions to PDF files:
- Open a file in Acrobat and choose “Tools” > “Protect.”
- Select whether you want to restrict editing with a password or encrypt the file with a certificate or password.
- Set password or security method as desired.
- Click “OK” and then click “Save.”
Click here for more information.
Redact:
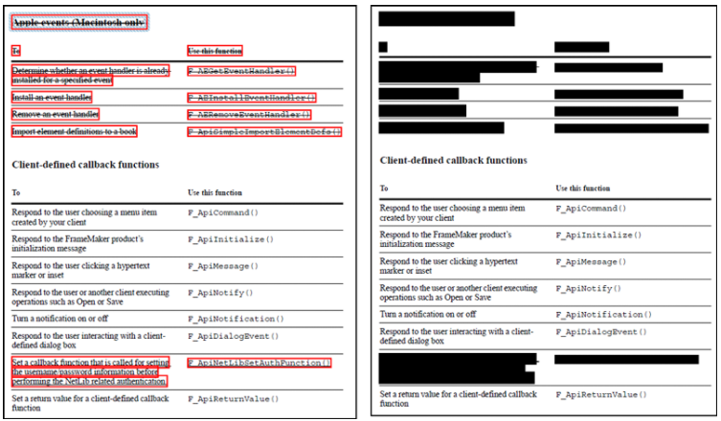
What does Redact mean and why redact or remove sensitive content: Before you distribute a PDF, you may want to examine the document for sensitive content or private information. Use the Redact tools to remove or redact sensitive images and text that are visible in a PDF. Use the Remove Hidden Information feature to find and remove hidden content from a PDF. For example, if you created the PDF, the document metadata normally lists your name as the author. You may also want to remove content that can inadvertently change and modify the document’s appearance. JavaScript, actions, and form fields are types of content that are subject to change.
Redaction is the process of permanently removing visible text and graphics from a document. You use the Redact tools to remove content. In place of the removed items, you can have redaction marks that appear as coloured boxes, or you can leave the area blank. You can specify custom text or redaction codes to appear over the redaction marks.
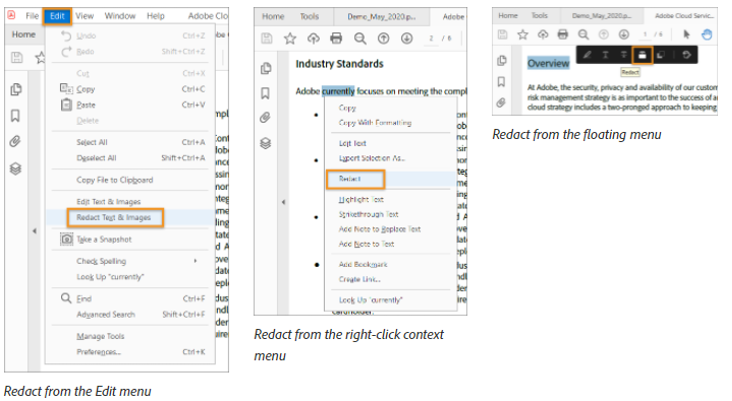
- Open the PDF in Acrobat DC, and then do one of the following:
- Choose Tools > Redact.
- On the Edit menu, choose Redact Text & Images.
- Select the text or image in a PDF, right-click, and select Redact.
- Select the text or image in a PDF, choose Redact in the floating context-menu.
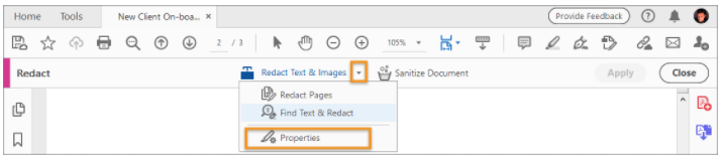
- (This is optional) To set the appearance of redaction marks, click the drop-down in the Redact toolset in the secondary toolbar, and choose Properties.
- Mark items you want to remove by doing any of the following:
- Double-click to select a word or image.
- Drag to select a line, block of text, object, or area.
- To apply multiple code entries to a single redaction, right-click a redaction mark and select an option.
- (Optional) To repeat a redaction mark, right-click it and choose Repeat Mark Across Pages. This feature is convenient if a particular header, footer, or watermark appears in the same location on many pages.
- When you have finished marking the items you want to redact, click Apply in the secondary toolbar to remove the items. Alternatively, you can Save the document, and then choose Apply & Save.
- In the Apply Redactions dialog, choose if you want to Sanitize And Remove Hidden Information by clicking the toggle button, and then click OK. (Note* The items aren’t permanently removed from the document until you save it.)
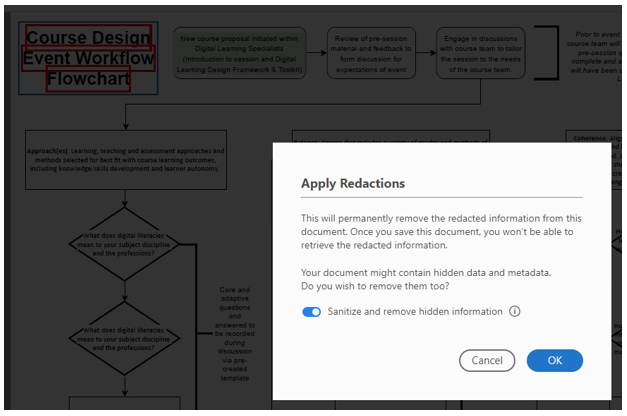
8.The Save As dialog is displayed. Specify a filename and location. The suffix “_Redacted” is appended to the filename. If you don’t want to overwrite the original file, save the file with a different name, at a different location, or both.

Click here for more information.
PDF Standards:
You can save a copy of the PDF as PDF/X, PDF/A, or PDF/E, provided it complies with the specified requirements. For example, in certain situations, if your document doesn’t have an embedded ICC output profile, you can embed one before saving. You can convert a PDF to a standards-compliant PDF using the Standards wizard. This wizard explains the intents of specific formats as it guides you through the process. If you are familiar with the standards, you can use a built-in profile, or a profile created via the wizard, to convert a PDF.
Convert to PDF/X, PDF/A, or PDF/E
- Choose Tools > PDF Standards.
- Choose Save As PDF/A, Save As PDF/X, or Save As PDF/E in the right-pane.
- Choose the location to save the file, and then click Save.
For more information click here.
Optimize PDF:
Acrobat will reduce the size of a PDF file without compromising quality. The Acrobat PDF compression tool balances an optimized file size against the expected quality of images, fonts, and other file content.
The PDF Optimizer functionality provides many settings for reducing the size of PDF files. Whether you use all these settings or only a few depends on how you intend to use the files and on the essential properties a file must have. In most cases, the default settings are appropriate for maximum space saving by removing embedded fonts, compressing images, and removing items from the file that are no longer needed.
Before you optimize a file, it’s a good idea to audit the file’s space usage. The space audit results may give ideas about where best to reduce file size.
Audit the space usage of a PDF (Acrobat Pro)
Auditing the space usage gives you a report of the total number of bytes used for specific document elements, including fonts, images, bookmarks, forms, named destinations, and comments, as well as the total file size. The results are reported both in bytes and as a percentage of the total file size.
- Choose File > Save As Other > Optimized PDF, or go to Tools > Optimize PDF, and then click Advanced Optimization. The PDF Optimizer dialog box opens.
- Click the Audit Space Usage button at the top of the dialog box.
For more information click here.
Print Production:
Adobe Acrobat adds sophisticated print production tools that enable a complete PDF workflow for high-end colour output. The print production tools can be accessed by choosing Tools > Print Production.
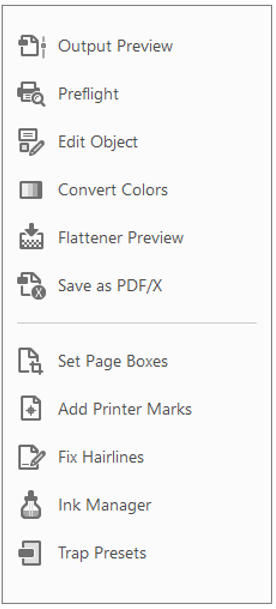
Print Production tools
- Output Preview: Combines separation preview, soft proofing, colour warnings, and more in one convenient dialog box.
- Pre-flight: Allows you to perform more than 400 predefined checks for all the common output errors, and then correct all fixable errors.
- Edit Object: Allows you to select, move, and edit both raster and vector objects. You can edit individual object properties, such as tags, colour space, or rendering intent.
- Convert Colours: Allows you to convert any colour space in the document to the target colour space.
- Flattener Preview: Allows you to define and apply flattening settings for transparent objects. Includes a preview for viewing transparent objects and the effects your settings have on those objects. You can save the settings as pre-sets to apply to other pages or PDFs.
- Save As PDF/X: Allows you to save the current document as per the PDF/X standards.
- Set Page Boxes: Allows you to define the crop, trim, bleed, art, and media boxes on a page. The elements are important for proper page positioning and placement of printer marks, especially for imposition.
- Add Printer Marks: Adds standard printer marks to a PDF page for positioning. These marks are embedded in the PDF.
- Fix Hairlines: Based on user settings, finds hairlines and replaces them with heavier-weight lines.
- Ink Manager: Modifies the way inks are treated while the current PDF is open. The Acrobat Ink Manager uses the same options and controls as other Adobe applications.
- Trap Pre-sets: Allows you to create and apply trap settings for later execution by an Adobe RIP that licenses Adobe In-RIP Trapping.
- Add Article Box: Allows you to define a series of article boxes
For more information click here.
Accessibility:
Acrobat tools make it easy to create accessible PDFs and check the accessibility of existing PDFs. You can create PDFs to meet common accessibility standards, such as Web Content Accessibility Guidelines (WCAG) 2.0 and PDF/UA (Universal Access, or ISO 14289). The simple guided workflow lets you do the following:
- Make PDFs accessible: A predefined action automates many tasks, checks accessibility, and provides instructions for items that require manual fixes. Quickly find and fix problem areas.
- Check accessibility: The Full Check/Accessibility Check tool verifies whether the document conforms to accessibility standards, such as PDF/UA and WCAG 2.0.
- Report accessibility status: The Accessibility Report summarizes the findings of the accessibility check. It contains links to tools and documentation that assist in fixing problems.
Make PDFs accessible
The Make Accessible action walks you through the steps required to make a PDF accessible. It prompts to address accessibility issues, such as a missing document description or title. It looks for common elements that need further action, such as scanned text, form fields, tables, and images. You can run this action on all PDFs except dynamic forms (XFA documents) or portfolios.
- Choose Tools > Action Wizard. (The Action Wizard toolset is displayed in the secondary toolbar)
* Note: There will be a list of available actions displayed under the Action List in the right-hand pane.
- From the Actions List, click Make Accessible. The right-hand pane changes to display each task included in the Make Accessible action, as well as the instructions to execute the action.
- Select the files that you want to apply the Make Accessible action to. By default, the action runs on the document that’s currently open. Select Add Files to select additional files or a folder to run the action on.
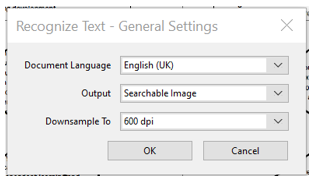
- Click Start. (You may have to set some expected default expected configurations such as Document Language etc.)
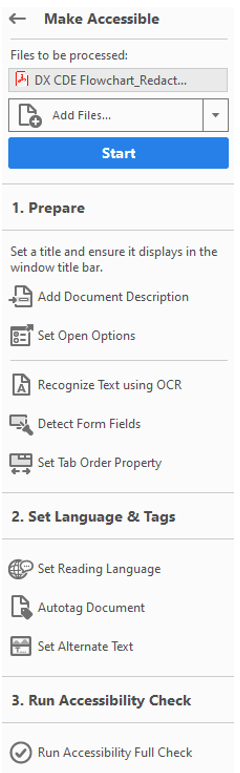
5. Follow the prompts to complete the Make Accessible
Check accessibility
A good way to check the accessibility of a document is to use tools that your readers will use. Even if you do not have access to those tools, Adobe Acrobat provides an automated way to check the accessibility of a PDF file. The Full Check/Accessibility Check feature in Acrobat checks a PDF for many of the characteristics of accessible PDFs. You can choose which accessibility problems to look for and how you want the results reported.
- Choose Tools> Accessibility. (The Accessibility toolset is displayed in the secondary toolbar.)
- In the secondary toolbar, click Full Check/Accessibility Check. (The Accessibility Checker Options dialog box is displayed.)
- In the Report Options section, select options for how you want to view the results. You can save the results as an HTML file or attach the results file to the document itself.
- Select a page range if you prefer to check individual pages of a document.
- Select one or more of the Checking Options.
- Click Start Checking. The results are displayed in the Accessibility Checker panel on the left, which also has helpful links and hints for repairing issues.
* If you created a report in step 2, the results are available in the selected folder. Because the Full Check/Accessibility Check feature cannot distinguish between essential and nonessential content types, some issues it reports don’t affect readability. It’s a good idea to review all issues to determine which ones require correction.
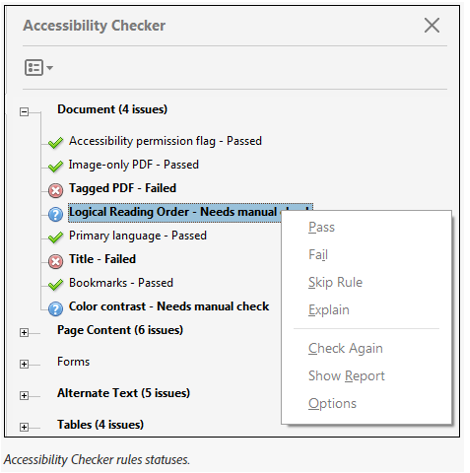
The report displays one of the following statuses for each rule check:
a Passed: The item is accessible.
b Skipped By User: Rule was not checked because it wasn’t selected in the Accessibility Checker Options dialog box.
c Needs Manual Check: The Full Check/Accessibility Check feature couldn’t check the item automatically. Verify the item manually.
d Failed: The item didn’t pass the accessibility check.
Fix accessibility issues (Acrobat Pro)
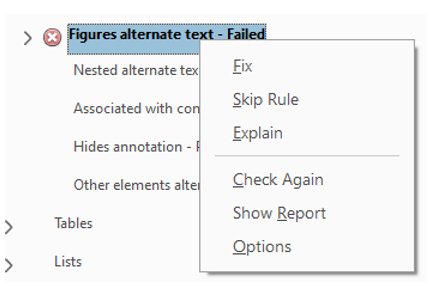
To fix a failed check after running Full Check/Accessibility Check, right-click (Windows) or Ctrl-click (Mac OS) the item in the Accessibility Checker panel. Choose one of the following options from the context menu:
- Fix: Acrobat either fixes the item automatically or displays a dialog box prompting you to fix the item manually.
- Skip Rule: Deselects this option in the Accessibility Checker Options dialog box for future checks of this document and changes the item status to Skipped.
- Explain: Opens the online Help where you can get more details about the accessibility issue.
- Check Again: Runs the checker again on all items. Choose this option after modifying one or more items.
- Show Report: Displays a report with links to tips on how to repair failed checks.
- Options: Opens the Accessibility Checker Options dialog box, so you can select which checks are performed.
Click here for more information.