
This quick start guide is intended to show you some of the functionality of the University’s Virtual Learning Environment (VLE) powered by Blackboard Ultra. It is the first step to getting familiar with the basics of using the system and will sign post you where to find help and support.
Login
Go to https://bb.tees.ac.uk, click on Sign In and authenticate your login details using your university email address and password. If off campus, you may be asked to “approve” your access using multi-factor authentication. This login process is exactly the same as already used to access university systems such email or unity.
If you have not set up multi-factor authentication for your university IT account, it is quite likely you will see an error message when you try to sign in from off campus. This help article describes multi-factor authentication in detail, and this article describes how to enable it for your account. If you encounter problems, please contact the IT Service Desk (details at the bottom of this page).

Base Navigation Menu
The first time you login to the system you get a welcome overlay screen informing you of several new features, including the Base Navigation Menu.
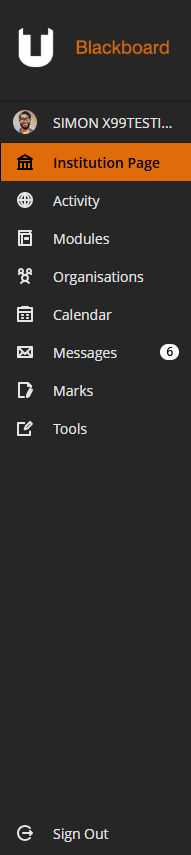
The menu provides you with quick access to your modules and several other tools which provide timely information about all of your modules in one convenient location. Should there be a number next to any menu item, this indicates new information for you to read. For example, in the screen shot below, we can see there are 6 unread messages. The Base Navigation Menu consists of the the following areas:
- At the top of the menu is your Profile page.
 This gives you access to some of you personal information and settings. From here you are able to upload a profile photo. The profile photo will show in the class register and in discussions, conversations, and messages next to your activity.
 - The Institution page contains links to important information and messages.
- The Activity page will display notifications from your modules or items that need attention. This will include posted announcements, new content items, grades and due assignments. Notifications are shown on the website, through email and via push notifications if you have installed the Blackboard app. You can change which notifications you receive by clicking on the “cog” icon at the top right corner of the screen, and then following the on-screen prompts.
- The Modules page gives you access to all your current, previous and future modules. Your modules will be divided into sections according the semester in which they started. Modules can be viewed in list view or grid view. Various options to Filter your modules are also provided.
- The Organisations page contains all the school and department organisations you are enrolled on. Organisations can also be viewed in List View or Grid View.
- The Calendar displays the calendar items within all your modules. This is also your own personal Calendar area. You can add your own events here should you wish. Customise your calendar experience by clicking the cog in the top right hand corner. From here, you can customise which modules you want to view. Click the three dots to explore options to share the whole Calendar into your own email account. Note: You can find your timetable on the myTU website: mytu.tees.ac.uk or through the myTU app.
- The Messages page displays a list of all your modules and number of any unread messages within a module. The number of unread messages are indicated on the base navigation menu.
- The Marks page provides an overview of all your modules and any assignment submissions, grades and feedback. It will also include any other gradable items – such as discussion board engagement.
- At the bottom of the menu you have the option to Sign Out. If you are using a shared device, it is recommended you sign out of your Blackboard session to ensure security.
Modules
The Modules page lists all the modules you are studying. When you first access this, you will see your Current Modules.
Modules Page Views
At the top of the Modules page, you can customise your experience, using the menu shown below.
To the left, you can switch between list or grid view, depending on your preference. There is the ability to Search for courses as well as apply a Term or custom Filter.

Regardless of whether you prefer List or Grid view, you will notice that each module has a star icon – this allows you to Favourite modules. Favourites appear at the top of the module list.
Identifying Areas of a Module
When you click a module it will open, taking full advantage of the entire screen. Regardless of the module, you will always see the same Course Menu items at the top of the page, as well as the Details & Actions over to the right of the page. The Module Content is displayed in the central area and contains all the module materials. The basic layout of a module can be seen below:
Course Tools

At the top of the page, you will see the Course Tools menu. Click on the Home icon (far top left) to return to the Institution Page of Blackboard. Clicking on Modules will show you the most recent modules you’ve visited for quick access. From this drop down menu, you can also select View All to take you back to the Modules page.
From left to right, the following options are available to you:
Module Content – This will return you back to the module content area of the module.
Calendar – Gives you access to the module calendar. This will show you any scheduled events your tutor may have arranged, as well as any assignments/tests that are due.
Announcements – Any new announcement will appear as a “pop up” when you first access the module, but the Announcements section will show you all announcements in the module. Any announcement you have read will be marked with a tick so you can focus on new content.
Discussions – This menu item lets you access all the discussion boards within the module. If there is any new activity in a discussion board, you can see this by a small purple icon next to the discussion board title. Click on a Discussion board title to open it up and engage with it.
Gradebook – Provides access to all the assessed items with a due date in the module. From here, you can see any submission you may have made, and any score/feedback your tutor has left you.
Messages – Contains any messages sent to you from within the module.
Groups – If your tutor has set up any group work, you can access your group details here. This will allow you to see any group you’ve been allocated to, and the members of that group. In addition, if your tutor has set up a group assignment, you can also access that from this space. Click the down arrow to the right of the page on the Group Set name to reveal your individual group. By clicking on the Group Name, you can access any group specific content as well as see other members.
The Details & Actions menu
At the top, your Tutors will be listed in the Module Staff panel. Underneath, you can see the Details & Actions panel, containing the following areas: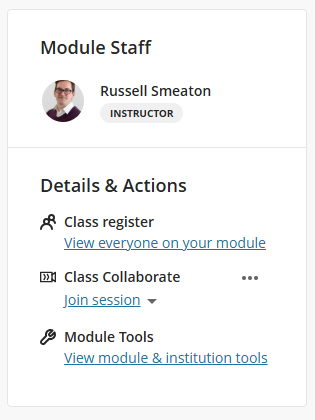
Class Register
From here you can view all the students and instructors on the module. The register can be viewed in list view and grid view. Either click on the persons name or hover your mouse over an Instructor, and click the Eye icon that appears to view more information about that person.
Class Collaborate
Depending on your module, you can join live Collaborate sessions here. Click on the three dots to access any recordings that have been made via Collaborate. If you can’t see any recordings, you might need to adjust the Filter in the top right hand corner. By Default, this is set to Recent Recordings (which shows you anything recorded in the last 30 days). Clicking this will allow you to select Recordings in a Range and put in a specific date range.
Module Tools – Get quick access to the the module’s LibGuide and Reading List here. In addition (depending on your module), you can also access the OneNote Class Notebook from here.
Module Content
The content inside different modules will vary but you should notice that most follow a similar structure. For example, there is usually a space called “Learning Materials” and another called “Assessments”.
It is common practice for content to be placed into different areas within the module, and so you will most likely need to expand them to access the content. Inside these spaces you might another level of folders (such as “Week 1” or “Introduction to the Module”). Within the spaces, you will find a range of content items: files for you to download, discussion boards, assignments or content that you can access online.
Depending on the content, when you open up a specific item, a Contents menu will be visible to the left of the page. You can collapse or expand this to suit your needs, but it will help you navigate through the module content. In addition to the Contents menu, in the top right of the page there will most likely be “Previous” and “Next” navigation tools to help you move through the module.
It is strongly recommended you explore your module to discover the content found within, and check it frequently. Your tutor will keep you informed of any changes – such as new content being added to the module. Your Activity (mentioned earlier) will also keep you up to date with your modules.
Accessible Content

In your module, you will see an A icon at various points. This is Blackboard Ally and it allows you to access content in a variety of different formats. What formats you can access will depend on the content in question.
Some examples of alternative content include an MP3 version of text to allow you to listen to the content, or an ePub version that you can download to use on an eBook device.
Select your preferred format, and click the Download option (bottom right).